Pioneer DVR-520H-S Owner's Manual - Page 112
Additional information, Manual recording modes, Additional information for cable, satellite/STB set-
 |
View all Pioneer DVR-520H-S manuals
Add to My Manuals
Save this manual to your list of manuals |
Page 112 highlights
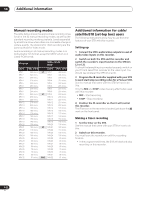
14 Additional information Manual recording modes The table below shows the approximate recording times for all of the 32 manual recording modes, as well as the standard recording mode equivalents. Levels separated by a bold line show where there is a noticeable change in picture quality. The divisions for HDD recording are the same as those for Video mode. Audio recording in all manual recording modes is in Dolby Digital 2ch format, except for MN32 which is in Linear PCM format. VR mode Level MN 1 MN 2 MN 3 MN 4 MN 5 MN 6 MN 7 MN 8 MN 9 MN 10 MN 11 MN 12 MN 13 MN 14 MN 15 MN 16 MN 17 MN 18 MN 19 MN 20 MN 21 MN 22 MN 23 MN 24 MN 25 MN 26 MN 27 MN 28 MN 29 MN 30 MN 31 MN 32 Rec. time 360 mins. 345 mins. 330 mins. 315 mins. 300 mins. 285 mins. 270 mins. 255 mins. 240 mins. 230 mins. 220 mins. 210 mins. 200 mins. 190 mins. 180 mins. 170 mins. 160 mins. 150 mins. 140 mins. 130 mins. 120 mins. 110 mins. 105 mins. 100 mins. 95 mins. 90 mins. 85 mins. 80 mins. 75 mins. 70 mins. 65 mins. 61 mins. EP LP SP FINE Video mode / HDD Level Rec. time MN 1 MN 2 MN 3 MN 4 MN 5 MN 6 MN 7 MN 8 MN 9 MN 10 MN 11 MN 12 MN 13 MN 14 MN 15 MN 16 MN 17 MN 18 MN 19 MN 20 MN 21 MN 22 MN 23 MN 24 MN 25 MN 26 MN 27 MN 28 MN 29 MN 30 MN 31 MN 32 360 mins. 345 mins. 330 mins. 315 mins. 300 mins. 285 mins. 270 mins. 255 mins. 240 mins. 230 mins. 220 mins. 210 mins. 200 mins. 190 mins. 180 mins. 170 mins. 160 mins. 150 mins. 140 mins. 130 mins. 120 mins. 110 mins. 105 mins. 100 mins. 95 mins. 90 mins. 85 mins. 80 mins. 75 mins. 70 mins. 65 mins. 61 mins. Additional information for cable/ satellite/STB (set-top box) users The following instructions show how to use the timer features of your STB with this recorder. Setting up 1 Connect the STB's audio/video outputs to a set of audio/video inputs on this recorder. 2 Switch on both the STB and this recorder and switch the recorder's input function to the STB (L1, L2 or L3). To check that everything is connected properly, switch on your TV and select this recorder as the video input. You should see whatever the STB is tuned to. 3 Program the IR controller supplied with your STB to send start/stop recording codes for a Pioneer VCR. See the manual that came with the STB for how to do this. Only the REC and STOP codes have any effect when used with this recorder: • REC - Start recording • STOP - Stop recording 4 Position the IR controller so that it will control this recorder. The IR sensor on the recorder is located just above the mark on the front panel. Making a timer recording 1 Set the timer on the STB. See the manual that came with your STB for how to do this. 2 Switch on this recorder. You must leave the recorder on until the recording finishes. • At the programmed times, the STB will start and stop recording on this recorder. 112 En
-
 1
1 -
2
-
3
-
4
-
5
-
6
-
7
-
8
-
9
-
10
-
11
-
12
-
13
-
14
-
15
-
16
-
17
-
18
-
19
-
20
-
21
-
22
-
23
-
24
-
25
-
26
-
27
-
28
-
29
-
30
-
31
-
32
-
33
-
34
-
35
-
36
-
37
-
38
-
39
-
40
-
41
-
42
-
43
-
44
-
45
-
46
-
47
-
48
-
49
-
50
-
51
-
52
-
53
-
54
-
55
-
56
-
57
-
58
-
59
-
60
-
61
-
62
-
63
-
64
-
65
-
66
-
67
-
68
-
69
-
70
-
71
-
72
-
73
-
74
-
75
-
76
-
77
-
78
-
79
-
80
-
81
-
82
-
83
-
84
-
85
-
86
-
87
-
88
-
89
-
90
-
91
-
92
-
93
-
94
-
95
-
96
-
97
-
98
-
99
-
100
-
101
-
102
-
103
-
104
-
105
-
106
-
 107
107 -
 108
108 -
 109
109 -
 110
110 -
 111
111 -
 112
112 -
 113
113 -
 114
114 -
 115
115 -
 116
116 -
 117
117 -
118
-
119
-
120
-
121
 |
 |
