Pioneer DVR-520H-S Owner's Manual - Page 21
Controls and displays - hdd
 |
View all Pioneer DVR-520H-S manuals
Add to My Manuals
Save this manual to your list of manuals |
Page 21 highlights
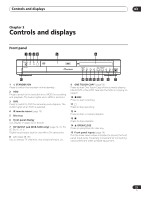
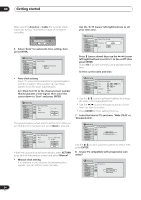
Controls and displays 03 Chapter 3 Controls and displays Front panel 1 2 34 5 STANDBY/ON HDD DVD PULL-OPEN 6 OPEN/CLOSE REC ONE TOUCH COPY DV IN/OUT 15 1 STANDBY/ON Press to switch the recorder on/into standby. 2 HDD Press to switch to the hard disk drive (HDD) for recording and playback. The button lights when HDD is selected. 3 DVD Press to switch to DVD for recording and playback. The button lights when DVD is selected. 4 IR remote sensor (page 10) 5 Disc tray 6 Front panel display See Display on page 22 for details. 7 DV IN/OUT jack (DVR-520H only) (page 14, 20, 53, 55, 56, 97, 111) Digital input/output jack for use with a DV camcorder. 8 +/- (page 28, 30) Use to change TV channels, skip chapters/tracks, etc. 14 13 12 11 10 9 8 7 9 ONE TOUCH COPY (page 59) Press to start One Touch Copy of the currently playing title to DVD or the HDD. See also the Note on copying on page 9. 10 ì REC Press to start recording. 11 Press to stop recording. 12 Press to start or restart playback. 13 Press to stop playback. 14 OPEN/CLOSE Press to open/close the disc tray. 15 Front panel inputs (page 14) Pull the cover down where indicated to access the front panel input jacks. Especially convenient for connecting camcorders and other portable equipment. 21 En
-
 1
1 -
2
-
3
-
4
-
5
-
6
-
7
-
8
-
9
-
10
-
11
-
12
-
13
-
14
-
15
-
 16
16 -
 17
17 -
 18
18 -
 19
19 -
 20
20 -
 21
21 -
 22
22 -
 23
23 -
 24
24 -
 25
25 -
 26
26 -
27
-
28
-
29
-
30
-
31
-
32
-
33
-
34
-
35
-
36
-
37
-
38
-
39
-
40
-
41
-
42
-
43
-
44
-
45
-
46
-
47
-
48
-
49
-
50
-
51
-
52
-
53
-
54
-
55
-
56
-
57
-
58
-
59
-
60
-
61
-
62
-
63
-
64
-
65
-
66
-
67
-
68
-
69
-
70
-
71
-
72
-
73
-
74
-
75
-
76
-
77
-
78
-
79
-
80
-
81
-
82
-
83
-
84
-
85
-
86
-
87
-
88
-
89
-
90
-
91
-
92
-
93
-
94
-
95
-
96
-
97
-
98
-
99
-
100
-
101
-
102
-
103
-
104
-
105
-
106
-
107
-
108
-
109
-
110
-
111
-
112
-
113
-
114
-
115
-
116
-
117
-
118
-
119
-
120
-
121
 |
 |
