Pioneer VSX-45TX Owner's Manual - Page 14
Select AUTO SETTING with - microphone
 |
View all Pioneer VSX-45TX manuals
Add to My Manuals
Save this manual to your list of manuals |
Page 14 highlights
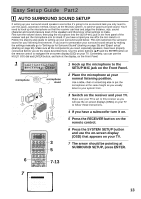
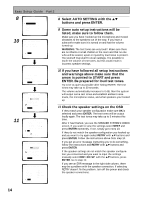
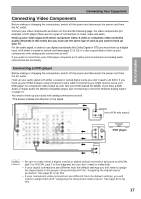
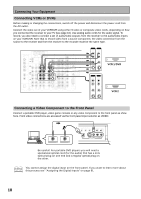
Easy Setup Guide Part2 8 1.Surround Setup [ SurrBack System ] [ Auto Setting ] [ Quick ] [ Normal ] [ Expert ] [ Exit ] 10 Auto Surround Setup Set microphone Turn on subwoofer [ Start ] [ Cancel ] \ Auto Surround Setup Please Wait Caution!! Test tone is output loudly. [Cancel] \ Auto Surround Setup Now Analyzing••• Environment Check Ambient Noise Microphone Speaker YES/NO [OK] [OK] [OK] [Cancel] \ 11 Check!! Front [ YES ] Center [ YES ] Surround [ YES ] SurrBack [ YES 2 ] Subwoofer [ YES ] [OK] [Retry] [ERR Fix SP.] [Return to Menu] Auto Surround Setup Now Analyzing••• Surround Analysis Speaker Systems Channel Delay Channel Level Acoustic Cal EQ [OK] [OK] [OK] [OK] [Cancel] Speaker Systems Check Front Center Surround SurrBack Subwoofer [Next ] [Exit ] [SMALL] [SMALL] [SMALL] [SMALLX2] [ YES ] 8 Select AUTO SETTING with the 5∞ buttons and press ENTER. 9 Some auto setup instructions will be listed, make sure to follow them. Make sure you have: hooked up the microphone and moved obstacles to the speakers out of the way. If you have a subwoofer make sure it is turned on and has the volume turned up. WARNING: The test tones are very loud!! Make sure there are no infants or small children in the room and that no one who will be scared, upset or injured by loud noise is present. You yourself may want to wear earplugs. It is possible to lower the volume of test tones, but this could result in incorrect speaker settings. 10 If you have followed all setup instructions and warnings above make sure that the arrow is pointed to START and press ENTER. Be prepared for loud test tones. Try to be as quiet as possible after hitting ENTER. The test tones may take up to 30 seconds. The volume automatically increases to 0 dB, then the system will output some test tones and establish ambient noise levels, the microphone status, and what speakers you hooked up. 11 Check the speaker settings on the OSD If they match your speaker configuration make sure OK is selected and press ENTER. The test tones will be output loudly again. The test tones may take up to 5 minutes this time. After it has finished, you see the SPEAKER SYSTEMS CHECK screen. If you want to view the settings select NEXT and press ENTER repeatedly. If not, simply go to step 13. If they do not match the speaker configuration you hooked up and you want to try again select RETRY with 5∞ buttons and press ENTER. Follow the instructions above from step 10. If you get an error message instructing you to do something, follow the instructions and RETRY with 5∞ buttons and press ENTER. If the speaker settings do not match the speaker configuration you connected and you want to input the settings manually select ERR=FIX SP with the 5∞ buttons, press ENTER. Go to step 12. If you see an ERR message in the right side column, there may be a problem with the speaker connection. If selecting RETRY doesn't fix the problem, turn off the power and check the speaker connections. 14
-
 1
1 -
2
-
3
-
4
-
5
-
6
-
7
-
8
-
 9
9 -
 10
10 -
 11
11 -
 12
12 -
 13
13 -
 14
14 -
 15
15 -
 16
16 -
 17
17 -
 18
18 -
 19
19 -
20
-
21
-
22
-
23
-
24
-
25
-
26
-
27
-
28
-
29
-
30
-
31
-
32
-
33
-
34
-
35
-
36
-
37
-
38
-
39
-
40
-
41
-
42
-
43
-
44
-
45
-
46
-
47
-
48
-
49
-
50
-
51
-
52
-
53
-
54
-
55
-
56
-
57
-
58
-
59
-
60
-
61
-
62
-
63
-
64
-
65
-
66
-
67
-
68
-
69
-
70
-
71
-
72
-
73
-
74
-
75
-
76
-
77
-
78
-
79
-
80
-
81
-
82
-
83
-
84
-
85
-
86
-
87
-
88
-
89
-
90
-
91
-
92
-
93
-
94
-
95
-
96
-
97
-
98
-
99
-
100
-
101
-
102
-
103
-
104
-
105
-
106
-
107
-
108
-
109
-
110
-
111
-
112
-
113
-
114
-
115
-
116
-
117
-
118
-
119
-
120
 |
 |
