Pioneer VSX-45TX Owner's Manual - Page 36
Press the SYSTEM SETUP button.
 |
View all Pioneer VSX-45TX manuals
Add to My Manuals
Save this manual to your list of manuals |
Page 36 highlights
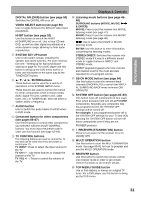
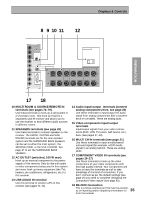
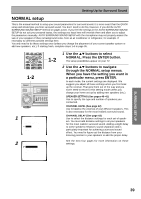
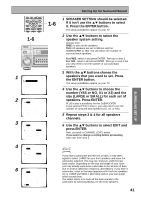
Setting Up for Surround Sound To ensure the best possible surround sound, complete the following setup operations. Some of these are the same (and take precedence over) the settings you made in the Easy Setup Guide, so consider if the ones you made at that time were adequate. If you feel they were, move on to the next setting in this section. These setup operations use on-screen displays (OSDs) on your TV to display the settings and choices so be sure your TV and receiver are properly hooked up and that your TV is set to this receiver. You need to connect the setup mic to the front panel of the receiver so that it can measure the sound and ensure the proper settings. For more information on the mic hookup see page 13. Use the arrow buttons (5∞) and the ENTER button on the remote control to navigate the OSDs on your TV. Conversely, you can use the MULTI JOG dial and ENTER button, and look at the display, on the Front Panel. 1 Turn on the receiver and your TV. Press SETUP the RECEIVER button on the remote control. S0URCE TV SYSTEM RECEIVER Make sure your TV is connected and set to the video input OFF the receiver is using. DVD/LD TV/SAT VCR1/ DVR TV CONT MULTI CONTROL VCR2 VIDEO CD MULTI OPERATION CD-R/ TAPE1 DIMMER 1 MD/ TAPE2 LOUDNESS 2 TUNER RECEIVER TONE EFFECT/CH SEL 3 4 1 2 Press the SYSTEM SETUP button. The menu possibilities appear on your TV. + SIGNAL SEL DNR BASS/TREBLE 5 6 VIDEO SEL HI-BIT 9 0 7 8 +10 - DISC ENTER 3 SURROUND SETUP should be selected. If 2 SYSTEM SETUP MENU TUNER EDIT DIRECT ACCESS SEARCH MODE GUIDE TOP MENU ENTER TRACK EXIT 3-4 it isn't use the 5∞ buttons to select it. Press the ENTER button. AUDIO RETURN MPX ¶ TUNING - 1 STATION - 4 CHANNEL - DTV ON/OFF 8 BAND 3 DTV MENU CLASS 7 DISP MODE SUB TITLE TUNING + ¡ STATION + ¢ CHANNEL+ 4 Use the 5∞ buttons to navigate through the menus. When you have the setting you want in a particular menu, press 3-4 2 ENTER. In each mode, the current settings are displayed. We suggest you do a basic system setup for surround sound when you first hook up the receiver. That gets it out of the way and you won't need to do it again unless you change your home set STANDBY/ON MOVIE MUSIC ENTER STANDBY up (by adding new speakers, etc.). To do a basic setup use the SURRBACK menu if necessary and then choose either MULTI JOG MULTI JOG CONTROL SET UP RETURN SIGNAL HI-BIT SELECT HI-SAMPLING SB CH MODE BAND PHONES SPEAKERS TONE TONE CONTROL BASS/TREBLE the AUTO SETTING, QUICK or NORMAL setup procedure and complete that. You don't need to do all three as they accomplish the same ends and we recommend the AUTO SETTING method. To do a more advanced setup for surround sound see EXPERT setup starting on page 96. 3 System Setup [1. Surround Setup ] [2. THX CINEMA Setup ] [3. Input Assign ] [4. Function Rename ] [5. PHONO/LINE Setup ] [6. Multi Room ] [7. 12V Trigger ] [Exit ] SURRBACK (Surround Back) SYSTEM (See page 37) Use to choose options for your surround back speakers. AUTO SETTING (See page 13-15) See the Easy Setup Guide Part 2 for an explanation of this setup. QUICK setup (See page 38) Use to setup your surround sound system in the minimum amount of time. 4 1.Surround Setup [ SurrBack System ] [ Auto Setting ] [ Quick ] [ Normal ] [ Expert ] [ Exit ] NORMAL setup (See page 39) Use this method to manually adjust all the surround sound functions. EXPERT setup (See pages 96-104) Use these settings to fine tune your surround sound and make it more personalized. 36
-
 1
1 -
2
-
3
-
4
-
5
-
6
-
7
-
8
-
9
-
10
-
11
-
12
-
13
-
14
-
15
-
16
-
17
-
18
-
19
-
20
-
21
-
22
-
23
-
24
-
25
-
26
-
27
-
28
-
29
-
30
-
 31
31 -
 32
32 -
 33
33 -
 34
34 -
 35
35 -
 36
36 -
 37
37 -
 38
38 -
 39
39 -
 40
40 -
 41
41 -
42
-
43
-
44
-
45
-
46
-
47
-
48
-
49
-
50
-
51
-
52
-
53
-
54
-
55
-
56
-
57
-
58
-
59
-
60
-
61
-
62
-
63
-
64
-
65
-
66
-
67
-
68
-
69
-
70
-
71
-
72
-
73
-
74
-
75
-
76
-
77
-
78
-
79
-
80
-
81
-
82
-
83
-
84
-
85
-
86
-
87
-
88
-
89
-
90
-
91
-
92
-
93
-
94
-
95
-
96
-
97
-
98
-
99
-
100
-
101
-
102
-
103
-
104
-
105
-
106
-
107
-
108
-
109
-
110
-
111
-
112
-
113
-
114
-
115
-
116
-
117
-
118
-
119
-
120
 |
 |
