Pioneer VSX-45TX Owner's Manual - Page 22
Connecting Digital Audio Components
 |
View all Pioneer VSX-45TX manuals
Add to My Manuals
Save this manual to your list of manuals |
Page 22 highlights
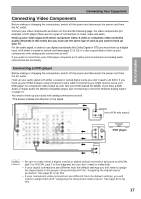
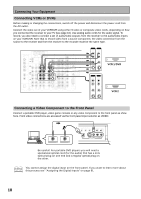
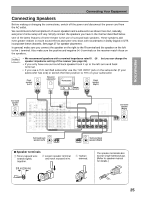
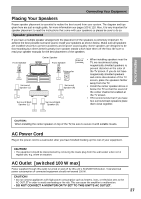
Connecting Your Equipment Connecting Digital Audio Components Before making or changing the connections, switch off the power and disconnect the power cord from the AC outlet. Connect your digital components as shown below. The VSX-45TX has two coaxial and two optical inputs for a total of four digital inputs on the rear panel plus one digital input on the front panel. In order to use digital soundtracks like Dolby Digital or DTS (among others) you need to make digital audio connections. You can do this by either a coaxial or an optical connection (you don't need to do both). The quality of these two types of connections is the same but since some digital components only have one type of digital terminal, it is a matter of matching like with like (for example, the coaxial out from the component to coaxial in on the receiver). Hook up your digital equipment in accordance with this receiver's default settings (see next page) unless you want to, or need to, change them. To do this see "Assigning the Digital Inputs" on page 91. There are two optical digital out jacks (the CD recorder is connected to one in the diagram below). If you connect this to the optical input on a digital recorder (currently these include MD, DAT and CD-R) you can make direct digital recordings with this unit. We also recommend hooking up your digital components to analog audio jacks (see page 20) in order to make recordings (some digital sources may be protected against making digital copies). *The arrows indicate the direction of the audio signal. B type ASSIGNABLE PCM/ 2DIGITAL / DTS/MPEG FM UNBAL 75Ω OUT1 IN OUT OUT2 CONTROL R L IN 1 PLAY (TV/ SAT) IN IN 2 CD-R/ (CD-R/ TAPE1 TAPE1) OUT REC IN 3 (DVD/ LD) IN 4 (CD) PLAY IN MD/ TAPE2 OUT REC CD IN PHONO/ LINE USB AUDIO IN R L DIGITAL AUDIO AM LOOP ANTENNA MULTI-ROOM & SOURCE MULTI-ROOM & SOURCE MONITOR OUT PRE OUT CENTER SUB WOOFER R OUT L MONITOR OUT FRONT R L AUDIO IN VCR1/ DVR OUT IN VCR2 OUT TV/ SAT IN R SURROUND R SURROUND BACK R FRONT R SURROUND R SUB WOOFER L L (Single) L L L CEN- TER DVD/ LD IN SURROUND BACK R L VIDEO S VIDEO VIDEO MULTI CH IN DIGITAL OUTPUT DIGITAL OUTPUT (PLAY) DIGITAL INPUT (REC) Satellite tuner DIGITAL OUTPUT CD recorder (not a PCM-only output) DVD player DIGITAL OUTPUT CD player USB cable A type PC 22
-
 1
1 -
2
-
3
-
4
-
5
-
6
-
7
-
8
-
9
-
10
-
11
-
12
-
13
-
14
-
15
-
16
-
 17
17 -
 18
18 -
 19
19 -
 20
20 -
 21
21 -
 22
22 -
 23
23 -
 24
24 -
 25
25 -
 26
26 -
 27
27 -
28
-
29
-
30
-
31
-
32
-
33
-
34
-
35
-
36
-
37
-
38
-
39
-
40
-
41
-
42
-
43
-
44
-
45
-
46
-
47
-
48
-
49
-
50
-
51
-
52
-
53
-
54
-
55
-
56
-
57
-
58
-
59
-
60
-
61
-
62
-
63
-
64
-
65
-
66
-
67
-
68
-
69
-
70
-
71
-
72
-
73
-
74
-
75
-
76
-
77
-
78
-
79
-
80
-
81
-
82
-
83
-
84
-
85
-
86
-
87
-
88
-
89
-
90
-
91
-
92
-
93
-
94
-
95
-
96
-
97
-
98
-
99
-
100
-
101
-
102
-
103
-
104
-
105
-
106
-
107
-
108
-
109
-
110
-
111
-
112
-
113
-
114
-
115
-
116
-
117
-
118
-
119
-
120
 |
 |
