Pioneer VSX-45TX Owner's Manual - Page 30
Remote Control
 |
View all Pioneer VSX-45TX manuals
Add to My Manuals
Save this manual to your list of manuals |
Page 30 highlights
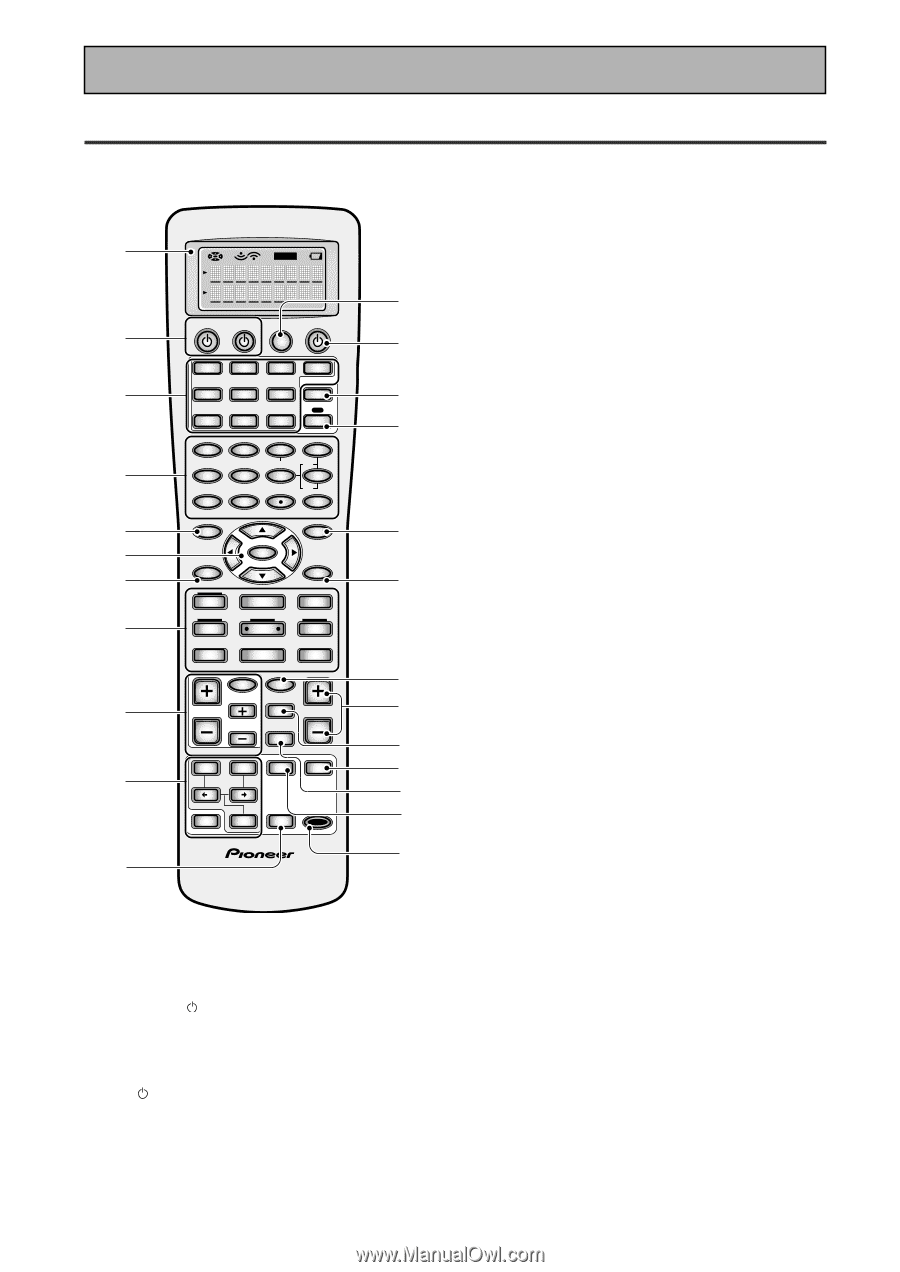
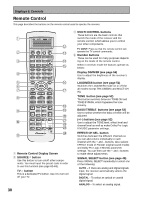
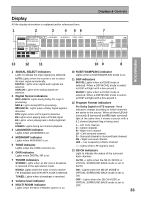
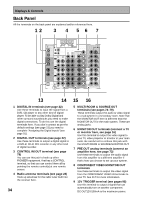
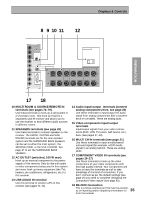
Displays & Controls Remote Control This page describes the buttons on the remote control used to operate the receiver. 1 2 3 4 5 6 7 8 9 0 - SETUP S0URCE TV SYSTEM RECEIVER OFF DVD/LD TV/SAT VCR1/ DVR MULTI CONTROL VCR2 VIDEO CD TV CONT MULTI OPERATION CD-R/ TAPE1 MD/ TAPE2 TUNER RECEIVER DIMMER LOUDNESS 1 2 TONE EFFECT/CH SEL 3 4 SIGNAL SEL 5 VIDEO SEL 9 DNR BASS/TREBLE + 6 7 8 HI-BIT +10 - DISC 0 ENTER SYSTEM SETUP DIRECT ACCESS SEARCH MODE GUIDE MENU TOP MENU TUNER EDIT ENTER TRACK EXIT AUDIO RETURN MPX ¶ TUNING - 1 STATION - 4 CHANNEL - DTV ON/OFF 8 BAND 3 DTV MENU CLASS 7 DISP MODE SUB TITLE TUNING + ¡ STATION + ¢ CHANNEL+ TV INPUT TV CONTROL TV VOL TV CH INPUT MIDNIGHT MULTI CH INPUT VOLUME MOVIE MUSIC ACOUSTIC EQ MODE SURROUND STEREO/ DIRECT ENTER SB CH MODE MUTE REMOTE SETUP Î = ~ ! @ # $ 1 Remote Control Display Screen 2 SOURCE button Use this button to turn on/off other components. You must input the preset code in order to use this function (see page 62-63). TV button This is a dedicated TV button. Use it to turn on/ off your TV. 30 3 MULTI CONTROL buttons These buttons are the basic controls that switch the mode of the receiver and the remote control, which allows you to control your other components. TV CONT: Press so that the remote control can operate the TV control commands. 4 Number buttons These can be used for many purposes depending on the mode of the remote control. When in receiver mode the buttons operate as below: Display DIMMER (see page 56) Use to adjust the brightness of the receiver's display. LOUDNESS button (see page 51) Switches the LOUDNESS mode on or off (for all modes except THX CINEMA and MULTI CH IN). TONE button (see page 52) This button switches between TONE ON and TONE BYPASS, which bypasses the tone circuitry. BASS/TREBLE buttons (see page 52) Use to select whether the bass or treble will be adjusted. (+/-) buttons (see page 52) Use to adjust the TONE level, effect level and channel level as well as make Dolby Pro Logic II MUSIC parameter settings. EFFECT/CH SEL. button Switches between the different channels so you can add volume individually to each channel with the + and - buttons. Also selects EFFECT mode of Pioneer original sound modes and Dolby Pro Logic II MUSIC parameter settings. You can then use the + and - buttons to make these adjustments. SIGNAL SELECT button (see page 45) Press SIGNAL SELECT repeatedly to select one of the following: AUTO - If there are analog and digital signals input, the receiver automatically selects the digital signal. DIGITAL - To select an optical or coaxial digital signal. ANALOG - To select an analog signal.
-
 1
1 -
2
-
3
-
4
-
5
-
6
-
7
-
8
-
9
-
10
-
11
-
12
-
13
-
14
-
15
-
16
-
17
-
18
-
19
-
20
-
21
-
22
-
23
-
24
-
 25
25 -
 26
26 -
 27
27 -
 28
28 -
 29
29 -
 30
30 -
 31
31 -
 32
32 -
 33
33 -
 34
34 -
 35
35 -
36
-
37
-
38
-
39
-
40
-
41
-
42
-
43
-
44
-
45
-
46
-
47
-
48
-
49
-
50
-
51
-
52
-
53
-
54
-
55
-
56
-
57
-
58
-
59
-
60
-
61
-
62
-
63
-
64
-
65
-
66
-
67
-
68
-
69
-
70
-
71
-
72
-
73
-
74
-
75
-
76
-
77
-
78
-
79
-
80
-
81
-
82
-
83
-
84
-
85
-
86
-
87
-
88
-
89
-
90
-
91
-
92
-
93
-
94
-
95
-
96
-
97
-
98
-
99
-
100
-
101
-
102
-
103
-
104
-
105
-
106
-
107
-
108
-
109
-
110
-
111
-
112
-
113
-
114
-
115
-
116
-
117
-
118
-
119
-
120
 |
 |