Pioneer VSX-45TX Owner's Manual - Page 42
Channel Level: Manual Or Auto. - weight
 |
View all Pioneer VSX-45TX manuals
Add to My Manuals
Save this manual to your list of manuals |
Page 42 highlights
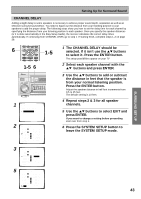
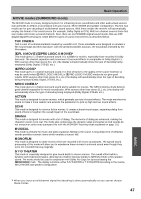
Setting Up for Surround Sound CHANNEL LEVEL (channel balance) The following steps show you how to balance the sound output level of your speakers. Proper speaker balance is essential for obtaining high quality surround sound. If continuing from SPEAKER SETTING go to step 1. If starting fresh, complete steps 1-2 on page 39. VIDEO SEL 9 SYSTEM SETUP MENU TUNER EDIT AUDIO MPX ¶ TUNING - 1 HI-BIT +10 - DISC 0 ENTER DIRECT ACCESS SEARCH MODE GUIDE TOP MENU ENTER TRACK EXIT RETURN DTV ON/OFF 8 BAND 3 DISP MODE SUB TITLE TUNING + ¡ 1-5 1-5 STANDBY/ON MOVIE MUSIC ENTER MULTI JOG STANDBY MULTI JOG CONTROL SET UP RETURN SIGNAL HI-BIT SELECT HI-SAMPLING SB CH MODE BAND PHONES SPEAKERS TONE TONE CONTROL BASS/TREBLE 1 Normal [ Speaker Setting ] [ Channel Level ] [ Channel Delay ] [ Exit ] 2 3 Channel Level Test Tone [Manual] [Auto] [Exit ] Channel Level Front L Center Front R Surround R SurrBack R SurrBack L Surround L Subwoofer [Exit ] [ +1. 5dB] [ +1. 5dB] [ +2. 0dB] [ -3. 5dB] [ -1. 5dB] [ +3. 0dB] [ +2. 0dB] [+10. 0dB] Channel Level Front L Center Front R Surround R SurrBack R SurrBack L Surround L Subwoofer [ +1. 5dB] [ +1. 5dB] [ +2. 0dB] [ -3. 5dB] [ -1. 5dB] [ +3. 0dB] [ +2. 0dB] [+10. 0dB] Set OK =Push Enter 1 CHANNEL LEVEL should be selected. If it isn't use the 5∞ buttons to select and press ENTER. 2 There are two ways to set the CHANNEL LEVEL: MANUAL or AUTO. Select a setting mode with the 5∞ buttons and press ENTER. Test tones will be output. WARNING : Be prepared! The test tones are output at a high volume level. MASTER VOLUME rotates to the reference position (0 dB) and the display on the receiver flashes TEST TONE. After a few seconds the test tone is output. MANUAL: move the test tone manually and adjust the channel level. AUTO: the test tone moves by itself and you adjust the levels. 3 Adjust the speaker level with the below instructions for the method you chose. Adjust the channel level from -10 dB to +10 dB in 0.5 dB increments. The default setting is 0 dB. In MANUAL (manual test tone) mode To switch the test tone between each speaker use the 5∞ buttons and push ENTER. Adjust the level of each speaker using the 5∞ buttons and ENTER. When done go to step 4. in MANUAL setting in AUTO setting 4 Channel Level Front L Center Front R Surround R SurrBack R SurrBack L Surround L Subwoofer [Exit ] [ +1. 5dB] [ +1. 5dB] [ +2. 0dB] [ -3. 5dB] [ -1. 5dB] [ +3. 0dB] [ +2. 0dB] [+10. 0dB] memo • If your subwoofer has a volume control, set it to the middle position before doing these operations. • If you are using a Sound Pressure Level (SPL) meter take the readings from your main listening position and adjust the level of each speaker to 75dB SPL (C-weighting/ slow reading). • The volume of the subwoofer test tone 42 tends to sound lower than it actually is. You may need to adjust the level after testing your system with an actual soundtrack. In AUTO (automatic test tone) mode This mode switches the test tone between each speaker automatically. The test tone output cycles through the speakers in the following order: FRONT L SUB WOOFER CENTER SURROUND L FRONT R SURRBACK L SURROUND R SURRBACK R Adjust the level of each speaker using the 5∞ buttons as the test tone is emitted and wait for it to move to the next speaker . When done go to step 5. If you want to change a setting before proceeding you need to complete the procedure and start over from step 1. 4 When you have the levels you want press ENTER. EXIT should be selected (if it isn't select it with the 5∞ buttons). 5 Press ENTER. Next, proceed to CHANNEL DELAY next page.
-
 1
1 -
2
-
3
-
4
-
5
-
6
-
7
-
8
-
9
-
10
-
11
-
12
-
13
-
14
-
15
-
16
-
17
-
18
-
19
-
20
-
21
-
22
-
23
-
24
-
25
-
26
-
27
-
28
-
29
-
30
-
31
-
32
-
33
-
34
-
35
-
36
-
 37
37 -
 38
38 -
 39
39 -
 40
40 -
 41
41 -
 42
42 -
 43
43 -
 44
44 -
 45
45 -
 46
46 -
 47
47 -
48
-
49
-
50
-
51
-
52
-
53
-
54
-
55
-
56
-
57
-
58
-
59
-
60
-
61
-
62
-
63
-
64
-
65
-
66
-
67
-
68
-
69
-
70
-
71
-
72
-
73
-
74
-
75
-
76
-
77
-
78
-
79
-
80
-
81
-
82
-
83
-
84
-
85
-
86
-
87
-
88
-
89
-
90
-
91
-
92
-
93
-
94
-
95
-
96
-
97
-
98
-
99
-
100
-
101
-
102
-
103
-
104
-
105
-
106
-
107
-
108
-
109
-
110
-
111
-
112
-
113
-
114
-
115
-
116
-
117
-
118
-
119
-
120
 |
 |
