Samsung SCD351 User Manual (ENGLISH) - Page 108

Marking Images for Printing, Marquage des images pour impression

Page 108 highlights

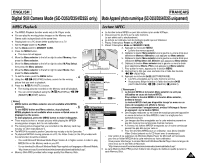
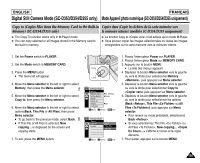
ENGLISH FRANÇAIS Digital Still Camera Mode (SC-D353/D354/D355 only) Mode Appareil photo numérique (SC-D353/D354/D355 uniquement) Marking Images for Printing Marquage des images pour impression ✤ This Camcorder supports the DPOF (Digital Print Order Format) print format. ✤ You can automatically print images recorded on a Memory card with a printer supporting DPOF. ✤ There are 2 ways to make a Print Mark. - This File: You can set a print mark on the photo image displayed on the LCD screen. It can be set up to 999. - All Files: To print 1 copy each of all of the stored images. ✤ Ce caméscope prend en charge le format d'impression DPOF ( protocole de commande d'impression numérique). ✤ Vous pouvez imprimer automatiquement des images enregistrées sur une carte mémoire avec une imprimante compatible avec la fonction DPOF. ✤ Il existe 2 manières de poser un Print Mark

  • 1
  • 2
  • 3
  • 4
  • 5
  • 6
  • 7
  • 8
  • 9
  • 10
  • 11
  • 12
  • 13
  • 14
  • 15
  • 16
  • 17
  • 18
  • 19
  • 20
  • 21
  • 22
  • 23
  • 24
  • 25
  • 26
  • 27
  • 28
  • 29
  • 30
  • 31
  • 32
  • 33
  • 34
  • 35
  • 36
  • 37
  • 38
  • 39
  • 40
  • 41
  • 42
  • 43
  • 44
  • 45
  • 46
  • 47
  • 48
  • 49
  • 50
  • 51
  • 52
  • 53
  • 54
  • 55
  • 56
  • 57
  • 58
  • 59
  • 60
  • 61
  • 62
  • 63
  • 64
  • 65
  • 66
  • 67
  • 68
  • 69
  • 70
  • 71
  • 72
  • 73
  • 74
  • 75
  • 76
  • 77
  • 78
  • 79
  • 80
  • 81
  • 82
  • 83
  • 84
  • 85
  • 86
  • 87
  • 88
  • 89
  • 90
  • 91
  • 92
  • 93
  • 94
  • 95
  • 96
  • 97
  • 98
  • 99
  • 100
  • 101
  • 102
  • 103
  • 104
  • 105
  • 106
  • 107
  • 108
  • 109
  • 110
  • 111
  • 112
  • 113
  • 114
  • 115
  • 116
  • 117
  • 118
  • 119
  • 120
  • 121
  • 122
  • 123
  • 124

ENGLISH
FRAN
Ç
AIS
108
108
Digital Still Camera Mode (SC-D353/D354/D355 only)
This Camcorder supports the DPOF (Digital Print Order Format)
print format.
You can automatically print images recorded on a Memory card with
a printer supporting DPOF.
There are 2 ways to make a Print Mark.
-
This File: You can set a print mark on the photo image displayed
on the LCD screen. It can be set up to 999.
-
All Files: To print 1 copy each of all of the stored images.
1. Set the
Power
switch to
PLAYER
.
2. Set the
Mode
switch to
MEMORY CARD
.
The last recorded image appears.
3. Using the
(REV/FWD) buttons, search for the
still image that you want to mark.
4. Press the
MENU
button.
The menu list will appear.
5. Move the
Menu selector
to the left or right to select
Memory
, then press the
Menu selector
.
6. Move the
Menu selector
to the left or right to
select
Print Mark
, then press the
Menu
selector
.
7. Move the
Menu selector
to the left or right to
select desired option(
All Off
,
This File
or
All Files
),
then press the
Menu selector
.
8. If you select
This File
, move the
Menu selector
to the left or right to select the quantity, then press the
Menu selector
.
9. To exit, press the
MENU
button.
Removing the Print Mark
To remove all Print Marks select
All Off
, to remove
individual file
s Print Mark, select the file and set
This
File
to
000
.
Mode Appareil photo num
é
rique (SC-D353/D354/D355 uniquement)
Marking Images for Printing
Ce cam
é
scope prend en charge le format d
impression DPOF (<Digital Print
Order Format> protocole de commande d
impression num
é
rique).
Vous pouvez imprimer automatiquement des images enregistr
é
es sur une
carte m
é
moire avec une imprimante compatible avec la fonction DPOF.
Il existe 2 mani
è
res de poser un Print Mark <Voyant D
lamp> sur une image.
-
This File <Ce Fichier> : vous pouvez poser un symbole d
impression sur
une photo affich
é
e sur l
’é
cran ACL. Il peut
ê
tre r
é
gl
é
jusqu
’à
999.
-
All Files <Ts Fichiers> : pour imprimer une copie de toutes les images
enregistr
é
es.
1. Placez l
interrupteur
Power
sur
PLAYER
.
2. Placez l
interrupteur
Mode
sur
MEMORY CARD
.
La derni
è
re image enregistr
é
e appara
î
t.
3. Recherchez l
image fig
é
e sur laquelle vous souhaitez poser
un symbole d
impression
à
l
aide des boutons
/
(REV/FWD).
4. Appuyez sur le bouton
MENU
.
La liste des menus appara
î
t.
5. D
é
placez le bouton
Menu selector
vers la gauche ou vers
la droite pour s
é
lectionner
Memory <M
é
moire>
, puis
appuyez sur
Menu selector
.
6. D
é
placez le bouton
Menu selector
vers la gauche ou vers
la droite pour s
é
lectionner
Print Mark <Voyant D
lamp>
puis appuyez sur
Menu selector
.
7. D
é
placez le bouton
Menu selector
vers la gauche ou vers
la droite pour s
é
lectionner l
option souhait
é
e
(All Off <tout
é
teindre>, This File <Ce Fichier> ou All Files <Ts
Fichiers>)
, puis appuyez sur
Menu selector
.
8. Si vous s
é
lectionnez
This File <Ce Fichier>
, d
é
placez le
bouton
Menu selector
vers la gauche ou vers la droite pour
s
é
lectionner la quantit
é
puis appuyez sur
Menu selector
.
9. Pour quitter, appuyez sur le bouton
MENU
.
Suppression de l
ic
ô
ne d
impression
Pour supprimer toutes les ic
ô
nes d
impression, s
é
lectionnez
All Off <tout
é
teindre>
. Pour supprimer les ic
ô
nes
d
impression d
un fichier
à
la fois, s
é
lectionnez le fichier voulu
puis r
é
glez
This File <Ce Fichier>
sur
000
.
Marquage des images pour impression
Previous
Next
M.Player Mode
Back
M.Play Select
Delete
Delete All
Protect
Print Mark
Format
Photo
Off
Move
Select
Exit
MENU
M.Player Mode
Memory
M.Play Select
Delete
Delete All
Protect
Print Mark
Format
All Off
This File
All Files
2/46
800x600
002
100-0002
5
7
9