Sharp MX-M350N Fax Guide - Page 17
A Look At The Operation Panel
 |
View all Sharp MX-M350N manuals
Add to My Manuals
Save this manual to your list of manuals |
Page 17 highlights
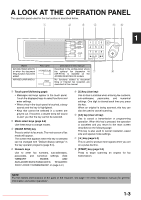
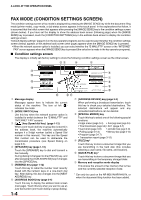
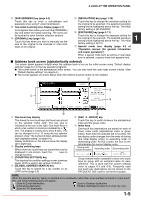
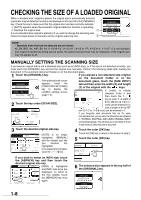
A LOOK AT THE OPERATION PANEL The operation panel used for the fax function is described below. 1 Model AR-M351N/AR-M451N or when the document filing function has been added AR-M351U/AR-M451U Key name Description in this manual Described in the configuration where the optional fax expansion kit (AR-FX12) is installed on the AR-M351N/AR-M451N models. No functions related to document filing or Internet fax reception are described in this manual. Touch panel (following page) • Messages and keys appear in the touch panel. Touch the displayed keys to select functions and enter settings. • When a key in the touch panel is touched, a beep sounds and the key is highlighted. • Keys that cannot be selected in a screen are greyed out. If touched, a double-beep will sound to alert you that the key cannot be selected. Mode select keys (page 2-2) Use these keys to change modes. [IMAGE SEND] key Press to switch to fax mode. The main screen of fax mode will appear. The screen that appears when this key is selected can be changed with "Default display settings" in the key operator programs (page 8-4). Numeric keys Use to enter fax numbers, sub-addresses, passcodes, and numerical settings. (See "MEMORY BOXES AND SUB-ADDRESSES/PASSCODES REQUIRED FOR F-CODE TRANSMISSION" on page 4-2.) [C] key (clear key) Use to clear a mistake when entering fax numbers, sub-addresses, passcodes, and numerical settings. One digit is cleared each time you press the key. When an original is being scanned, this key can also be used to cancel scanning. [CA] key (clear all key) Use to cancel a transmission or programming operation. When this key is pressed, the operation is cancelled and you return to the main screen described on the following page. This key is also used to cancel resolution, paper size and special mode settings. [ ] key (page 5-3) This is used to produce tone signals when you are on a pulse dial line. [START] key (page 2-3) Press to begin scanning an original for fax transmission. NOTE For the names and functions of the parts of the machine, see page 1-9 of the "Operation manual (for general information and copier operation)". Downloaded From ManualsPrinter.com Manuals 1-3
-
 1
1 -
2
-
3
-
4
-
5
-
6
-
7
-
8
-
9
-
10
-
11
-
 12
12 -
 13
13 -
 14
14 -
 15
15 -
 16
16 -
 17
17 -
 18
18 -
 19
19 -
 20
20 -
 21
21 -
 22
22 -
23
-
24
-
25
-
26
-
27
-
28
-
29
-
30
-
31
-
32
-
33
-
34
-
35
-
36
-
37
-
38
-
39
-
40
-
41
-
42
-
43
-
44
-
45
-
46
-
47
-
48
-
49
-
50
-
51
-
52
-
53
-
54
-
55
-
56
-
57
-
58
-
59
-
60
-
61
-
62
-
63
-
64
-
65
-
66
-
67
-
68
-
69
-
70
-
71
-
72
-
73
-
74
-
75
-
76
-
77
-
78
-
79
-
80
-
81
-
82
-
83
-
84
-
85
-
86
-
87
-
88
-
89
-
90
-
91
-
92
-
93
-
94
-
95
-
96
-
97
-
98
-
99
-
100
-
101
-
102
-
103
-
104
-
105
-
106
-
107
-
108
-
109
-
110
 |
 |
