Sharp MX-M350N Fax Guide - Page 25
Selecting The Exposure
 |
View all Sharp MX-M350N manuals
Add to My Manuals
Save this manual to your list of manuals |
Page 25 highlights
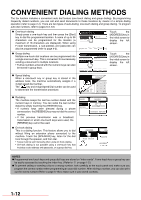
SELECTING RESOLUTION AND EXPOSURE SETTINGS SELECTING THE EXPOSURE The initial exposure setting is AUTO. To change the setting, follow these steps: Change the exposure. 1 Touch the [EXPOSURE] key. AUTO EXPOSURE STANDARD RESOLUTION AUTO ORIGINAL 2 Touch the desired exposure key. To darken the exposure, AUTO MANUAL touch the key. To lighten the exposure, touch the key. When the or key is touched, [AUTO] is not highlighted and [MANUAL] is highlighted. To return to auto exposure, touch [AUTO]. 3 Touch the [OK] key. You will return to the OK initial screen. AUTO MANUAL NOTES When using the document glass to scan pages an 1 original, the exposure setting can be changed each time you change pages. When using the automatic document feeder, the exposure setting cannot be changed once scanning has begun. The default (initial) exposure setting can be changed in "Default exposure settings" (page 8-5) in the key operator programs. Exposure settings 1 to 2 Select this setting if your original consists Originalmostly of dark characters. Auto This setting automatically adjusts the exposure for light and dark parts of the original. 4 to 5 Select this setting if your original consists Originalmostly of faint characters. Downloaded From ManualsPrinter.com Manuals 1-11
-
 1
1 -
2
-
3
-
4
-
5
-
6
-
7
-
8
-
9
-
10
-
11
-
12
-
13
-
14
-
15
-
16
-
17
-
18
-
19
-
 20
20 -
 21
21 -
 22
22 -
 23
23 -
 24
24 -
 25
25 -
 26
26 -
 27
27 -
 28
28 -
 29
29 -
 30
30 -
31
-
32
-
33
-
34
-
35
-
36
-
37
-
38
-
39
-
40
-
41
-
42
-
43
-
44
-
45
-
46
-
47
-
48
-
49
-
50
-
51
-
52
-
53
-
54
-
55
-
56
-
57
-
58
-
59
-
60
-
61
-
62
-
63
-
64
-
65
-
66
-
67
-
68
-
69
-
70
-
71
-
72
-
73
-
74
-
75
-
76
-
77
-
78
-
79
-
80
-
81
-
82
-
83
-
84
-
85
-
86
-
87
-
88
-
89
-
90
-
91
-
92
-
93
-
94
-
95
-
96
-
97
-
98
-
99
-
100
-
101
-
102
-
103
-
104
-
105
-
106
-
107
-
108
-
109
-
110
 |
 |
