Sharp MX-M350N Fax Guide - Page 24
Selecting Resolution And Exposure Settings
 |
View all Sharp MX-M350N manuals
Add to My Manuals
Save this manual to your list of manuals |
Page 24 highlights
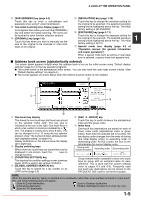
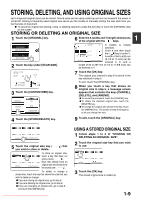
SELECTING RESOLUTION AND EXPOSURE SETTINGS After loading an original, you can adjust the resolution and exposure settings to match the condition of the original-for example, if it has small or faint characters, or if it is a photo. After loading the original in fax mode, adjust the settings as explained below. SELECTING THE RESOLUTION The initial resolution setting is STANDARD. To change the setting, follow these steps: Change the resolution. 1 Touch the [RESOLUTION] key. STANDARD RESOLUTION AUTO A4 ORIGINAL 2 Touch the [STANDARD] key, [FINE] key, [SUPER FINE] key, or [ULTRA FINE] key. The selected key is STANDARD FINE highlighted. If you touched the [FINE] key, [SUPER FINE] key, SUPER FINE HALF TONE or [ULTRA FINE] key, ULTRA FINE you can also select halftone by touching the [HALF TONE] key. Resolution settings Standard Touch this key if your original consists of normal-sized characters (like those in this manual). Touch this key if your original has small Fine characters or diagrams. The original will be scanned at twice the resolution of the [STANDARD] setting. Super fine Touch this key if your original has intricate pictures or diagrams. A higher-quality image will be produced than with the [FINE] setting. Ultra fine Touch this key if your original has intricate pictures or diagrams. This setting gives the best image quality. However, transmission will take longer than with the other settings. 3 Touch the [OK] key. You will return to the OK initial screen. DARD NE FINE HALF TONE FINE Half tone Touch this key if your original is a photograph or has gradations of colour (such as a colour original). This setting will produce a clearer image than [FINE], [SUPER FINE], or [ULTRA FINE] used alone. Half tone cannot be selected if [STANDARD] has been selected. NOTES The factory default setting for the initial resolution is [STANDARD]. The initial resolution can be changed to a different setting in the key operator programs (see "Initial resolution setting" on page 8-4). When using the automatic document feeder, the resolution setting cannot be changed once scanning has begun. When a fax is sent at [ULTRA FINE], [SUPER FINE], or [FINE] resolution, a lower resolution will be used if the receiving machine does not have that resolution. 1-10 Downloaded From ManualsPrinter.com Manuals
-
 1
1 -
2
-
3
-
4
-
5
-
6
-
7
-
8
-
9
-
10
-
11
-
12
-
13
-
14
-
15
-
16
-
17
-
18
-
 19
19 -
 20
20 -
 21
21 -
 22
22 -
 23
23 -
 24
24 -
 25
25 -
 26
26 -
 27
27 -
 28
28 -
 29
29 -
30
-
31
-
32
-
33
-
34
-
35
-
36
-
37
-
38
-
39
-
40
-
41
-
42
-
43
-
44
-
45
-
46
-
47
-
48
-
49
-
50
-
51
-
52
-
53
-
54
-
55
-
56
-
57
-
58
-
59
-
60
-
61
-
62
-
63
-
64
-
65
-
66
-
67
-
68
-
69
-
70
-
71
-
72
-
73
-
74
-
75
-
76
-
77
-
78
-
79
-
80
-
81
-
82
-
83
-
84
-
85
-
86
-
87
-
88
-
89
-
90
-
91
-
92
-
93
-
94
-
95
-
96
-
97
-
98
-
99
-
100
-
101
-
102
-
103
-
104
-
105
-
106
-
107
-
108
-
109
-
110
 |
 |
