Sharp MX-M350N Fax Guide - Page 23
Storing, Deleting, And Using Original Sizes
 |
View all Sharp MX-M350N manuals
Add to My Manuals
Save this manual to your list of manuals |
Page 23 highlights
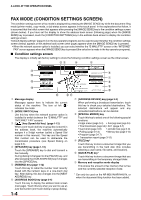
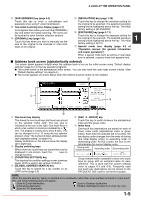
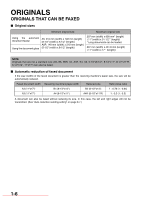
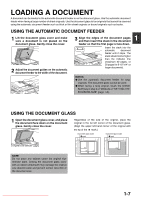
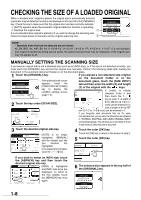
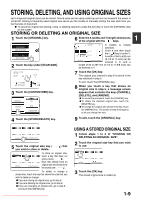
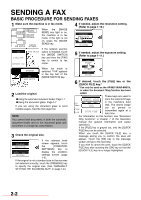
STORING, DELETING, AND USING ORIGINAL SIZES Up to 9 special original sizes can be stored. Stored sizes can be easily called up and are not erased if the power is turned off. Storing a frequently used original size saves you the trouble of manually setting the size each time you fax that size of document. To cancel an original size storing, using, or deleting operation, press the [CA] key or touch the [ORIGINAL] key on the screen. STORING OR DELETING AN ORIGINAL SIZE 1 Touch the [ORIGINAL] key. 6 1 Enter the X (width) and Y (length) dimensions of the original with the keys. STANDARD RESOLUTION AUTO A4 ORIGINAL 2 Touch the key under [SCAN SIZE]. X CANCEL OK X (width) is initially AY selected. X 420 (64 432) mm Enter X and then touch the ( ) key to enter Y. Y 297 (64 297) mm A width of 64 to 432 mm RECALL STORE/DELETE (2-1/2 to 17 inch) can be entered in X, and a length of 64 to 297 mm (2-1/2 to 11-5/8 inch) can be entered in Y. SCAN SIZE AUTO A4 100% 2-SIDED 2-S BOOKLET TAB 3 Touch the [CUSTOM SIZE] key. A5R MANUAL B5 CUSTOM SIZE B5R STANDARD SI 7 Touch the [OK] key. The original size entered in step 6 is stored in the key selected in step 5. To exit, touch the [ORIGINAL] key. 8 When you touch a key that shows an original size in step 5, a message screen appears that contains the keys [CANCEL], [DELETE], and [AMEND]. To cancel the procedure, touch the [CANCEL] key. To delete the selected original size, touch the [DELETE] key. To change the original size stored in the key, touch the [AMEND] key. The screen of step 6 will appear to let you change the size. 4 Touch the [STORE/DELETE] key. 9 To exit, touch the [ORIGINAL] key. RECALL STORE/DELETE 5 Touch the original size key ( you wish to store or delete. ) that X68 Y78 RECALL STORE/DELETE To store an original size, touch a key that does not show a size ( ). Keys that already have an original size stored will show the stored size ( X68 Y78 ). To delete or change a stored size, touch the key that shows the size that you wish to delete or change. If you are storing an original size, go to step 6. If you are deleting an original size, go to step 8. If you are changing an original size, go to step 8 and touch the [AMEND] key. Downloaded From ManualsPrinter.com Manuals USING A STORED ORIGINAL SIZE 1 Follow steps 1 to 3 of "STORING OR DELETING AN ORIGINAL SIZE". 2 Touch the original size key that you wish to use. X68 Y78 RECALL STORE/DELETE 3 Touch the [OK] key. The stored original size is called up. 1-9
-
 1
1 -
2
-
3
-
4
-
5
-
6
-
7
-
8
-
9
-
10
-
11
-
12
-
13
-
14
-
15
-
16
-
17
-
 18
18 -
 19
19 -
 20
20 -
 21
21 -
 22
22 -
 23
23 -
 24
24 -
 25
25 -
 26
26 -
 27
27 -
 28
28 -
29
-
30
-
31
-
32
-
33
-
34
-
35
-
36
-
37
-
38
-
39
-
40
-
41
-
42
-
43
-
44
-
45
-
46
-
47
-
48
-
49
-
50
-
51
-
52
-
53
-
54
-
55
-
56
-
57
-
58
-
59
-
60
-
61
-
62
-
63
-
64
-
65
-
66
-
67
-
68
-
69
-
70
-
71
-
72
-
73
-
74
-
75
-
76
-
77
-
78
-
79
-
80
-
81
-
82
-
83
-
84
-
85
-
86
-
87
-
88
-
89
-
90
-
91
-
92
-
93
-
94
-
95
-
96
-
97
-
98
-
99
-
100
-
101
-
102
-
103
-
104
-
105
-
106
-
107
-
108
-
109
-
110
 |
 |
