Sharp PN-V601 Sharp Digital Signage Software (SDSS™) Operation Manual - Page 72
Creating a schedule
 |
UPC - 074000047068
View all Sharp PN-V601 manuals
Add to My Manuals
Save this manual to your list of manuals |
Page 72 highlights
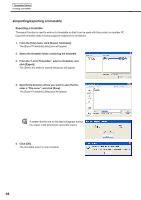
Schedule Editor Creating a schedule Creating a schedule ●Registering a timetable in the schedule 1. Select the timetable folder containing the timetable. 2. Select a timetable from the "Timetable" list and click , or alternatively, double-click the timetable, or from the [Edit] menu, click [Add Timetable to Schedule]. The [Add Timetable to Schedule] dialog box will appear. Timetable folder 3. Set a "Span". This is the length of time that the program will be played for. Specify dates between 1/1/2005 and 12/31/2020. If you do not set the "Option" area, the time schedule will be added to the entire span from "Start" to "End". Use the "Option" settings to add timetables to specified days or weeks. • If you check the "Select the day(s) of the week below:" check box and the "Sunday" to "Saturday" check boxes, the timetable will only be added to the specified days of the week during the span. • If you check the "Select the week(s) of the month below:" check box and the "1st week" to "6th week" check boxes, the timetable will only be added to the specified weeks during the span. • If you specify both "Select the day(s) of the week below:" and "Select the week(s) of the month below:", the timetable will only be added to days that meet both sets of conditions. For example, setting "Select the day(s) of the week below:" to "Wednesday", and "Select the week(s) of the month below:" to "2nd week", would add the timetable to the second Wednesday of every month. 4. Click [OK]. The timetable will be registered in the schedule. Timetables may also be registered by dragging them from the "Timetable" list to the "Calendar". Registered timetables can be changed in the calendar. (Fp.64) 5. Repeat steps 2 to 3 as necessary and add all the timetables that you want to display to the schedule. 72
-
 1
1 -
2
-
3
-
4
-
5
-
6
-
7
-
8
-
9
-
10
-
11
-
12
-
13
-
14
-
15
-
16
-
17
-
18
-
19
-
20
-
21
-
22
-
23
-
24
-
25
-
26
-
27
-
28
-
29
-
30
-
31
-
32
-
33
-
34
-
35
-
36
-
37
-
38
-
39
-
40
-
41
-
42
-
43
-
44
-
45
-
46
-
47
-
48
-
49
-
50
-
51
-
52
-
53
-
54
-
55
-
56
-
57
-
58
-
59
-
60
-
61
-
62
-
63
-
64
-
65
-
66
-
 67
67 -
 68
68 -
 69
69 -
 70
70 -
 71
71 -
 72
72 -
 73
73 -
 74
74 -
 75
75 -
 76
76 -
 77
77 -
78
-
79
-
80
-
81
-
82
-
83
-
84
-
85
-
86
-
87
-
88
-
89
-
90
-
91
-
92
-
93
-
94
-
95
-
96
-
97
-
98
-
99
-
100
-
101
-
102
-
103
-
104
-
105
-
106
-
107
-
108
-
109
-
110
-
111
-
112
-
113
-
114
-
115
-
116
-
117
 |
 |
