Sharp PN-V601 Sharp Digital Signage Software (SDSS™) Operation Manual - Page 86
Select a Distribution Date Time.
 |
UPC - 074000047068
View all Sharp PN-V601 manuals
Add to My Manuals
Save this manual to your list of manuals |
Page 86 highlights
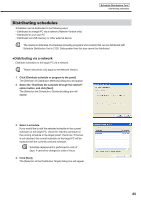
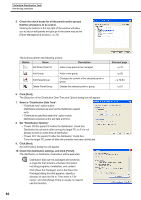
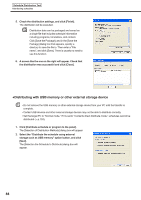
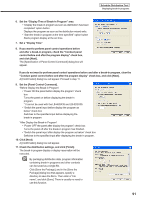
Schedule Distribution Tool Distributing schedules 5. Check the check boxes for all the panels and/or groups that the schedule is to be sent to. Clicking the buttons in the top right of the window will allow you to add or edit panels and groups in the same way as the [Panel Management] window (Fp.78). The buttons perform the following actions: Button Name Description Add Panel (Panel PC) Adds a new panel to be managed. Add Group Edit Panel/Group Delete Panel/Group Adds a new group. Changes the content of the selected panel or group. Deletes the selected panel or group. 6. Click [Next]. The [Selection of the Distribution Date Time and Option] dialog box will appear. 7. Select a "Distribution Date Time". • "Distribute now" option button Distributes schedule as soon as the distribution wizard exits. • "Distribute at specified date time" option button Distributes schedule at the set date and time. 8. Set "Distribution Options". • "Power ON the panel PC before the distribution" check box Distributes the schedule after turning the target PC on if it is not already turned on at the time of distribution. • "Power OFF the panel PC after the distribution" check box Turns the target PC power off after the schedule has been distributed. 9. Click [Next]. A [Confirmation] dialog box will appear. 10. Check the distribution settings, and click [Finish]. The distribution or distribution reservation will be executed. Distribution data can be packaged and saved as a single file that includes schedule information including programs, timetables, and content. Click [Save the Package], and in the [Save the Package] dialog box that appears, specify a directory to save the file to. Then enter a "File name", and click [Save]. There is usually no need to use this function. Relevant page Fp.79 Fp.80 Fp.79-80 Fp.81 86
-
 1
1 -
2
-
3
-
4
-
5
-
6
-
7
-
8
-
9
-
10
-
11
-
12
-
13
-
14
-
15
-
16
-
17
-
18
-
19
-
20
-
21
-
22
-
23
-
24
-
25
-
26
-
27
-
28
-
29
-
30
-
31
-
32
-
33
-
34
-
35
-
36
-
37
-
38
-
39
-
40
-
41
-
42
-
43
-
44
-
45
-
46
-
47
-
48
-
49
-
50
-
51
-
52
-
53
-
54
-
55
-
56
-
57
-
58
-
59
-
60
-
61
-
62
-
63
-
64
-
65
-
66
-
67
-
68
-
69
-
70
-
71
-
72
-
73
-
74
-
75
-
76
-
77
-
78
-
79
-
80
-
 81
81 -
 82
82 -
 83
83 -
 84
84 -
 85
85 -
 86
86 -
 87
87 -
 88
88 -
 89
89 -
 90
90 -
 91
91 -
92
-
93
-
94
-
95
-
96
-
97
-
98
-
99
-
100
-
101
-
102
-
103
-
104
-
105
-
106
-
107
-
108
-
109
-
110
-
111
-
112
-
113
-
114
-
115
-
116
-
117
 |
 |
