Sharp PN-V601 Sharp Digital Signage Software (SDSS™) Operation Manual - Page 87
●Distributing to your own PC
 |
UPC - 074000047068
View all Sharp PN-V601 manuals
Add to My Manuals
Save this manual to your list of manuals |
Page 87 highlights
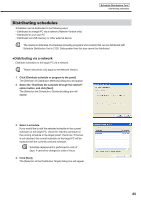
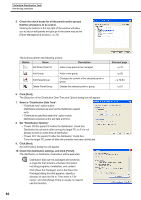
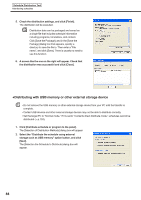
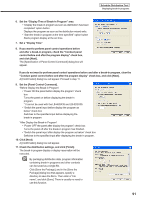
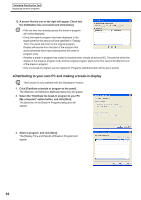
11. If you selected the "Distribute now" option button in step 7, a screen like the one on the right will appear. Check that the distribution was successful and click [Close]. Schedule Distribution Tool Distributing schedules If you selected the "Distribute at specified date time" option button in step 7, a screen like the one on the right will appear. Click [OK]. • Schedule and program distribution may take some time. If you perform simultaneous distribution to multiple panels, data is actually sent sequentially. For this reason, there may be some time difference in schedule and program distribution. • Old schedules are no longer required after new schedules have been sent. Unnecessary schedules and their associated content will be automatically deleted the next time Client Scheduler starts. ●Distributing to your own PC These instructions only apply to the Standalone Version. 1. Click [Distribute schedule or program to the panel]. The [Selection of Distribution Methods] dialog box will appear. 2. Select the "Distribute the schedule to your PC (My computer)" option button, and click [Next]. The [Selection the Schedule to Distribute] dialog box will appear. 3. Select a schedule. If you want to add the selected schedule to the current open schedule on your PC, check the "Add this schedule on the running schedule in the target panel" check box. If the box is not checked, the currently open schedule on your PC will be replaced with the currently selected schedule. 4. Click [Next]. A [Confirmation] dialog box will appear. 87
-
 1
1 -
2
-
3
-
4
-
5
-
6
-
7
-
8
-
9
-
10
-
11
-
12
-
13
-
14
-
15
-
16
-
17
-
18
-
19
-
20
-
21
-
22
-
23
-
24
-
25
-
26
-
27
-
28
-
29
-
30
-
31
-
32
-
33
-
34
-
35
-
36
-
37
-
38
-
39
-
40
-
41
-
42
-
43
-
44
-
45
-
46
-
47
-
48
-
49
-
50
-
51
-
52
-
53
-
54
-
55
-
56
-
57
-
58
-
59
-
60
-
61
-
62
-
63
-
64
-
65
-
66
-
67
-
68
-
69
-
70
-
71
-
72
-
73
-
74
-
75
-
76
-
77
-
78
-
79
-
80
-
81
-
 82
82 -
 83
83 -
 84
84 -
 85
85 -
 86
86 -
 87
87 -
 88
88 -
 89
89 -
 90
90 -
 91
91 -
 92
92 -
93
-
94
-
95
-
96
-
97
-
98
-
99
-
100
-
101
-
102
-
103
-
104
-
105
-
106
-
107
-
108
-
109
-
110
-
111
-
112
-
113
-
114
-
115
-
116
-
117
 |
 |
