Sony DCR SR100 Operating Guide - Page 30
Recording/Playback, Recording, Press START/STOP
 |
UPC - 027242692251
View all Sony DCR SR100 manuals
Add to My Manuals
Save this manual to your list of manuals |
Page 30 highlights
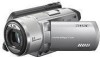
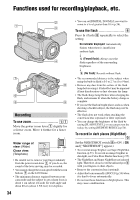
Recording/Playback Recording Lens cover Opens in accordance with the setting of the POWER switch. Zoom lever START/STOP B 1 Slide the POWER switch in the direction of the arrow repeatedly to light up the respective lamp. PHOTO POWER switch START/STOP A ACCESS lamp Press the green button only when the POWER switch is in the OFF (CHG) position. 2 Start recording. Movies Press START/STOP A (or B). 60min REC 00:01:00 START/ STOP P-MENU [STBY] b [REC] To stop recording, press START/STOP again. Still Images Press PHOTO lightly to adjust the focus A, then press it fully B. Beep 60min 3.0M FINE 123 Shutter click P-MENU Flashing b Lights up A shutter sound is heard. When disappears, the image has been recorded. • If the ACCESS lamp is on after recording is finished, it means data is still being written onto the hard disk. Do not apply shock or vibration to your camcorder, and do not remove the battery pack or AC Adaptor. • You cannot record movies and still images at the same time. • A recordable time of movies in a succession is up to 12 hours. • When a movie data file exceeds 2 GB, the next file is created automatically. • For image quality of movies, see [REC MODE] (p.61), of still images, see [ IMAGE SIZE] (p.57). 30
-
 1
1 -
2
-
3
-
4
-
5
-
6
-
7
-
8
-
9
-
10
-
11
-
12
-
13
-
14
-
15
-
16
-
17
-
18
-
19
-
20
-
21
-
22
-
23
-
24
-
 25
25 -
 26
26 -
 27
27 -
 28
28 -
 29
29 -
 30
30 -
 31
31 -
 32
32 -
 33
33 -
 34
34 -
 35
35 -
36
-
37
-
38
-
39
-
40
-
41
-
42
-
43
-
44
-
45
-
46
-
47
-
48
-
49
-
50
-
51
-
52
-
53
-
54
-
55
-
56
-
57
-
58
-
59
-
60
-
61
-
62
-
63
-
64
-
65
-
66
-
67
-
68
-
69
-
70
-
71
-
72
-
73
-
74
-
75
-
76
-
77
-
78
-
79
-
80
-
81
-
82
-
83
-
84
-
85
-
86
-
87
-
88
-
89
-
90
-
91
-
92
-
93
-
94
-
95
-
96
-
97
-
98
-
99
-
100
-
101
-
102
-
103
-
104
-
105
-
106
-
107
 |
 |
