Sony DCR SR100 Operating Guide - Page 45
Deleting images, Deleting the desired images
 |
UPC - 027242692251
View all Sony DCR SR100 manuals
Add to My Manuals
Save this manual to your list of manuals |
Page 45 highlights
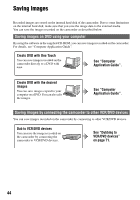
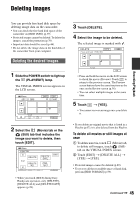
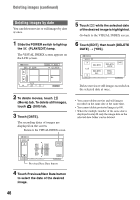
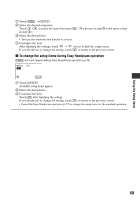
Deleting images Recording/Playback You can provide free hard disk space by deleting image data on the camcorder. • You can check the free hard disk space of the camcorder on [HDD INFO] (p.59). • Protected images cannot be deleted. To delete the images, cancel the protection (p.70). • Important data should be saved (p.44). • Do not delete the image data on the hard disk of the camcorder from your computer. Deleting the desired images 3 Touch [DELETE]. 4 Select the image to be deleted. The selected image is marked with . DELETE DATE Press and hold : PREVIEW END 1 Slide the POWER switch to light up the (PLAY/EDIT) lamp. The VISUAL INDEX screen appears on the LCD screen. 60min DEC 21 2006 DATE EDIT 12 : 34:01 P-MENU 2 Select the (Movie) tab or the (Still) tab that includes the image you want to delete, then touch [EDIT]. 60min 21E1D2IT2006 DELETE 1/2 DELETE ALL 12 : 34 DELETE DATE END PROTECT P-MENU • When you touch [EDIT] during Easy Handycam operation, only [DELETE], [DELETE ALL] and [DELETE DATE] appears (p.28). OK • Press and hold the movie on the LCD screen to check the movie (Preview). Touch to return to the previous screen. The Preview screen buttons have the same functions as the ones on the Review screen (p.38). • You can select multiple images at the same time. 5 Touch t [YES]. • You cannot recover an image once you delete it. • If you delete an original movie that is listed in a Playlist (p.67), it is also deleted from the Playlist. To delete all movies or still images at once 1 To delete a movie, touch (Movie) tab, to delete still images, touch (Still) tab on the VISUAL INDEX screen. 2 Touch [EDIT] t [DELETE ALL] t [YES] t [YES]. • Protected images cannot be deleted (p.69). • To recover all the recordable space of hard disk, perform [HDD FORMAT] (p.59). Continued , 45
-
 1
1 -
2
-
3
-
4
-
5
-
6
-
7
-
8
-
9
-
10
-
11
-
12
-
13
-
14
-
15
-
16
-
17
-
18
-
19
-
20
-
21
-
22
-
23
-
24
-
25
-
26
-
27
-
28
-
29
-
30
-
31
-
32
-
33
-
34
-
35
-
36
-
37
-
38
-
39
-
 40
40 -
 41
41 -
 42
42 -
 43
43 -
 44
44 -
 45
45 -
 46
46 -
 47
47 -
 48
48 -
 49
49 -
 50
50 -
51
-
52
-
53
-
54
-
55
-
56
-
57
-
58
-
59
-
60
-
61
-
62
-
63
-
64
-
65
-
66
-
67
-
68
-
69
-
70
-
71
-
72
-
73
-
74
-
75
-
76
-
77
-
78
-
79
-
80
-
81
-
82
-
83
-
84
-
85
-
86
-
87
-
88
-
89
-
90
-
91
-
92
-
93
-
94
-
95
-
96
-
97
-
98
-
99
-
100
-
101
-
102
-
103
-
104
-
105
-
106
-
107
 |
 |
