Sony DCR-TRV350 Operating Instructions - Page 169
Selecting a folder to view
 |
View all Sony DCR-TRV350 manuals
Add to My Manuals
Save this manual to your list of manuals |
Page 169 highlights
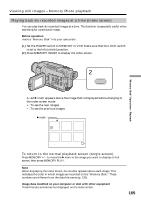
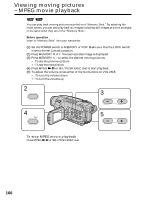
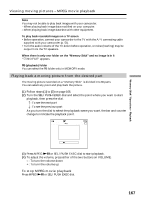
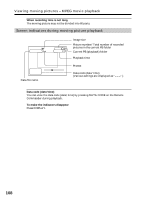
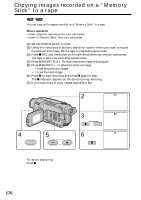
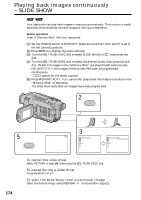
Selecting a folder to view You can select a folder to view images in it. Before operation Insert a "Memory Stick" into your camcorder. (1) Set the POWER switch to MEMORY. Make sure that the LOCK switch is set to the left (unlock) position. (2) Press MENU to display the menu settings. (3) Turn the SEL/PUSH EXEC dial to select PB FOLDER in 1 , then press the dial (p. 217). (4) Press MEMORY +/- to select the desired folder. - : To view the previous folder + : To view the next folder The first image in the current selected PB folder and the folder information are displayed. (5) Press MENU when you find the folder that contains images you want to view. Press MEMORY +/- to select the desired image in the folder. "Memory Stick" Operations - Playback 4,5 MENU 3 MEM SET 1 STILL SET MOVIE SET NEW FOLDER 1 REC FOLDER 2 FILE NO. PRINT MARK PROTECT PB FOLDER READY RETURN [MENU] : END PB FOLDER FOLDER NAME: DATE: FILES: 101 101MSDCF JUL 4 2003 12 : 05 : 56 PM 40 [a] [b] SELECT [MENU] : END [a]: The date when the folder is created [b]: The number of the files stored in the folder To cancel selecting the folder Press RETURN in step (3). Note Folders created, or renamed with your computer may not be recognized by your camcorder. Current PB folder The current PB folder is valid until the next recording is made. Once you record an image, the current recording folder becomes the current PB folder. When no image is in the PB folder "NO FILE AVAILABLE" appears. 169
-
 1
1 -
2
-
3
-
4
-
5
-
6
-
7
-
8
-
9
-
10
-
11
-
12
-
13
-
14
-
15
-
16
-
17
-
18
-
19
-
20
-
21
-
22
-
23
-
24
-
25
-
26
-
27
-
28
-
29
-
30
-
31
-
32
-
33
-
34
-
35
-
36
-
37
-
38
-
39
-
40
-
41
-
42
-
43
-
44
-
45
-
46
-
47
-
48
-
49
-
50
-
51
-
52
-
53
-
54
-
55
-
56
-
57
-
58
-
59
-
60
-
61
-
62
-
63
-
64
-
65
-
66
-
67
-
68
-
69
-
70
-
71
-
72
-
73
-
74
-
75
-
76
-
77
-
78
-
79
-
80
-
81
-
82
-
83
-
84
-
85
-
86
-
87
-
88
-
89
-
90
-
91
-
92
-
93
-
94
-
95
-
96
-
97
-
98
-
99
-
100
-
101
-
102
-
103
-
104
-
105
-
106
-
107
-
108
-
109
-
110
-
111
-
112
-
113
-
114
-
115
-
116
-
117
-
118
-
119
-
120
-
121
-
122
-
123
-
124
-
125
-
126
-
127
-
128
-
129
-
130
-
131
-
132
-
133
-
134
-
135
-
136
-
137
-
138
-
139
-
140
-
141
-
142
-
143
-
144
-
145
-
146
-
147
-
148
-
149
-
150
-
151
-
152
-
153
-
154
-
155
-
156
-
157
-
158
-
159
-
160
-
161
-
162
-
163
-
 164
164 -
 165
165 -
 166
166 -
 167
167 -
 168
168 -
 169
169 -
 170
170 -
 171
171 -
 172
172 -
 173
173 -
 174
174 -
175
-
176
-
177
-
178
-
179
-
180
-
181
-
182
-
183
-
184
-
185
-
186
-
187
-
188
-
189
-
190
-
191
-
192
-
193
-
194
-
195
-
196
-
197
-
198
-
199
-
200
-
201
-
202
-
203
-
204
-
205
-
206
-
207
-
208
-
209
-
210
-
211
-
212
-
213
-
214
-
215
-
216
-
217
-
218
-
219
-
220
-
221
-
222
-
223
-
224
-
225
-
226
-
227
-
228
-
229
-
230
-
231
-
232
-
233
-
234
-
235
-
236
-
237
-
238
-
239
-
240
-
241
-
242
-
243
-
244
-
245
-
246
-
247
-
248
-
249
-
250
-
251
-
252
-
253
-
254
-
255
-
256
-
257
-
258
-
259
-
260
-
261
-
262
-
263
-
264
-
265
-
266
-
267
-
268
 |
 |