Sony DCR-TRV350 Operating Instructions - Page 31
cassette is inserted, To set the counter to 0:00:00
 |
View all Sony DCR-TRV350 manuals
Add to My Manuals
Save this manual to your list of manuals |
Page 31 highlights
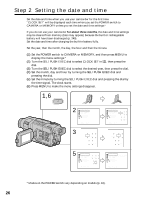
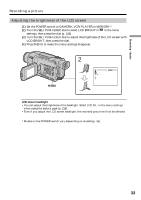
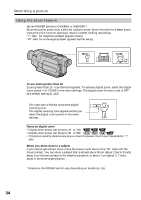
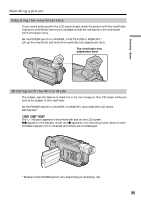
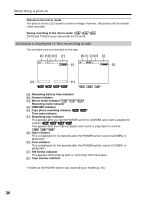
Recording - Basics Recording a picture Note on the LOCK switch When you slide the LOCK switch to the right, the POWER switch can no longer be set to MEMORY accidentally. The LOCK switch is set to the left as the default setting. Note on recording mode Your camcorder records and plays back in the SP (standard play) mode or in the LP (long play) mode. Select SP or LP in the menu settings (p. 219). In the LP mode, you can record longer than in SP mode.*1) When you record a tape in the LP mode on your camcorder, we recommend that you play back the tape on your camcorder. To enable smooth transition Transition between the last scene you recorded and the next scene is smooth as long as you do not eject the cassette even if you turn off your camcorder. However, check the following: - Do not mix recordings in the SP mode and in the LP mode on one tape. - When you change the battery pack, set the POWER switch to OFF (CHG). If you leave your camcorder in the standby mode for a certain period *2) while the cassette is inserted Your camcorder automatically turns off. This is to save battery power and to prevent battery and tape wear. To resume the standby mode, set the POWER switch to OFF (CHG) once, then turn it to CAMERA again. However, your camcorder does not turn off automatically while the cassette is not inserted. To set the counter to 0:00:00 Press COUNTER RESET (p. 259). When you record in the SP and LP modes on one tape or you record some scenes in the LP mode •The time code may not be written properly between scenes. •The transition between scenes may not be smooth. •The playback picture may be distorted. *1) 1.5 times: Twice: *2) three minutes: five minutes: 31
-
 1
1 -
2
-
3
-
4
-
5
-
6
-
7
-
8
-
9
-
10
-
11
-
12
-
13
-
14
-
15
-
16
-
17
-
18
-
19
-
20
-
21
-
22
-
23
-
24
-
25
-
 26
26 -
 27
27 -
 28
28 -
 29
29 -
 30
30 -
 31
31 -
 32
32 -
 33
33 -
 34
34 -
 35
35 -
 36
36 -
37
-
38
-
39
-
40
-
41
-
42
-
43
-
44
-
45
-
46
-
47
-
48
-
49
-
50
-
51
-
52
-
53
-
54
-
55
-
56
-
57
-
58
-
59
-
60
-
61
-
62
-
63
-
64
-
65
-
66
-
67
-
68
-
69
-
70
-
71
-
72
-
73
-
74
-
75
-
76
-
77
-
78
-
79
-
80
-
81
-
82
-
83
-
84
-
85
-
86
-
87
-
88
-
89
-
90
-
91
-
92
-
93
-
94
-
95
-
96
-
97
-
98
-
99
-
100
-
101
-
102
-
103
-
104
-
105
-
106
-
107
-
108
-
109
-
110
-
111
-
112
-
113
-
114
-
115
-
116
-
117
-
118
-
119
-
120
-
121
-
122
-
123
-
124
-
125
-
126
-
127
-
128
-
129
-
130
-
131
-
132
-
133
-
134
-
135
-
136
-
137
-
138
-
139
-
140
-
141
-
142
-
143
-
144
-
145
-
146
-
147
-
148
-
149
-
150
-
151
-
152
-
153
-
154
-
155
-
156
-
157
-
158
-
159
-
160
-
161
-
162
-
163
-
164
-
165
-
166
-
167
-
168
-
169
-
170
-
171
-
172
-
173
-
174
-
175
-
176
-
177
-
178
-
179
-
180
-
181
-
182
-
183
-
184
-
185
-
186
-
187
-
188
-
189
-
190
-
191
-
192
-
193
-
194
-
195
-
196
-
197
-
198
-
199
-
200
-
201
-
202
-
203
-
204
-
205
-
206
-
207
-
208
-
209
-
210
-
211
-
212
-
213
-
214
-
215
-
216
-
217
-
218
-
219
-
220
-
221
-
222
-
223
-
224
-
225
-
226
-
227
-
228
-
229
-
230
-
231
-
232
-
233
-
234
-
235
-
236
-
237
-
238
-
239
-
240
-
241
-
242
-
243
-
244
-
245
-
246
-
247
-
248
-
249
-
250
-
251
-
252
-
253
-
254
-
255
-
256
-
257
-
258
-
259
-
260
-
261
-
262
-
263
-
264
-
265
-
266
-
267
-
268
 |
 |