Sony SRG300SE User Manual (SRG-300SE User's Guide)
Sony SRG300SE Manual
 |
View all Sony SRG300SE manuals
Add to My Manuals
Save this manual to your list of manuals |
Sony SRG300SE manual content summary:
- Sony SRG300SE | User Manual (SRG-300SE User's Guide) - Page 1
C-055-100-11 (1) HD Color Video Camera User's Guide Software Version 1.0 Before operating the unit, please read this manual thoroughly and retain it for future reference. SRG-300SE/301SE © 2014 Sony Corporation - Sony SRG300SE | User Manual (SRG-300SE User's Guide) - Page 2
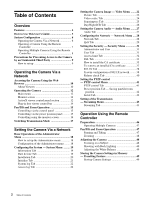
Table of Contents Overview Features 4 How to Use This User's Guide 5 System Configuration 6 Operating the Camera Via a Network 6 Tab 31 Access limit Tab 32 SSL Tab 33 How to install the CA certificate 35 To remove an installed CA certificate 37 802.1X Tab 38 System configuration of 802.1X - Sony SRG300SE | User Manual (SRG-300SE User's Guide) - Page 3
EXPOSURE Menu 53 WHITE BALANCE Menu 54 PICTURE Menu 54 PAN TILT ZOOM Menu 55 SYSTEM Menu 56 STATUS Menu 57 Others Message List 58 Troubleshooting 59 Menu Configuration 60 Preset Items 62 Glossary 63 Index 65 3 Table of Contents - Sony SRG300SE | User Manual (SRG-300SE User's Guide) - Page 4
JPEG/ H.264 are supported. • A maximum 3 codec modes are available. • Date/time can be superimposed on the image. • You can install the camera on in external communication. NOTICE TO USERS © 2014 Sony Corporation. All rights reserved. This manual or the software described herein, in whole or - Sony SRG300SE | User Manual (SRG-300SE User's Guide) - Page 5
RM-IP10) (optional accessary). The IP Remote Controller is described simply as "Remote Controller" in this User's Guide. Installation Manual (printed matter) The supplied Installation Manual describes the names and functions of parts and controls of the camera, connection examples, and how to set up - Sony SRG300SE | User Manual (SRG-300SE User's Guide) - Page 6
Overview System Configuration This camera has various system configuration capabilities using optional products. This section describes three typical system examples with the required components and the main usage of each system. Operating the Camera Via a Network What you can do with this system - Sony SRG300SE | User Manual (SRG-300SE User's Guide) - Page 7
Overview Memory 2 GB or more Display 1600 × 1200 pixels or higher * In case of Windows 8 or Windows 8.1, use the Internet Explorer desktop user interface (desktop UI) edition. Operating a Camera Using the Remote Controller What you can do with this system To perform pan/tilt and zoom operations - Sony SRG300SE | User Manual (SRG-300SE User's Guide) - Page 8
Overview Operating Multiple Cameras Using the Remote Controller What you can do with this system • You can operate up to 7 cameras with daisy chain connection using the remote controller (not supplied). System Configuration Camera HD video monitor, VTR, etc. Camera Camera Video switcher Remote - Sony SRG300SE | User Manual (SRG-300SE User's Guide) - Page 9
SNC toolbox. For details about how to use SNC toolbox, refer to the application guide. After this step, do not use SNC toolbox to change the network settings of SSL connection. Tip SNC toolbox stands for Sony Network Camera toolbox. 9 Precautions for Preventing Access to the Camera by an - Sony SRG300SE | User Manual (SRG-300SE User's Guide) - Page 10
camera. For settings, see "Assigning the IP address" in the Installation Manual. The default setting of the camera is DHCP in the factory setting the Internet Explorer - Security Warning message appears. Click Yes or Install and install ActiveX Control. You can use all the functions of the viewer - Sony SRG300SE | User Manual (SRG-300SE User's Guide) - Page 11
Operating the Camera Via a Network • When you install ActiveX Control, you should be logged in to the computer as Administrator. Tip Every page of this software is optimized for Internet Explorer in Medium - Sony SRG300SE | User Manual (SRG-300SE User's Guide) - Page 12
Operating the Camera This section explains the functions of the parts and controls of the live viewer. For a detailed explanation on each part or control, see the specified pages. Live viewer using ActiveX viewer Main menu ActiveX viewer control panel section You can drag the panels to the monitor - Sony SRG300SE | User Manual (SRG-300SE User's Guide) - Page 13
on the zoom position. This is a phenomenon related to the structure of the camera, and does not cause a problem. Focus control This function is displayed when Focus mode is set to Manual in the PTZF control menu (page 41). To focus on a nearby object, click . To focus on a distant object - Sony SRG300SE | User Manual (SRG-300SE User's Guide) - Page 14
acceleration Check the checkbox if there are problems in video playback. Note The settings of is C C:\Users\\AppData\Roaming\Sony\ SNCActiveXViewer\SNCActiveXViewer_configuratio n.ini Plug-in free viewer set the image size, frame rate, PTZ operation mode and image codec. Streaming start - Sony SRG300SE | User Manual (SRG-300SE User's Guide) - Page 15
using the monitor screen": Area zoom, Vector dragging, and PTZ control bar. The available functions for the camera operation modes of the camera, and does not cause a problem. Focus control This function is displayed when Focus mode is set to Manual in the PTZF control menu (page 41). - Sony SRG300SE | User Manual (SRG-300SE User's Guide) - Page 16
image: Area zoom mode and Vector dragging mode using a mouse, and PTZ control bar clicking a control bar. • Area zoom mode By clicking an the camera. Using pan/tilt/zoom operations with the displayed control bar (PTZ control bar) Panning, tilting and zooming by specifying the area (Area zoom - Sony SRG300SE | User Manual (SRG-300SE User's Guide) - Page 17
main drive is C C:\Users\\AppData\Roaming\Sony\ SNCActiveXViewer\SNCActiveXViewer_configurati on.ini Operating the Camera Via a Network If a router that does not correspond to a multicast or firewall is installed between the camera and the computer, video/audio may not play back properly - Sony SRG300SE | User Manual (SRG-300SE User's Guide) - Page 18
menus of this unit will clearly display only the setting options that you can currently select. Grayed out options cannot be selected. Only supported functions are displayed. Basic Operations of the Administrator Menu You can use the Administrator menu to set all functions to suit the user's needs - Sony SRG300SE | User Manual (SRG-300SE User's Guide) - Page 19
. Use this menu to perform the principal settings of the software. The System menu consists of the following tabs: Information, Date & time, Installation, Initialize, System log and Access log. Information Tab Model Name The model name of the camera is displayed. Serial number The serial number of - Sony SRG300SE | User Manual (SRG-300SE User's Guide) - Page 20
Set the time difference from Greenwich Mean Time in the area where the camera is installed. Select the time zone in the area where the camera is installed from the drop-down list. Manual time zone If you select Manual in Time zone, you can set a desired time zone that is not included in - Sony SRG300SE | User Manual (SRG-300SE User's Guide) - Page 21
while pressing the reset button on the camera. For details, refer to the supplied Installation Manual. Backup setting data Saves the setting data of the camera in a file. Click Backup setting data, and follow the instructions on the Web browser to specify the folder and save the setting data of the - Sony SRG300SE | User Manual (SRG-300SE User's Guide) - Page 22
is recorded in this log. It includes data that is useful if a problem occurs. Click Reload to reload the latest data. Access log Tab The access automatically, and you can select the iris. Manual: Adjust the gain, iris and shutter speed manually. Bright: Adjust the brightness level (combined with - Sony SRG300SE | User Manual (SRG-300SE User's Guide) - Page 23
function can be selected only when Mode is set to Shutter priority, Manual. Iris Select the amount of iris (F value) from the list box. 56, the adjusted result of white balance is not output to the SDI output. Manual: When this option is selected, R gain and B gain become active. Selectable gain - Sony SRG300SE | User Manual (SRG-300SE User's Guide) - Page 24
Setting the Camera Via a Network Noise reduction You can enjoy clearer images by removing unnecessary noise (fixed pattern and randomized noise). You can select Off (MIN) or 5 levels from 1 to 5 (MAX) for noise reduction. Aperture Set the sharpness. Select high values to make the image edges - Sony SRG300SE | User Manual (SRG-300SE User's Guide) - Page 25
, set Image size1 in the Video codec tab of the Video menu to the maximum rate. • Deselect the checkbox of Image stabilizer in the Installation tab of the System menu. After setting superimpose, set the Image stabilizer function again. Preview screen Preview the image, and adjust the superimposed - Sony SRG300SE | User Manual (SRG-300SE User's Guide) - Page 26
may switch to Night mode even when in bright surroundings. In this case, set the gain limit value to be high. Manual Switch the day/night ICR mode manually. When you select Manual and the checkbox of the Night mode is selected, the camera works in night mode. Otherwise, the camera works in - Sony SRG300SE | User Manual (SRG-300SE User's Guide) - Page 27
Setting the Camera Audio - Audio Menu When you click Audio in the Administrator menu, the Audio menu appears. Use this menu to set the audio functions of the camera. The Audio menu consists of the Audio tab. Audio Tab Input selection Select microphone input or line input. Mic volume When the Audio - Sony SRG300SE | User Manual (SRG-300SE User's Guide) - Page 28
When you select Obtain an IP address automatically (DHCP), make sure that a DHCP server is operating on the network. To specify the IP address manually Deselect Obtain an IP address automatically (DHCP). Type the address in the IP address, Subnet mask and Default gateway boxes. Host name and Domain - Sony SRG300SE | User Manual (SRG-300SE User's Guide) - Page 29
can be assigned. This function is not available in a multi-prefix environment. The transmission may not work properly. To specify the IPv6 address manually Deselect Obtain IP address automatically. Type the address in the IP address, Prefix length and Default gateway boxes. IP address Type the IP - Sony SRG300SE | User Manual (SRG-300SE User's Guide) - Page 30
Setting the Camera Via a Network IPv4 QoS Enable Select the checkbox to configure the QoS setting for IPv4. Rule Used to register, edit and delete QoS. No. Select the number to use when registering on the QoS table. When you select a registered number, the registered QoS information is displayed. - Sony SRG300SE | User Manual (SRG-300SE User's Guide) - Page 31
Setting the Camera Via a Network Setting the Security - Security Menu When you click Security in the Administrator menu, the Security menu appears. The Security menu consists of the User, Access limit, SSL, 802.1X and Referer check tabs. Administrator and User This camera identifies those who log - Sony SRG300SE | User Manual (SRG-300SE User's Guide) - Page 32
Setting the Camera Via a Network Light: In addition to the View mode, the user can select the image size of the live viewer, select codec and capture a still image. View: The user can only monitor the camera image. Viewer authentication Set whether the user is authenticated or not when the viewer - Sony SRG300SE | User Manual (SRG-300SE User's Guide) - Page 33
date and time are not correctly set, it may cause browser connection problems. • Reload the window when you change the SSL setting. Press the switch on the camera to initialize. For details, refer to the supplied Installation Manual. Note SSL connection will load the camera down; therefore, not all - Sony SRG300SE | User Manual (SRG-300SE User's Guide) - Page 34
installation mode of the certificate. Use an external certificate: Uses the certificate including private key information issued by a CA. The PKCS#12 and PEM formats are supported security, we recommend using this mode only when there is no problem even if perfect security is not saved. Notes • When - Sony SRG300SE | User Manual (SRG-300SE User's Guide) - Page 35
When using the client authentication, the personal certificate must be successfully installed on the PC to use it. If this preparation cannot be from trusted CAs can be imported to the camera. Only PEM format is supported. To import the CA certificate 1 Click Browse... to select the CA certificate - Sony SRG300SE | User Manual (SRG-300SE User's Guide) - Page 36
Setting the Camera Via a Network 1 Save in the PC the certificate of CA which has signed the certificate to be installed in the camera. The extension of the certificate file is normally ".cer". Double-click this file. The following Certificate dialog appears. 3 Click Next. 4 Select Automatically - Sony SRG300SE | User Manual (SRG-300SE User's Guide) - Page 37
will be removed. There may be a case that a certificate cannot be removed by the steps above due to the type of certificate. Check the installation condition and remove it following the steps below. Note You need to log in as Administrator to perform these steps. 1 Open Run... of the Windows - Sony SRG300SE | User Manual (SRG-300SE User's Guide) - Page 38
and other elements. For details on these settings, refer to the manual of the corresponding equipment. Supplicant A supplicant is a device that Normally a CA is located inside an authentication server. Note This camera supports EAP mode in which the supplicant and the server authenticate using the - Sony SRG300SE | User Manual (SRG-300SE User's Guide) - Page 39
. This will cancel other changes made to the settings. EAP method You can select the authentication method used with the authentication server. This device supports TLS and PEAP. TLS: By this method, the supplicant and the server authenticate each other using a certificate. This enables secure port - Sony SRG300SE | User Manual (SRG-300SE User's Guide) - Page 40
certificate or route certificate) to the camera. Up to four certificates from trusted CAs can be imported to the camera. Only the PEM format is supported. To import the CA certificate Click Browse... to select the CA certificate to be imported. Click the OK button appearing on the dialog, and the - Sony SRG300SE | User Manual (SRG-300SE User's Guide) - Page 41
"PAN TILT ZOOM Menu" on page 55. PTZ mode Set the pan/tilt control mode using the mode. Auto: The focus is automatically adjusted. Manual: The focus can be adjusted by using the Set the Eflip function setting in accordance with the installation condition of the camera and select the value. Setting - Sony SRG300SE | User Manual (SRG-300SE User's Guide) - Page 42
image, click Browse.... Note A thumbnail cannot be registered with the operation using the remote controller. When switching the Eflip function On/Off in the Installation tab of System menu, all preset settings are deleted. OK/Cancel See "Buttons common to every menu" on page 18. Serial Tab Set the - Sony SRG300SE | User Manual (SRG-300SE User's Guide) - Page 43
Note The communication speed setting should be the same between the connected camera with the VISCA RS-422 connector and the remote controller. The connection is not recognized. After changing the communication speed, turn on the power of the remote controller, and prepare the operation. For details - Sony SRG300SE | User Manual (SRG-300SE User's Guide) - Page 44
Setting the Camera Via a Network Video port number 1, 2, 3 Specify the transmission port number of the H.264 video data. The default setting is 50000, 52000 or 54000. Specify an even number from 1024 to 65534. Two port numbers (the number specified here and an odd number with 1 added to the - Sony SRG300SE | User Manual (SRG-300SE User's Guide) - Page 45
Setting the Camera Via a Network RTSP multicast audio port number Specify the audio transmission port number used for RTSP multicast streaming. The default setting is 59000. Specify an even number from 1024 to 65534. Two port numbers (the number specified here and an odd number with 1 added to the - Sony SRG300SE | User Manual (SRG-300SE User's Guide) - Page 46
a Network" on page 10. Before operating, check that the camera, the remote controller, and peripheral devices are properly installed and connected. For details, see "Installation Manual" and "System Configuration" on page 6. Notes • The connection of the camera and the remote controller is available - Sony SRG300SE | User Manual (SRG-300SE User's Guide) - Page 47
is up to 7. Pan/Tilt and Zoom Operation Panning and Tilting PAN-TILT RESET VALUE - + R BRIGHT JOYSTICK LOCK KNOB MODE - + B FOCUS AUTO AUTO MANUAL POSITION RESET PRESET SHIFT GROUP SELECT POWER NEAR FAR ONE PUSH AF GROUP BLACK PAN-TILT ONE PUSH LIGHT RESET AWB MENU GROUP - Sony SRG300SE | User Manual (SRG-300SE User's Guide) - Page 48
switch on the remote controller. For details, see the Operating Instructions of the remote controller. Note This setting only changes the signal FOCUS Focusing on a far subject NEAR FAR One-push auto focusing during manual focus adjustment Press the ONE PUSH AF button. The camera focuses on the - Sony SRG300SE | User Manual (SRG-300SE User's Guide) - Page 49
positions other than POSITION 1 to 16 via a Network. Storing Camera Settings RESET 4 1 VALUE - + R BRIGHT JOYSTICK LOCK KNOB MODE - + B FOCUS AUTO AUTO MANUAL POSITION RESET PRESET SHIFT GROUP SELECT POWER NEAR FAR ONE PUSH AF GROUP BLACK PAN-TILT ONE PUSH LIGHT RESET AWB MENU - Sony SRG300SE | User Manual (SRG-300SE User's Guide) - Page 50
POSITION. • When you store the position, zooming, and focusing, etc. of the camera, make sure to install and secure the camera on the place to be used properly. If you change the installations of the camera after storing the settings, the differences may occur in the settings. • You can also set - Sony SRG300SE | User Manual (SRG-300SE User's Guide) - Page 51
. Setting Menu The setting menu selected on the main menu is displayed. 1 MENU VALUE - + R BRIGHT JOYSTICK LOCK KNOB MODE - + B FOCUS AUTO AUTO MANUAL POSITION RESET PRESET SHIFT GROUP SELECT POWER NEAR ONE PUSH FAR AF GROUP BLACK PAN-TILT ONE PUSH LIGHT RESET AWB MENU GROUP - Sony SRG300SE | User Manual (SRG-300SE User's Guide) - Page 52
4 Set value The currently set values are displayed. To change a set value, incline the joystick of the remote controller to the right or left. For the default value of each setting item, see "Menu Configuration" on page 60. To cancel the menu When the main menu is displayed, press the MENU button - Sony SRG300SE | User Manual (SRG-300SE User's Guide) - Page 53
is adjusted automatically using the sensitivity and electronic shutter speed. Adjust the iris (IRIS) manually. MANUAL (manual): Adjust the sensitivity (GAIN), electronic shutter speed (SPEED) and iris (IRIS) manually. When you select one from among the various exposure modes, some of the following - Sony SRG300SE | User Manual (SRG-300SE User's Guide) - Page 54
also set via a Web browser. See "Picture" on page 23 or "Installation Tab" on page 20. Setting with the Remote Controller MODE (white balance DOOR (indoor), OUT DOOR (outdoor), ONE PUSH (one push), ATW, MANUAL (manual) When you select MANUAL, R.GAIN (R gain) and B.GAIN (B gain) appear. You can - Sony SRG300SE | User Manual (SRG-300SE User's Guide) - Page 55
may not be effective. • When the image stabilizer function is enabled, the subject appears closer. • The image stabilizer may not be effective in an installation environment where high frequency vibration is present. In this case, set the image stabilizer function to OFF. PAN TILT ZOOM Menu The PAN - Sony SRG300SE | User Manual (SRG-300SE User's Guide) - Page 56
Setting the range of the RIGHT/LEFT movement (Eflip: OFF) CENTER (0°) -170° +170° SYSTEM Menu Setting the range of the UP/DOWN movement (Eflip: OFF) (Eflip: ON) +90° 0° -20° +20° 0° -90° Note When you turn the camera to the right or left beyond the 100° with the camera pointed downward by - Sony SRG300SE | User Manual (SRG-300SE User's Guide) - Page 57
Setting with the Remote Controller STATUS Menu The STATUS menu is used to display the settings selected with the menus. The STATUS menu consists of PAGE1 to PAGE4. This menu only displays the current menu settings, and you cannot change them with this menu. PAGE1: Shows the settings selected with - Sony SRG300SE | User Manual (SRG-300SE User's Guide) - Page 58
Others Message List The following messages and indications may appear on this camera. Perform the following as necessary. POWER indicator lit NETWORK indicator Lights green Unlit Camera status Operating normally Not connected to the network POWER indicator flashing NETWORK indicator Camera - Sony SRG300SE | User Manual (SRG-300SE User's Guide) - Page 59
Before bringing in your camera for service, check the following as a guide to troubleshooting the problem. If the problem cannot be corrected, consult your Sony dealer. Symptom Cause Remedy The power of the camera is not The AC power adaptor is not connected to the Insert the power - Sony SRG300SE | User Manual (SRG-300SE User's Guide) - Page 60
Menu Configuration The displayed menus on the external monitor that is connected to the SDI output of the camera are configured as described below. For more details, refer to the pages in parentheses. The initial settings of each item are in bold. (page 53) 60 Menu Configuration Others - Sony SRG300SE | User Manual (SRG-300SE User's Guide) - Page 61
Others (page 54) (page 54) (page 55) (page 56) (page 57) 61 Menu Configuration - Sony SRG300SE | User Manual (SRG-300SE User's Guide) - Page 62
stored in the memory of the camera. Items that can be preset Items stored to presets Pan/Tilt Position Zoom Position Focus Mode Auto/Manual Focus Position Backlight Compensation ON/OFF Exposure mode WDR (View-DR) Auto slow shutter Bright level Shutter speed Iris Gain Exposure compensation Exposure - Sony SRG300SE | User Manual (SRG-300SE User's Guide) - Page 63
3G-SDI 3G-SDI (SMPTE 424M) is the SDI interface that can transfer in broadband. It can transfer signals with one BNC cable which supports 1080p/59.94,1080p/50 signals due to 3 Gbps transmission capacity. ActiveX Control A component program object that can be used with web pages or other application - Sony SRG300SE | User Manual (SRG-300SE User's Guide) - Page 64
Network address The portion that identifies the local network (subnet) in an IP address. Network bandwidth Bit rate that can be used for networking. NTP server Acronym for Network Time Protocol server. Network time server that transmits time information used in the networks. Primary DNS server One - Sony SRG300SE | User Manual (SRG-300SE User's Guide) - Page 65
21 Information panel 12 Information Tab 19 Initialize Tab 21 Input selection 27 Installation Tab 20 Internet Explorer 11 IP address 63 I-picture interval 24 IPv4 12 M MAC address 63 Main menu 12, 51 Manual time zone 20 Maximum bit rate limit 25 Menu configuration 60 Message list 58 - Sony SRG300SE | User Manual (SRG-300SE User's Guide) - Page 66
Primary DNS server 64 Private key password 39 Proxy server 64 PTZ control bar 15 PTZ mode 41 PTZF control Menu 41 PTZF control Tab 41 42 Time setting 20 Time zone 20 Transmission Mode 17 Transparent 26 Troubleshooting 59 Type 26 U UDP 64 Unicast 17, 64 Unicast streaming 43 - Sony SRG300SE | User Manual (SRG-300SE User's Guide) - Page 67
Sony Corporation
-
 1
1 -
 2
2 -
 3
3 -
 4
4 -
 5
5 -
 6
6 -
 7
7 -
8
-
9
-
10
-
11
-
12
-
13
-
14
-
15
-
16
-
17
-
18
-
19
-
20
-
21
-
22
-
23
-
24
-
25
-
26
-
27
-
28
-
29
-
30
-
31
-
32
-
33
-
34
-
35
-
36
-
37
-
38
-
39
-
40
-
41
-
42
-
43
-
44
-
45
-
46
-
47
-
48
-
49
-
50
-
51
-
52
-
53
-
54
-
55
-
56
-
57
-
58
-
59
-
60
-
61
-
62
-
63
-
64
-
65
-
66
-
67
 |
 |

HD Color
Video Camera
User’s Guide
Software Version 1.0
Before operating the unit, please read this manual thoroughly
and retain it for future reference.
SRG-300SE/301SE
C-055-100-
11
(1)
© 2014 Sony Corporation