Sony SRG300SE User Manual (SRG-300SE User's Guide) - Page 25
Superimpose Tab, OK/Cancel, Preview screen, Image, Position
 |
View all Sony SRG300SE manuals
Add to My Manuals
Save this manual to your list of manuals |
Page 25 highlights
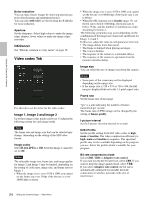
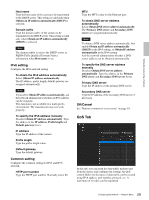
Setting the Camera Via a Network Notes • The frame rate or bit rate that is actually transmitted may be different from the set values depending on image size, scene, network environment. • The Adaptive rate control cannot operate when the Plug-in free viewer is being used. • If you want to use the Adaptive rate control, set the connection method in the live viewer to Unicast. If you set TCP as a connection method, the adaptive rate control will be disabled. For details, see "Operating the Camera Via a Network" - "Switching Transmission Mode" on page 17. Min, Max Set the maximum and minimum bit rates that are adjusted with the adaptive rate mode when Bit rate compression mode is set to Adaptive rate control. Bit rate When you set Image codec to H.264 and set Bit rate compression mode to CBR, the bit rate of the image transmission for a line can be set. When the bit rate is set to a high level, a high image quality can be enjoyed. Image quality If you set Image codec to JPEG, or Bit rate compression mode to VBR when Image codec is set to H.264, the image quality setting will be enabled. Selectable values are from 1 to 10. When 10 is selected, the best image quality is achieved. Selectable values are changed depending on the setting. Maximum bit rate limit Enable the check box when Bit rate compression mode is set to VBR, to set the maximum value of the bit rate. Max: Set the maximum value of the bit rate when the camera is operated with VBR. Accept frame skip: If you enable the checkbox, the frame skip will be allowed for bit rate control. Bandwidth control Limits the network bandwidth for the JPEG image data output from the camera when you set Image codec to JPEG. Note Audio may be interrupted depending on the selected bandwidth. In this case, select a wider bandwidth. This function is not available when the setting is set to 0. OK/Cancel See "Buttons common to every menu" on page 18. Superimpose Tab Select whether or not to superimpose the custom string and the character of date & time on the image. Three custom strings and one logo (still image) can be superimposed simultaneously. Notes • For setting the superimposing, set Image size1 in the Video codec tab of the Video menu to the maximum rate. • Deselect the checkbox of Image stabilizer in the Installation tab of the System menu. After setting superimpose, set the Image stabilizer function again. Preview screen Preview the image, and adjust the superimposed image. You can move the position of superimposed image displayed on the preview screen by drag and drop. Image Select the video codec mode to set for the superimposed image. The setting for the superimposed image is available if you select the checkbox next to the list box. For details about the video codec mode, see the Video codec tab in the Video menu. Position Select the number of the display position or logo, on the preview screen. When Logo is selected, the logo file setting is displayed. Note Permissible logo file specifications; File format: PNG8 with alpha channel Image size: 160 × 120 or smaller Width (pixels): multiples of 16 You can cancel the logo files in the Initialize tab. When display position number 1, 2 or 3 is selected, the following setting menus appear. 25 Setting the Camera Image - Video Menu
-
 1
1 -
2
-
3
-
4
-
5
-
6
-
7
-
8
-
9
-
10
-
11
-
12
-
13
-
14
-
15
-
16
-
17
-
18
-
19
-
 20
20 -
 21
21 -
 22
22 -
 23
23 -
 24
24 -
 25
25 -
 26
26 -
 27
27 -
 28
28 -
 29
29 -
 30
30 -
31
-
32
-
33
-
34
-
35
-
36
-
37
-
38
-
39
-
40
-
41
-
42
-
43
-
44
-
45
-
46
-
47
-
48
-
49
-
50
-
51
-
52
-
53
-
54
-
55
-
56
-
57
-
58
-
59
-
60
-
61
-
62
-
63
-
64
-
65
-
66
-
67
 |
 |
