Sony SRG300SE User Manual (SRG-300SE User's Guide) - Page 18
Setting the Camera Via a Network, Basic Operations of the Administrator Menu
 |
View all Sony SRG300SE manuals
Add to My Manuals
Save this manual to your list of manuals |
Page 18 highlights
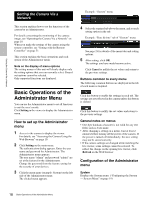
Setting the Camera Via a Network Setting the Camera Via a Network This section explains how to set the functions of the camera by an Administrator. For details concerning the monitoring of the camera image, see "Operating the Camera Via a Network" on page 10. When you make the settings of the camera using the remote controller, see "Setting with the Remote Controller" on page 51. This section explains the basic operations and each option of the Administrator menu. Note on the display of menu options The setting menus of this unit will clearly display only the setting options that you can currently select. Grayed out options cannot be selected. Only supported functions are displayed. Basic Operations of the Administrator Menu You can use the Administrator menu to set all functions to suit the user's needs. Click Setting in the viewer to display the Administrator menu. How to set up the Administrator menu 1 Access to the camera to display the viewer. For details, see "Accessing the Camera Using the Web Browser" on page 10. 2 Click Setting on the main menu. The authentication dialog appears. Enter the user name and password for Administrator. The Administrator menu appears. The user name "admin" and password "admin" are set at the factory for the Administrator. Change the password from the factory setting for the security of your devices. 3 Click the menu name (example: System) on the left side of the Administrator menu. The clicked menu appears. Example: "System" menu 4 Select the required tab above the menu, and set each setting option in the tab. Example: "Date & time" tab of "System" menu See page 19 for details of the menu tabs and setting options. 5 After setting, click OK. The settings you have made become active. Click Cancel to nullify the set values and return to the previous settings. Buttons common to every menu The following common buttons are displayed in the tab of each menu as required. Click this button to enable the settings in each tab. The settings are not reflected in the camera unless this button is clicked. Click this button to nullify the set values and return to the previous settings. General notes on menus • One-byte katakana character is not valid for any text field, such as User name. • After changing a setting on a menu, wait at least 2 minutes before turning off the power of the camera. If the power is turned off immediately, the new setting may not be stored correctly. • If the camera settings are changed while watching the live viewer, some settings cannot be restored. To reflect the change on the opening live viewer, click Refresh on the Web browser. Configuration of the Administrator menu System Displays the System menu. ("Configuring the System - System Menu" on page 19) 18 Basic Operations of the Administrator Menu
-
 1
1 -
2
-
3
-
4
-
5
-
6
-
7
-
8
-
9
-
10
-
11
-
12
-
 13
13 -
 14
14 -
 15
15 -
 16
16 -
 17
17 -
 18
18 -
 19
19 -
 20
20 -
 21
21 -
 22
22 -
 23
23 -
24
-
25
-
26
-
27
-
28
-
29
-
30
-
31
-
32
-
33
-
34
-
35
-
36
-
37
-
38
-
39
-
40
-
41
-
42
-
43
-
44
-
45
-
46
-
47
-
48
-
49
-
50
-
51
-
52
-
53
-
54
-
55
-
56
-
57
-
58
-
59
-
60
-
61
-
62
-
63
-
64
-
65
-
66
-
67
 |
 |
