Sony SRG300SE User Manual (SRG-300SE User's Guide) - Page 27
Setting the Camera Audio - Audio Menu, Audio Tab, Audio Menu
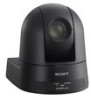 |
View all Sony SRG300SE manuals
Add to My Manuals
Save this manual to your list of manuals |
Page 27 highlights
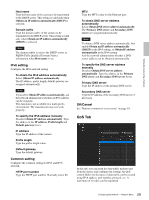
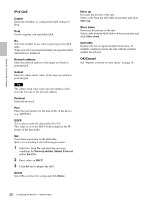
Setting the Camera Audio - Audio Menu When you click Audio in the Administrator menu, the Audio menu appears. Use this menu to set the audio functions of the camera. The Audio menu consists of the Audio tab. Audio Tab Input selection Select microphone input or line input. Mic volume When the Audio in is set to microphone input, set the volume level of the audio input from the microphone input connector. It is adjustable from -10 to +10. Audio codec Select the codec type for sending audio. The bit rate may differ, depending on the codec type. OK/Cancel See "Buttons common to every menu" on page 18. Setting the Camera Via a Network Send Notes • No audio is output to the SDI connector. • No audio is output if the Plug-in free viewer is used. Enable Select the checkbox if you want to send audio from the camera. Note When you check the Enable, click Refresh on the Web browser to reflect the change on the opening live viewer page. Setting Make settings for sending audio. Auto gain control Controls the audio input level to a suitable volume level automatically. Equalizer Uses to change the frequency response of audio in accordance with its use environment. Off: Disable the equalizer setting. Low cut: Reduces the noise from air conditioners and a projector, etc., and cuts low-frequency. Voice enhancement: Enhances the voice clearly, cutting low- and high-frequency. 27 Setting the Camera Audio - Audio Menu
-
 1
1 -
2
-
3
-
4
-
5
-
6
-
7
-
8
-
9
-
10
-
11
-
12
-
13
-
14
-
15
-
16
-
17
-
18
-
19
-
20
-
21
-
 22
22 -
 23
23 -
 24
24 -
 25
25 -
 26
26 -
 27
27 -
 28
28 -
 29
29 -
 30
30 -
 31
31 -
 32
32 -
33
-
34
-
35
-
36
-
37
-
38
-
39
-
40
-
41
-
42
-
43
-
44
-
45
-
46
-
47
-
48
-
49
-
50
-
51
-
52
-
53
-
54
-
55
-
56
-
57
-
58
-
59
-
60
-
61
-
62
-
63
-
64
-
65
-
66
-
67
 |
 |
