Sony VGC-RB45G VAIO User Guide (Large File - 12.11 MB) - Page 101
Transcoding/editing video content
 |
View all Sony VGC-RB45G manuals
Add to My Manuals
Save this manual to your list of manuals |
Page 101 highlights
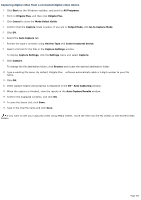
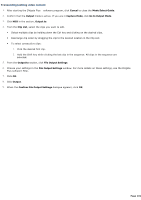
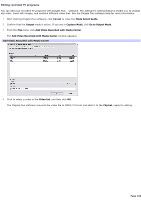
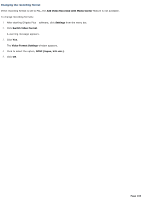
Transcoding/editing video content 1. After starting the DVgate Plus software program, click Cancel to close the Mode Select Guide. 2. Confirm that the Output mode is active. If you are in Capture Mode, click Go to Output Mode. 3. Click HDD in the section, Output to. 4. From the Clip List, select the clips you want to edit. Select multiple clips by holding down the Ctrl key and clicking on the desired clips. Rearrange clip order by dragging the clip to the desired location in the Clip List. To select consecutive clips: 1. Click the desired first clip. 2. Hold the Shift key while clicking the last clip in the sequence. All clips in the sequence are selected. 5. From the Output to section, click File Output Settings. 6. Choose your settings in the File Output Settings window. For more details on these settings, see the DVgate Plus software Help. 7. Click OK. 8. Click Output. 9. When the Confirm File Output Settings dialogue appears, click OK. Page 101
-
 1
1 -
2
-
3
-
4
-
5
-
6
-
7
-
8
-
9
-
10
-
11
-
12
-
13
-
14
-
15
-
16
-
17
-
18
-
19
-
20
-
21
-
22
-
23
-
24
-
25
-
26
-
27
-
28
-
29
-
30
-
31
-
32
-
33
-
34
-
35
-
36
-
37
-
38
-
39
-
40
-
41
-
42
-
43
-
44
-
45
-
46
-
47
-
48
-
49
-
50
-
51
-
52
-
53
-
54
-
55
-
56
-
57
-
58
-
59
-
60
-
61
-
62
-
63
-
64
-
65
-
66
-
67
-
68
-
69
-
70
-
71
-
72
-
73
-
74
-
75
-
76
-
77
-
78
-
79
-
80
-
81
-
82
-
83
-
84
-
85
-
86
-
87
-
88
-
89
-
90
-
91
-
92
-
93
-
94
-
95
-
 96
96 -
 97
97 -
 98
98 -
 99
99 -
 100
100 -
 101
101 -
 102
102 -
 103
103 -
 104
104 -
 105
105 -
 106
106 -
107
-
108
-
109
-
110
-
111
-
112
-
113
-
114
-
115
-
116
-
117
-
118
-
119
-
120
-
121
-
122
-
123
-
124
-
125
-
126
-
127
-
128
-
129
-
130
-
131
-
132
-
133
-
134
-
135
-
136
-
137
-
138
-
139
-
140
-
141
-
142
-
143
-
144
-
145
-
146
-
147
-
148
-
149
-
150
-
151
-
152
-
153
-
154
-
155
-
156
-
157
-
158
-
159
-
160
-
161
-
162
-
163
-
164
-
165
-
166
-
167
-
168
-
169
-
170
-
171
-
172
-
173
-
174
-
175
-
176
-
177
-
178
-
179
-
180
-
181
-
182
-
183
-
184
-
185
-
186
-
187
-
188
-
189
-
190
-
191
-
192
-
193
-
194
-
195
-
196
-
197
-
198
-
199
-
200
-
201
-
202
-
203
-
204
-
205
-
206
-
207
-
208
-
209
-
210
-
211
-
212
-
213
-
214
-
215
-
216
-
217
-
218
-
219
-
220
-
221
-
222
-
223
-
224
-
225
-
226
-
227
-
228
-
229
-
230
-
231
-
232
-
233
-
234
-
235
-
236
-
237
-
238
-
239
-
240
-
241
-
242
-
243
 |
 |