Sony VGC-RB45G VAIO User Guide (Large File - 12.11 MB) - Page 178
Setting Up a Client Computer, Enjoying Music, Photos, and Video on Other VAIO computers
 |
View all Sony VGC-RB45G manuals
Add to My Manuals
Save this manual to your list of manuals |
Page 178 highlights
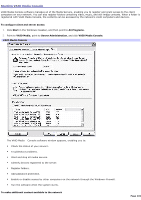
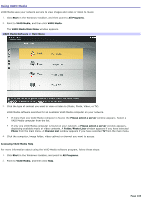
Setting Up a Client Computer From the server, copy and distribute the VAIO Media installer file to the client computers. To copy and distribute the installer file 1. Click Start on the Windows® taskbar, and point to All Programs. 2. Point to VAIO Media, and click Install VAIO Media to other VAIO PCs. The Enjoying Music, Photos, and Video on Other VAIO computers window appears. 3. Click Get Installer. A file download message box appears. 4. Click Save. 5. Save the file, VM31Inst.exe, to a blank storage media, such as a CD-R, CD-RW or Memory Stick® media, to transfer and set up the installer program on each client computer. The VM31Inst.exe file is 23 MB in size. Verify your storage media's data capacity before attempting to save the program. To register a client computer Your server computer must be turned on during client registration to enable the registration of each client computer. You can register only one client at a time. If more than one client computer is actively seeking registration, the server computer recognizes all registration requests1. You must restart the registration process for each client. Begin the client computer registration process after you have installed the VM31Inst.exe file to the client. 1. Save the installer program to the client computer, and then double-click to open and install it. Follow the on-screen installation instructions. 2. Restart the client computer after installing the file. VAIO Media software appears in the Start menu. 3. Click Start on the Windows® taskbar, and point to All Programs. 4. Point to VAIO Media, and then click Register to VAIO Servers. 5. Follow the on-screen instructions to complete the VAIO Media Registration wizard. 6. On the server computer, follow these steps: 1. From the Start menu, point to All Programs, and then point to VAIO Media. 2. From the VAIO Media submenu, point to Server Administration, and click to open VAIO Media Console. The VAIO Media Console window appears. 3. From the Access Control Settings tab, select the check box, Access this computer from other devices connected to the network. 4. Select the option, Restrict access this computer to manually-registered devices [Recommended]. This option only allows registered computers access to the server. To allow VAIO® computers access to the server, select the option, Allow all connectable devices to access this computer. 5. Click Register. The VAIO Media Registration wizard appears. Page 178
-
 1
1 -
2
-
3
-
4
-
5
-
6
-
7
-
8
-
9
-
10
-
11
-
12
-
13
-
14
-
15
-
16
-
17
-
18
-
19
-
20
-
21
-
22
-
23
-
24
-
25
-
26
-
27
-
28
-
29
-
30
-
31
-
32
-
33
-
34
-
35
-
36
-
37
-
38
-
39
-
40
-
41
-
42
-
43
-
44
-
45
-
46
-
47
-
48
-
49
-
50
-
51
-
52
-
53
-
54
-
55
-
56
-
57
-
58
-
59
-
60
-
61
-
62
-
63
-
64
-
65
-
66
-
67
-
68
-
69
-
70
-
71
-
72
-
73
-
74
-
75
-
76
-
77
-
78
-
79
-
80
-
81
-
82
-
83
-
84
-
85
-
86
-
87
-
88
-
89
-
90
-
91
-
92
-
93
-
94
-
95
-
96
-
97
-
98
-
99
-
100
-
101
-
102
-
103
-
104
-
105
-
106
-
107
-
108
-
109
-
110
-
111
-
112
-
113
-
114
-
115
-
116
-
117
-
118
-
119
-
120
-
121
-
122
-
123
-
124
-
125
-
126
-
127
-
128
-
129
-
130
-
131
-
132
-
133
-
134
-
135
-
136
-
137
-
138
-
139
-
140
-
141
-
142
-
143
-
144
-
145
-
146
-
147
-
148
-
149
-
150
-
151
-
152
-
153
-
154
-
155
-
156
-
157
-
158
-
159
-
160
-
161
-
162
-
163
-
164
-
165
-
166
-
167
-
168
-
169
-
170
-
171
-
172
-
 173
173 -
 174
174 -
 175
175 -
 176
176 -
 177
177 -
 178
178 -
 179
179 -
 180
180 -
 181
181 -
 182
182 -
 183
183 -
184
-
185
-
186
-
187
-
188
-
189
-
190
-
191
-
192
-
193
-
194
-
195
-
196
-
197
-
198
-
199
-
200
-
201
-
202
-
203
-
204
-
205
-
206
-
207
-
208
-
209
-
210
-
211
-
212
-
213
-
214
-
215
-
216
-
217
-
218
-
219
-
220
-
221
-
222
-
223
-
224
-
225
-
226
-
227
-
228
-
229
-
230
-
231
-
232
-
233
-
234
-
235
-
236
-
237
-
238
-
239
-
240
-
241
-
242
-
243
 |
 |