TP-Link 13dBi CPE510 V1 UG - Page 14
Quick Setup Guide, Wireless AP Settings, Security, PSK Password, Distance Setting, Finish
 |
View all TP-Link 13dBi manuals
Add to My Manuals
Save this manual to your list of manuals |
Page 14 highlights
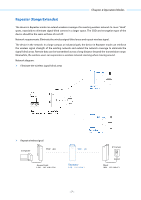
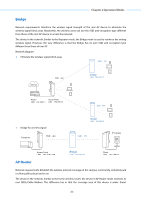
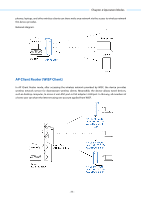
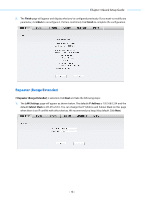
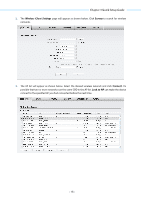
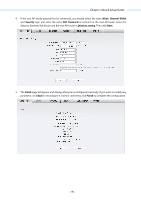
Chapter 3 Quick Setup Guide 2. The Wireless AP Settings page will appear as shown below. Create an easy-to-remember name for your wireless network. Select WPA-PSK/WPA2-PSK in the Security box and enter the PSK Password below to prevent unauthorized access to your AP. Enter the distance between this device and the furthest client in Distance Setting. Then click Next. 3. The Finish page will appear and display what you've configured previously. If you want to modify any parameter, click Back to reconfigure it. If all are confirmed, click Finish to complete the configuration. - 11 -
-
 1
1 -
2
-
3
-
4
-
5
-
6
-
7
-
8
-
 9
9 -
 10
10 -
 11
11 -
 12
12 -
 13
13 -
 14
14 -
 15
15 -
 16
16 -
 17
17 -
 18
18 -
 19
19 -
20
-
21
-
22
-
23
-
24
-
25
-
26
-
27
-
28
-
29
-
30
-
31
-
32
-
33
-
34
-
35
-
36
-
37
-
38
-
39
-
40
-
41
-
42
-
43
-
44
-
45
-
46
-
47
-
48
-
49
-
50
-
51
-
52
-
53
-
54
-
55
-
56
-
57
-
58
-
59
-
60
-
61
-
62
-
63
-
64
-
65
-
66
-
67
-
68
-
69
-
70
-
71
-
72
-
73
-
74
-
75
-
76
-
77
-
78
-
79
-
80
-
81
-
82
-
83
-
84
-
85
-
86
-
87
-
88
-
89
-
90
-
91
-
92
-
93
-
94
-
95
 |
 |

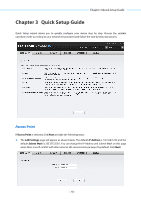
Chapter 3 Quick Setup Guide
2.
The
Wireless AP Settings
page will appear as shown below. Create an easy-to-remember name for
your wireless network. Select
WPA-PSK/WPA2-PSK
in the
Security
box and enter the
PSK Password
below to prevent unauthorized access to your AP. Enter the distance between this device and the
furthest client in
Distance Setting
. Then click
Next
.
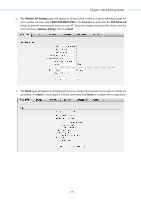
3.
The
Finish
page will appear and display what you’ve configured previously. If you want to modify any
parameter, click
Back
to reconfigure it. If all are confirmed, click
Finish
to complete the configuration.
- 11 -