TRENDnet TPL-410AP User's Guide - Page 24
Change your access point IP address, Network Settings, LAN Interface Setup, Dynamic IP, Static IP
 |
View all TRENDnet TPL-410AP manuals
Add to My Manuals
Save this manual to your list of manuals |
Page 24 highlights
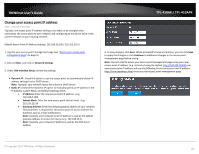
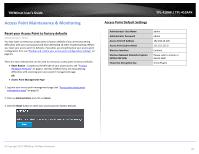
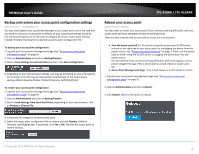
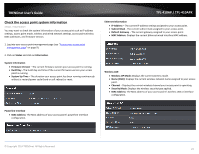
TRENDnet User's Guide Change your access point IP address Main > Network Settings Typically, the access point IP address settings only needs to be changed when connecting the access point to your network and configuring to the device to be in the same IP network as your existing network. Default Access Point IP Address Settings: 192.168.10.100 / 255.255.255.0 1. Log into your access point management page (see "Access your access point management page" on page 9). 2. Click on Main, and click on Network Settings. 3. Under LAN Interface Setup, review the settings. • Dynamic IP : Check this option to set the access point to automatically obtain IP address settings from a DHCP server . Note: Typically, your network router has a built-in DHCP server. • Static IP: Uncheck the Dynamic IP option to manually specify an IP address in the IP Address, Subnet Mask, and Default Gateway fields. • IP Address: Enter the new access point IP address. (e.g. 192.168.0.100) • Subnet Mask: Enter the new access point subnet mask. (e.g. 255.255.255.0) • Gateway Address: Enter the default gateway address of your network. This parameter is required for the access point to access Internet for functions such as e-mail notifications. Note: Typically, your network router IP address is used as the default gateway address to access the Internet e.g. 192.168.10.1) Note: Typically, your network IP address is used as the DNS server address. TPL-410AP / TPL-410APK 4. To save changes, click Save. When prompted to Save or Continue, you can click Save to apply the changes or click Continue to additional changes in the access point management page before saving. Note: You will need to access your access point management page using your new access point IP address. (e.g. Instead of using the default http://192.168.10.100 your new access point IP address will use the following format using your new IP address http://(new.ipaddress.here) to access your access point management page. © Copyright 2014 TRENDnet. All Rights Reserved. 22
-
 1
1 -
2
-
3
-
4
-
5
-
6
-
7
-
8
-
9
-
10
-
11
-
12
-
13
-
14
-
15
-
16
-
17
-
18
-
 19
19 -
 20
20 -
 21
21 -
 22
22 -
 23
23 -
 24
24 -
 25
25 -
 26
26 -
 27
27 -
 28
28 -
 29
29 -
30
-
31
-
32
-
33
-
34
-
35
-
36
-
37
-
38
-
39
-
40
-
41
-
42
-
43
-
44
-
45
-
46
-
47
-
48
-
49
-
50
-
51
-
52
-
53
-
54
-
55
-
56
-
57
-
58
-
59
-
60
-
61
-
62
-
63
-
64
-
65
 |
 |
