TRENDnet TPL-410AP User's Guide - Page 25
Set up the DHCP server on your access point, DHCP Server, Save Settings, Enable
 |
View all TRENDnet TPL-410AP manuals
Add to My Manuals
Save this manual to your list of manuals |
Page 25 highlights
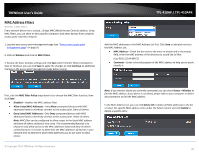
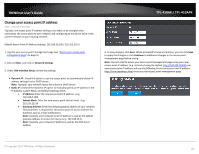
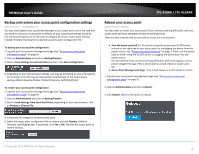
TRENDnet User's Guide Set up the DHCP server on your access point Main > DHCP Server Your access point can be used as a DHCP (Dynamic Host Configuration Protocol) server to automatically assign an IP address to each computer or device on your network. The DHCP server is disabled by default on your access point. In most cases your network router has a built-in DHCP server that is typically enabled and used as your network DHCP server. If you already have a DHCP server on your network, leave this settings disabled. 1. Log into your access point management page (see "Access your access point management page" on page 9). 2. Click on Main, and click on DHCP Server. 3. Review the DHCP Server settings. Click Save Settings to save settings. • Enable: Check to enable or uncheck to disable the DHCP server. • IP Pool Starting Address - Enter the starting IP address for the DHCP server range. (e.g.192.168.10.200) • Pool Size - Enter the maximum number of address the DHCP server is able to distribute. (e.g. 50, the DHCP server will issue 192.168.10.200-250 ) Note: The Start IP and End IP specify the range of IP addresses to automatically assign to computers or devices on your network. • Release Time - Enter the DHCP lease time in seconds. Note: The DHCP lease time is the amount of time a computer or device can keep an IP address assigned by the DHCP server. When the lease time expires, the computer or device will renew the IP address lease with the DHCP server, otherwise, if there is no attempt to renew the lease, the DHCP server will reallocate the IP address to be assigned to another computer or device. TPL-410AP / TPL-410APK 4. To save changes, click Save. When prompted to Save or Continue, you can click Save to apply the changes or click Continue to additional changes in the access point management page before saving. © Copyright 2014 TRENDnet. All Rights Reserved. 23
-
 1
1 -
2
-
3
-
4
-
5
-
6
-
7
-
8
-
9
-
10
-
11
-
12
-
13
-
14
-
15
-
16
-
17
-
18
-
19
-
 20
20 -
 21
21 -
 22
22 -
 23
23 -
 24
24 -
 25
25 -
 26
26 -
 27
27 -
 28
28 -
 29
29 -
 30
30 -
31
-
32
-
33
-
34
-
35
-
36
-
37
-
38
-
39
-
40
-
41
-
42
-
43
-
44
-
45
-
46
-
47
-
48
-
49
-
50
-
51
-
52
-
53
-
54
-
55
-
56
-
57
-
58
-
59
-
60
-
61
-
62
-
63
-
64
-
65
 |
 |
