TRENDnet TV-IP743SIC User's Guide - Page 13
Setup Your Camera with WPS Button, Mount your camera on the wall, WPS Wi-Fi Protected Setup
 |
View all TRENDnet TV-IP743SIC manuals
Add to My Manuals
Save this manual to your list of manuals |
Page 13 highlights
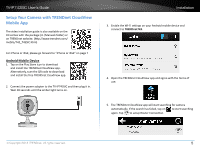
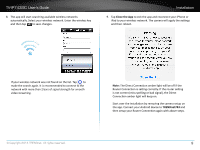
TV-IP743SIC User's Guide Setup Your Camera with WPS Button WPS (Wi-Fi Protected Setup) WPS is a simple way to setup your camera. Simply press the buttons and wait for connection setup. Enable your WPS pairing on your router by pushing and holding WPS physical button or through web administration. WPS light will indicate the WPS pairing is ongoing. Within the pairing period (usually 2 minutes), press and hold TV-IP743SIC's push button (about 4 seconds) until the top WPS light starts blinking in green. Wait for pairing process patiently. If the WPS pairing setup successful, the camera will reboot (you can see the blue boot up light, it will take about 30 seconds for system boot up) and then the System Status light will be solid light in green. It means your Router Connection is setup correctly and the camera is ready for access. If the WPS LED blinks quickly and then turned off, that means the WPS pairing session is closed. No successful WPS pairing was done. You can try the WPS pairing again or try other ways to setup your camera. * If the System Status light keeps in blue and never turned green, your camera is disconnected on both connections. Use a paper clip to push and hold reset button for 6 seconds until the LED turns blue. Then, start your camera settings again. Installation Mount your camera on the wall After camera installation, you can install your camera permanently and securely. Following instructions are installation with the wall mount bracket. The TV-IP743SIC comes with a wall mount bracket and two installation screws. Position your bracket. Mark the screw position. Use 1/2 or 7/16 drill to drill holes (about an inch in depth for brick walls). Then simple put on your TV-IP743SIC. © Copyright 2014 TRENDnet. All rights reserved. 10
-
 1
1 -
2
-
3
-
4
-
5
-
6
-
7
-
 8
8 -
 9
9 -
 10
10 -
 11
11 -
 12
12 -
 13
13 -
 14
14 -
 15
15 -
 16
16 -
 17
17 -
 18
18 -
19
-
20
-
21
-
22
-
23
-
24
-
25
-
26
-
27
-
28
-
29
-
30
-
31
-
32
-
33
-
34
-
35
-
36
-
37
-
38
-
39
-
40
-
41
-
42
-
43
-
44
-
45
-
46
-
47
-
48
-
49
-
50
-
51
-
52
-
53
-
54
-
55
-
56
-
57
-
58
-
59
 |
 |
