Toshiba Tecra M2-S410 Instruction Manual - Page 77
Using the USB floppy disk drive, Connecting 3 1/2\, Connecting 3 1/2 floppy disk drive
 |
View all Toshiba Tecra M2-S410 manuals
Add to My Manuals
Save this manual to your list of manuals |
Page 77 highlights
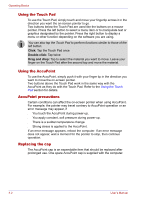
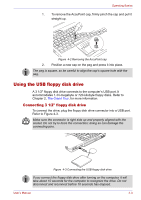
Operating Basics 1. To remove the AccuPoint cap, firmly pinch the cap and pull it straight up. Figure 4-2 Removing the AccuPoint cap 2. Position a new cap on the peg and press it into place. The peg is square, so be careful to align the cap's square hole with the peg. Using the USB floppy disk drive A 3 1/2" floppy disk drive connects to the computer's USB port. It accommodates 1.44-megabyte or 720-kilobyte floppy disks. Refer to Chapter 2, The Grand Tour, for more information. Connecting 3 1/2" floppy disk drive To connect the drive, plug the floppy disk drive connector into a USB port. Refer to Figure 4-3. Make sure the connector is right side up and properly aligned with the socket. Do not try to force the connection; doing so can damage the connecting pins. Figure 4-3 Connecting the USB floppy disk drive If you connect the floppy disk drive after turning on the computer, it will take about 10 seconds for the computer to recognize the drive. Do not disconnect and reconnect before 10 seconds has elapsed. User's Manual 4-3
-
 1
1 -
2
-
3
-
4
-
5
-
6
-
7
-
8
-
9
-
10
-
11
-
12
-
13
-
14
-
15
-
16
-
17
-
18
-
19
-
20
-
21
-
22
-
23
-
24
-
25
-
26
-
27
-
28
-
29
-
30
-
31
-
32
-
33
-
34
-
35
-
36
-
37
-
38
-
39
-
40
-
41
-
42
-
43
-
44
-
45
-
46
-
47
-
48
-
49
-
50
-
51
-
52
-
53
-
54
-
55
-
56
-
57
-
58
-
59
-
60
-
61
-
62
-
63
-
64
-
65
-
66
-
67
-
68
-
69
-
70
-
71
-
 72
72 -
 73
73 -
 74
74 -
 75
75 -
 76
76 -
 77
77 -
 78
78 -
 79
79 -
 80
80 -
 81
81 -
 82
82 -
83
-
84
-
85
-
86
-
87
-
88
-
89
-
90
-
91
-
92
-
93
-
94
-
95
-
96
-
97
-
98
-
99
-
100
-
101
-
102
-
103
-
104
-
105
-
106
-
107
-
108
-
109
-
110
-
111
-
112
-
113
-
114
-
115
-
116
-
117
-
118
-
119
-
120
-
121
-
122
-
123
-
124
-
125
-
126
-
127
-
128
-
129
-
130
-
131
-
132
-
133
-
134
-
135
-
136
-
137
-
138
-
139
-
140
-
141
-
142
-
143
-
144
-
145
-
146
-
147
-
148
-
149
-
150
-
151
-
152
-
153
-
154
-
155
-
156
-
157
-
158
-
159
-
160
-
161
-
162
-
163
-
164
-
165
-
166
-
167
-
168
-
169
-
170
-
171
-
172
-
173
-
174
-
175
-
176
-
177
-
178
-
179
-
180
-
181
-
182
-
183
-
184
-
185
-
186
-
187
-
188
-
189
-
190
-
191
-
192
-
193
-
194
-
195
-
196
-
197
-
198
-
199
-
200
-
201
-
202
-
203
-
204
-
205
-
206
-
207
-
208
-
209
-
210
-
211
-
212
-
213
-
214
-
215
-
216
-
217
-
218
-
219
-
220
-
221
-
222
-
223
-
224
-
225
-
226
-
227
-
228
-
229
-
230
-
231
-
232
-
233
-
234
-
235
-
236
-
237
-
238
-
239
-
240
-
241
-
242
-
243
-
244
-
245
-
246
 |
 |
