Toshiba Tecra M2-S410 Instruction Manual - Page 80
Using optical media drives, Loading discs
 |
View all Toshiba Tecra M2-S410 manuals
Add to My Manuals
Save this manual to your list of manuals |
Page 80 highlights
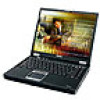
Operating Basics Using optical media drives The text and illustrations in this section refer primarily to the optional DVDROM drive. However, operation is the same for other optical drive in the Slim Select Bay. The full-size drive provides high-performance execution of CD/DVD-ROM-based programs. You can run either 12 cm (4.72") or 8 cm (3.15") CD/DVDs without an adaptor. An ATAPI interface controller is used for CD/DVD-ROM operation. When the computer is accessing a CD/DVDROM, an indicator on the drive glows and the Slim Select Bay indicator glows. Use the WinDVD 4 application to view DVD-Video discs. If you have a CD-RW/DVD-ROM drive, refer also to the Writing CDs on CD-RW/DVD-ROM drive section for precautions on writing to CDs. If you have a DVD Multi drive, refer also to the Writing CD/DVDs on DVD Multi drive section for precautions on writing to CDs. If you have a DVD±R/±RW drive, refer also to the Writing CD/DVDs on DVD±R/±RW drive (DVD Dual drive) section for precautions on writing to CDs. Loading discs To load CD/DVDs, follow the steps below and refer to figures 4-6 to 4-10. 1. a. When the power is on, press the DVD-ROM eject button to open the drawer slightly. Eject Button Figure 4-6 Pressing the DVD-ROM eject button 4-6 User's Manual
-
 1
1 -
2
-
3
-
4
-
5
-
6
-
7
-
8
-
9
-
10
-
11
-
12
-
13
-
14
-
15
-
16
-
17
-
18
-
19
-
20
-
21
-
22
-
23
-
24
-
25
-
26
-
27
-
28
-
29
-
30
-
31
-
32
-
33
-
34
-
35
-
36
-
37
-
38
-
39
-
40
-
41
-
42
-
43
-
44
-
45
-
46
-
47
-
48
-
49
-
50
-
51
-
52
-
53
-
54
-
55
-
56
-
57
-
58
-
59
-
60
-
61
-
62
-
63
-
64
-
65
-
66
-
67
-
68
-
69
-
70
-
71
-
72
-
73
-
74
-
 75
75 -
 76
76 -
 77
77 -
 78
78 -
 79
79 -
 80
80 -
 81
81 -
 82
82 -
 83
83 -
 84
84 -
 85
85 -
86
-
87
-
88
-
89
-
90
-
91
-
92
-
93
-
94
-
95
-
96
-
97
-
98
-
99
-
100
-
101
-
102
-
103
-
104
-
105
-
106
-
107
-
108
-
109
-
110
-
111
-
112
-
113
-
114
-
115
-
116
-
117
-
118
-
119
-
120
-
121
-
122
-
123
-
124
-
125
-
126
-
127
-
128
-
129
-
130
-
131
-
132
-
133
-
134
-
135
-
136
-
137
-
138
-
139
-
140
-
141
-
142
-
143
-
144
-
145
-
146
-
147
-
148
-
149
-
150
-
151
-
152
-
153
-
154
-
155
-
156
-
157
-
158
-
159
-
160
-
161
-
162
-
163
-
164
-
165
-
166
-
167
-
168
-
169
-
170
-
171
-
172
-
173
-
174
-
175
-
176
-
177
-
178
-
179
-
180
-
181
-
182
-
183
-
184
-
185
-
186
-
187
-
188
-
189
-
190
-
191
-
192
-
193
-
194
-
195
-
196
-
197
-
198
-
199
-
200
-
201
-
202
-
203
-
204
-
205
-
206
-
207
-
208
-
209
-
210
-
211
-
212
-
213
-
214
-
215
-
216
-
217
-
218
-
219
-
220
-
221
-
222
-
223
-
224
-
225
-
226
-
227
-
228
-
229
-
230
-
231
-
232
-
233
-
234
-
235
-
236
-
237
-
238
-
239
-
240
-
241
-
242
-
243
-
244
-
245
-
246
 |
 |