Troy-Bilt Horse Tiller Technical Manual - Page 26
Eccentric, Shaft, Assembly
 |
View all Troy-Bilt Horse Tiller manuals
Add to My Manuals
Save this manual to your list of manuals |
Page 26 highlights
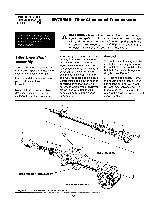
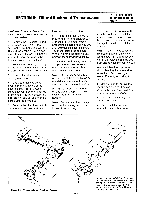
PTO HORSE MODEL TECHNICAL MANUAL Page 5-10 4/90 SECTION 5: PTO Power Unit Transmission check for burrs or rough edges either on the key or in the keyway. • Make sure there are no burrs or rough edges in the bore opening of the slow speed gear (9). • Using a spray lubricant, lubricate the clutch where the shaft and pins will fit. 2. Insert the three clutch guide pins (11) into the clutch. If a guide pin binds, discard it and use a new one. 3. Assemble the fast gear, clutch, and slow gear; the gear hubs face out. 4. Insert a piece of wood between the eccentric lever (12) and the housing to relieve the pressure of the eccentric shaft (15) on the clutch as you are installing it. 5. Gently place the gear and clutch assembly into the housing so that the eccentric pin (16) fits into the groove on the clutch. Make sure the smaller (fast speed) gear is on the right side. 6. Look through the wheel shaft opening and line up the keyways on the fast speed gear and clutch. 7. Insert the wheel shaft through the right side and slip it through the gears and clutch. 8. Remove the piece of wood from the eccentric lever and check to make sure the eccentric shaft can move freely from side to side. 9. Using #30 weight oil, lubricate the bronze bushings (8, 13). 10. Making sure the oil pick-up grooves are facing in, use a hammer to insert a bronze bushing (8 or 13) about 1/8 of the way in the housing. 11. Using a rubber hammer and driver, and making sure the oil pick-up grooves are facing in, install the other bronze bushing (8 or 13) so that the edge of the bushing is flush with the edge of the counterbore in the transmission housing. Then finish installing the other bushing in a similar manner. 12. Use a rubber hammer to strike down on the wheel shaft on both sides of the housing. This will loosen the shaft and make it easy to turn. 13. On the left or right side (it doesn't matter which side), insert a .062" wheel shaft shim (3, 7) and then install a snap ring (2, 6). Gently tap this end of the shaft inward so that the snap ring is flush against the bushing. Note: The snap ring has two sides: a flat side and a rounded side. Make sure the flat side is against the outside edge of the groove. 14. Go to the other side of the housing and shim (3, 7) the gap between the bushing and the snap ring groove. 15. Install the snap ring (6) after you shim the wheel shaft. 16. Using a rubber hammer, tap down on both ends of the wheel shaft. Then check for end play. There should be between .005" and .015" play in the shaft. Add or remove shims as needed. 17. Turn the wheel shaft with your hand; it should spin freely. Also, there should be no vertical or diagonal play. Vertical or diagonal play indicates a worn bronze bushing. 18. Apply a layer of nonhardening gasket sealer to the outside edges of the two oil seals (1) and install them at each end of the wheel shaft. Each seal should be flush with the edge of the transmission housing. Eccentric Shaft Assembly These instructions describe how to service the eccentric shaft assembly. Before you can remove the eccentric shaft you must first remove the wheel shaft. See the wheel shaft removal instructions in this section. Use Figure 5-8 as a reference for part locations in these instructions. Removal 1. Remove the wheel speed shifting pin (1) from the eccentric shaft. 2. Turn the housing upside down. Use a 5/32-inch drift to remove the spirol roll pin (2) that retains the eccentric lever (4) to the eccentric shaft (3). 3. From the outside of the housing, tap the eccentric shaft (3) inward until you remove the eccentric lever (4). 4. Continue tapping the eccentric shaft inward until the shaft drops into the housing. 5. Remove the spring (6) and washer (7) from the shaft. 6. Remove and discard the eccentric shaft oil seal (5). You can use a small screwdriver to pry it out. Inspection If the seal area on the eccentric shaft is excessively worn or scored, discard the eccentric shaft. Minor scoring can be removed with an emery cloth. Installation Use Figure 5-8 as a reference for part locations in these instructions. 1. Put the eccentric shaft spring (6) and washer (7) on the eccentric shaft (3). 2. Insert the eccentric shaft assembly into the PTO power unit
-
 1
1 -
2
-
3
-
4
-
5
-
6
-
7
-
8
-
9
-
10
-
11
-
12
-
13
-
14
-
15
-
16
-
17
-
18
-
19
-
20
-
 21
21 -
 22
22 -
 23
23 -
 24
24 -
 25
25 -
 26
26 -
 27
27 -
 28
28 -
 29
29 -
 30
30 -
 31
31 -
32
-
33
-
34
-
35
-
36
-
37
-
38
-
39
 |
 |
