Troy-Bilt Horse Tiller Technical Manual - Page 32
bearing
 |
View all Troy-Bilt Horse Tiller manuals
Add to My Manuals
Save this manual to your list of manuals |
Page 32 highlights
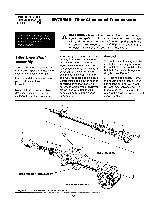
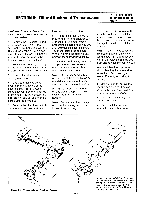
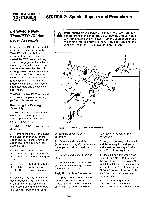
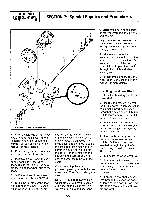
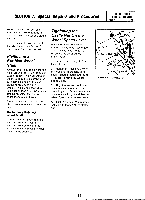
PTO HORSE MODEL TECHNICAL MANUAL Page 6-5 4/90 SECTION 6: Tiller Attachment Transmission b. Force the shaft down. This will dislodge one bearing (7). Also remove the washer (9), if so equipped. 10. Turn the shaft assembly 180 degrees and use the arbor press to dislodge the other bearing (and washer, if so equipped). 11. Slide the worm gear (10) off the shaft. 12. Remove the Woodruff key (11), if necessary. Inspection These instructions describe how to inspect parts on the tiller tine shaft. In addition to inspecting the parts you have removed, you should also inspect any replacement parts you will use. Note: Thoroughly degrease and clean all parts before inspection. Tiller Tine Shaft - The shaft should not be scored, pitted, or corroded in the areas where the oil seals are located. If the shaft is scored, pitted, or corroded, try using an emery cloth to clean the area. If the scoring, pitting, or corrosion is too extensive, discard the shaft. Also, remove any burrs or rough spots on the ends of the shaft. Bronze Worm Gear - If the gear teeth are damaged or excessively worn, discard the gear. Bearings - If the bearing has a bluish color then proper lubrication has not been maintained; discard the bearing and bearing cup. Also, if the bearing or its cup is scored or excessively worn, dirt may have gotten inside the housing. If so discard the bearing and bearing cup. Test each roller in the bearing by spinning it with your fingers. If a roller makes a growling noise or does not move at all, discard the bearing. Washers (on tillers so equipped) You will only be able to inspect the washers if you should need to disassemble the shaft. If a washer is warped, discard it. Installation 1. Install the Woodruff key (11) in the shaft. 2. Slide the bronze worm gear (10) on the shaft. The worm gear should be centered over the key. 3. Use an arbor press to replace a bearing (and washer, if so equipped). Make sure the washer is between the bearing and the bronze worm gear. Note: If an arbor press is not available, use the housing cover (without the oil seal installed) as a centering device. Simply support the cover on open vise jaws and place the bearing in the bearing cup (cup must be installed in cover). Add the washer (if so equipped) and tap the shaft down with a soft mallet. Repeat this procedure for the other end, making sure the bronze worm gear is centered over the key. 4. Turn the shaft 180 degrees and use an arbor press to replace the other bearing (and washer, if so equipped). Check to make sure the bronze worm gear is centered over the key. 5. Use an emery cloth to clean the tine shaft, especially around the oil seal locations. 6. Replace the bearing cup (8) in the housing cover (3) by using a piece of wood as a driver to seat the cup. Make sure the tapered bearing cup is oriented correctly to receive the bearing. Also make sure the bearing cup goes fully inside the cover; no metal should and the inside edge of the cover. 7. Use the same technique to replace the bearing cup (8) in the right side of the tiller housing. 8. If not already installed, install the tiller drive shaft assembly. See the installation instructions in this section. 9. Insert the tiller tine shaft assembly (5) in the tiller housing. Make sure the side on the bronze worm gear whose gear edges are the sharpest is facing towards the rear of the machine. Note: Since the front of each gear tooth gets little wear and the rear of each tooth gets most of the wear, rotate the gear so that the best side is facing the rear. 10. Install a new gasket (4) on the tiller housing cover (3). As you begin the shimming procedure, start with the thinnest gasket, which is .010". Do not install the oil seals (6) at this time. 11. Bolt the cover on using two bolts (1) about 180 degrees apart. Note: Even without the bolts installed, you should not be able to wiggle the cover from side to side or rotate it. Do not use the cover if you can. 12. Check the tine shaft for play: a. Using two hands, grasp the tiller tine shaft and rotate the shaft back and forth. b. You should be able to rotate the shaft slightly and to hear a small click. This means the tiller tine shaft is shimmed correctly. c. If you cannot rotate the shaft and do not hear a click, remove the .010" gasket and install a .030" gasket. If necessary, begin using gaskets in pairs to gradually increment the thickness of the gasket. For example, if a .030" gasket is insufficient, use a .030" and .010" gasket together. If these
-
 1
1 -
2
-
3
-
4
-
5
-
6
-
7
-
8
-
9
-
10
-
11
-
12
-
13
-
14
-
15
-
16
-
17
-
18
-
19
-
20
-
21
-
22
-
23
-
24
-
25
-
26
-
 27
27 -
 28
28 -
 29
29 -
 30
30 -
 31
31 -
 32
32 -
 33
33 -
 34
34 -
 35
35 -
 36
36 -
 37
37 -
38
-
39
 |
 |
