Troy-Bilt Horse Tiller Technical Manual - Page 27
workbench.
 |
View all Troy-Bilt Horse Tiller manuals
Add to My Manuals
Save this manual to your list of manuals |
Page 27 highlights
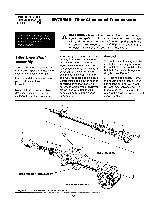
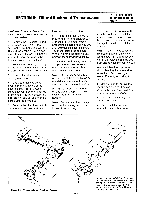
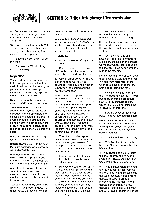
SECTION 5: PTO Power Unit Transmission PTO HORSE MODEL TECHNICAL MANUAL Page 5-11 4/90 1 6 7 1 + Figure 5-8: Eccentric Shaft Assembly. CA 54 4 2 housing. Make sure the shifting arm on the eccentric shaft is facing up, or at 12 o'clock, inside the housing. 3. Apply a layer of nonhardening gasket sealer to the eccentric shaft oil seal (5) and use a seal driver to install it flush with the transmission housing. 4. Start the spirol roll pin (2) in the eccentric lever (4) while the lever is still on the workbench. Then install the lever on the eccentric shaft. Make sure the lever is extended to the right side of the housing. 5. Install the wheel speed shifting pin (1) in the eccentric shaft.
-
 1
1 -
2
-
3
-
4
-
5
-
6
-
7
-
8
-
9
-
10
-
11
-
12
-
13
-
14
-
15
-
16
-
17
-
18
-
19
-
20
-
21
-
 22
22 -
 23
23 -
 24
24 -
 25
25 -
 26
26 -
 27
27 -
 28
28 -
 29
29 -
 30
30 -
 31
31 -
 32
32 -
33
-
34
-
35
-
36
-
37
-
38
-
39
 |
 |

SECTION
5:
PTO
Power
Unit
Transmission
PTO
HORSE
MODEL
TECHNICAL
MANUAL
Page
5-11
4/90
1
6
7
1
+
C
A
54
4
2
Figure
5-8:
Eccentric
Shaft
Assembly.
housing.
Make
sure
the
shifting
arm
on
the
eccentric
shaft
is
fac-
ing
up,
or
at
12
o'clock,
inside
the
housing.
3.
Apply
a
layer
of
non
-
hardening
gasket
sealer
to
the
eccentric
shaft
oil
seal
(5)
and
use
a
seal
driver
to
install
it
flush
with
the
transmission
housing.
4.
Start
the
spirol
roll
pin
(2)
in
the
eccentric
lever
(4)
while
the
lever
is
still
on
the
workbench.
Then
install
the
lever
on
the
eccentric
shaft.
Make
sure
the
lever
is
extended
to
the
right
side
of
the
housing.
5.
Install
the
wheel
speed
shifting
pin
(1)
in
the
eccentric
shaft.