WestBend 41087 Instruction Manual - Page 8
Measuring, Ingredients, Successful, Bread, Making
 |
View all WestBend 41087 manuals
Add to My Manuals
Save this manual to your list of manuals |
Page 8 highlights
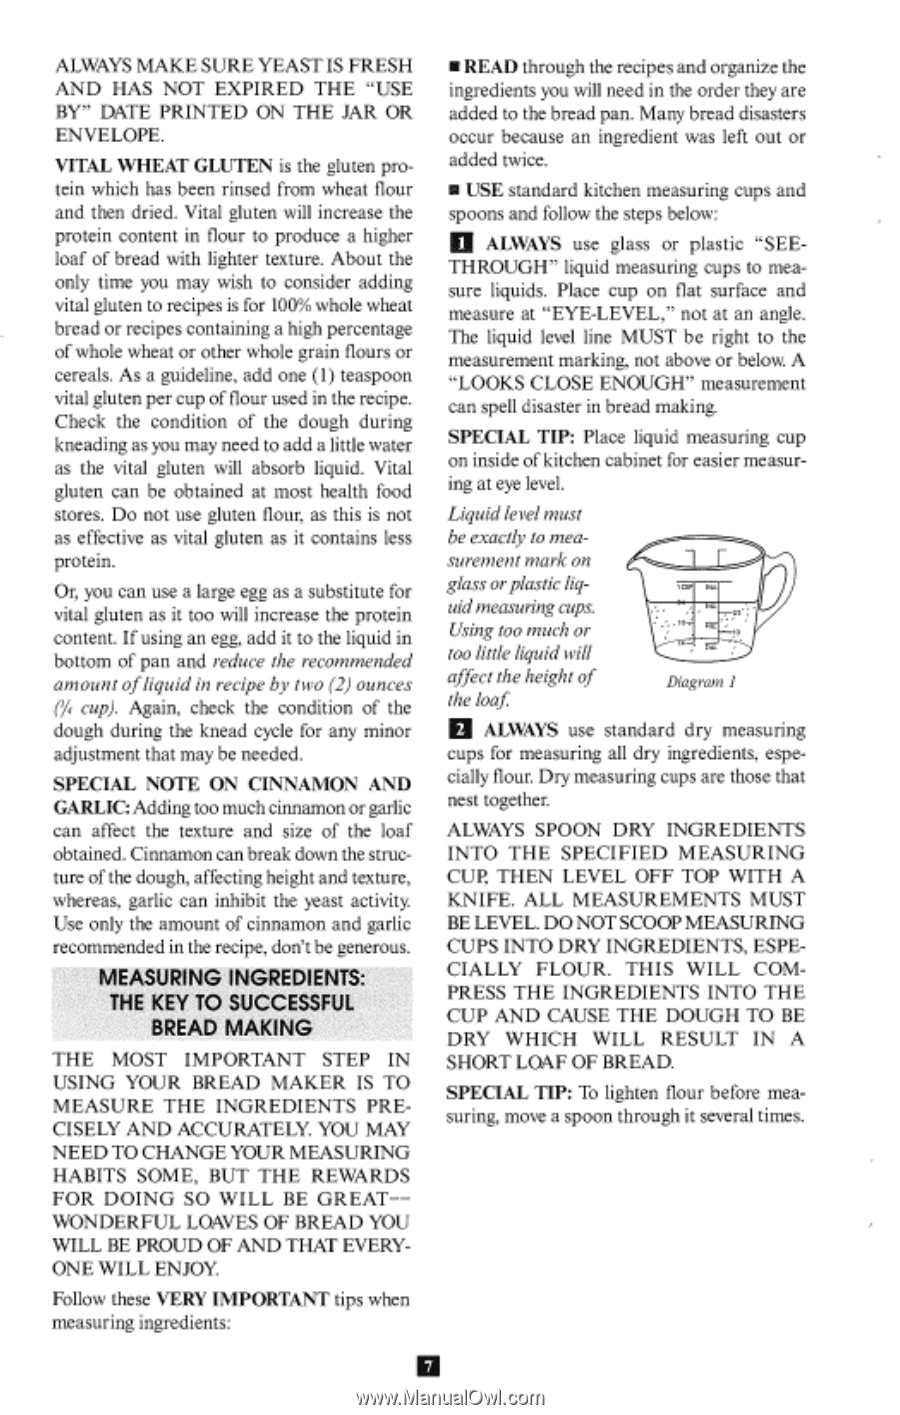
ALWAYS MAKE SURE YEAST IS FRESH AND HAS NOT EXPIRED THE "USE BY" DATE PRINTED ON THE JAR OR ENVELOPE. VITAL WHEAT GLUTEN is the gluten protein which has been rinsed from wheat flour and then dried. Vital gluten will increase the protein content in flour to produce a higher loaf of bread with lighter texture. About the only time you may wish to consider adding vital gluten to recipes is for 100% whole wheat bread or recipes containing a high percentage of whole wheat or other whole grain flours or cereals. As a guideline, add one (1) teaspoon vital gluten per cup of flour used in the recipe. Check the condition of the dough during kneading as you may need to add a little water as the vital gluten will absorb liquid. Vital gluten can be obtained at most health food stores. Do not use gluten flour, as this is not as effective as vital gluten as it contains less protein. Or, you can use a large egg as a substitute for vital gluten as it too will increase the protein content. If using an egg, add it to the liquid in bottom of pan and reduce the recommended amount of liquid in recipe by two (2) ounces (14/ cup). Again, check the condition of the dough during the knead cycle for any minor adjustment that may be needed. SPECIAL NOTE ON CINNAMON AND GARLIC: Adding too much cinnamon or garlic can affect the texture and size of the loaf obtained. Cinnamon can break down the structure of the dough, affecting height and texture, whereas, garlic can inhibit the yeast activity. Use only the amount of cinnamon and garlic recommended in the recipe, don't be generous. MEASURING INGREDIENTS: THE KEY TO SUCCESSFUL BREAD MAKING THE MOST IMPORTANT STEP IN USING YOUR BREAD MAKER IS TO MEASURE THE INGREDIENTS PRECISELY AND ACCURATELY. YOU MAY NEED TO CHANGE YOUR MEASURING HABITS SOME, BUT THE REWARDS FOR DOING SO WILL BE GREAT-WONDERFUL LOAVES OF BREAD YOU WILL BE PROUD OF AND THAT EVERYONE WILL ENJOY. Follow these VERY IMPORTANT tips when measuring ingredients: READ through the recipes and organize the ingredients you will need in the order they are added to the bread pan. Many bread disasters occur because an ingredient was left out or added twice. m USE standard kitchen measuring cups and spoons and follow the steps below: ALWAYS use glass or plastic "SEETHROUGH" liquid measuring cups to measure liquids. Place cup on flat surface and measure at "EYE-LEVEL," not at an angle. The liquid level line MUST be right to the measurement marking, not above or below. A "LOOKS CLOSE ENOUGH" measurement can spell disaster in bread making. SPECIAL TIP: Place liquid measuring cup on inside of kitchen cabinet for easier measuring at eye level. Liquid level must be exactly to measurement mark on glass or plastic liquid measuring cups. Using too much or too little liquid will affect the height of the loaf 1 CUP OE Diagram I ALWAYS use standard dry measuring cups for measuring all dry ingredients, especially flour. Dry measuring cups are those that nest together. ALWAYS SPOON DRY INGREDIENTS INTO THE SPECIFIED MEASURING CUP, THEN LEVEL OFF TOP WITH A KNIFE. ALL MEASUREMENTS MUST BE LEVEL. DO NOT SCOOP MEASURING CUPS INTO DRY INGREDIENTS, ESPECIALLY FLOUR. THIS WILL COMPRESS THE INGREDIENTS INTO THE CUP AND CAUSE THE DOUGH TO BE DRY WHICH WILL RESULT IN A SHORT LOAF OF BREAD. SPECIAL TIP: To lighten flour before measuring, move a spoon through it several times.
-
 1
1 -
2
-
 3
3 -
 4
4 -
 5
5 -
 6
6 -
 7
7 -
 8
8 -
 9
9 -
 10
10 -
 11
11 -
 12
12 -
 13
13 -
14
-
15
-
16
-
17
-
18
-
19
-
20
-
21
-
22
-
23
-
24
-
25
-
26
-
27
-
28
-
29
-
30
-
31
-
32
-
33
-
34
-
35
-
36
-
37
-
38
-
39
-
40
-
41
-
42
-
43
-
44
-
45
-
46
-
47
-
48
-
49
-
50
-
51
-
52
-
53
-
54
-
55
-
56
-
57
-
58
-
59
-
60
-
61
-
62
-
63
-
64
-
65
-
66
-
67
-
68
 |
 |