WestBend 41087 Instruction Manual - Page 9
Using, Bread, Mixes, Maker
 |
View all WestBend 41087 manuals
Add to My Manuals
Save this manual to your list of manuals |
Page 9 highlights
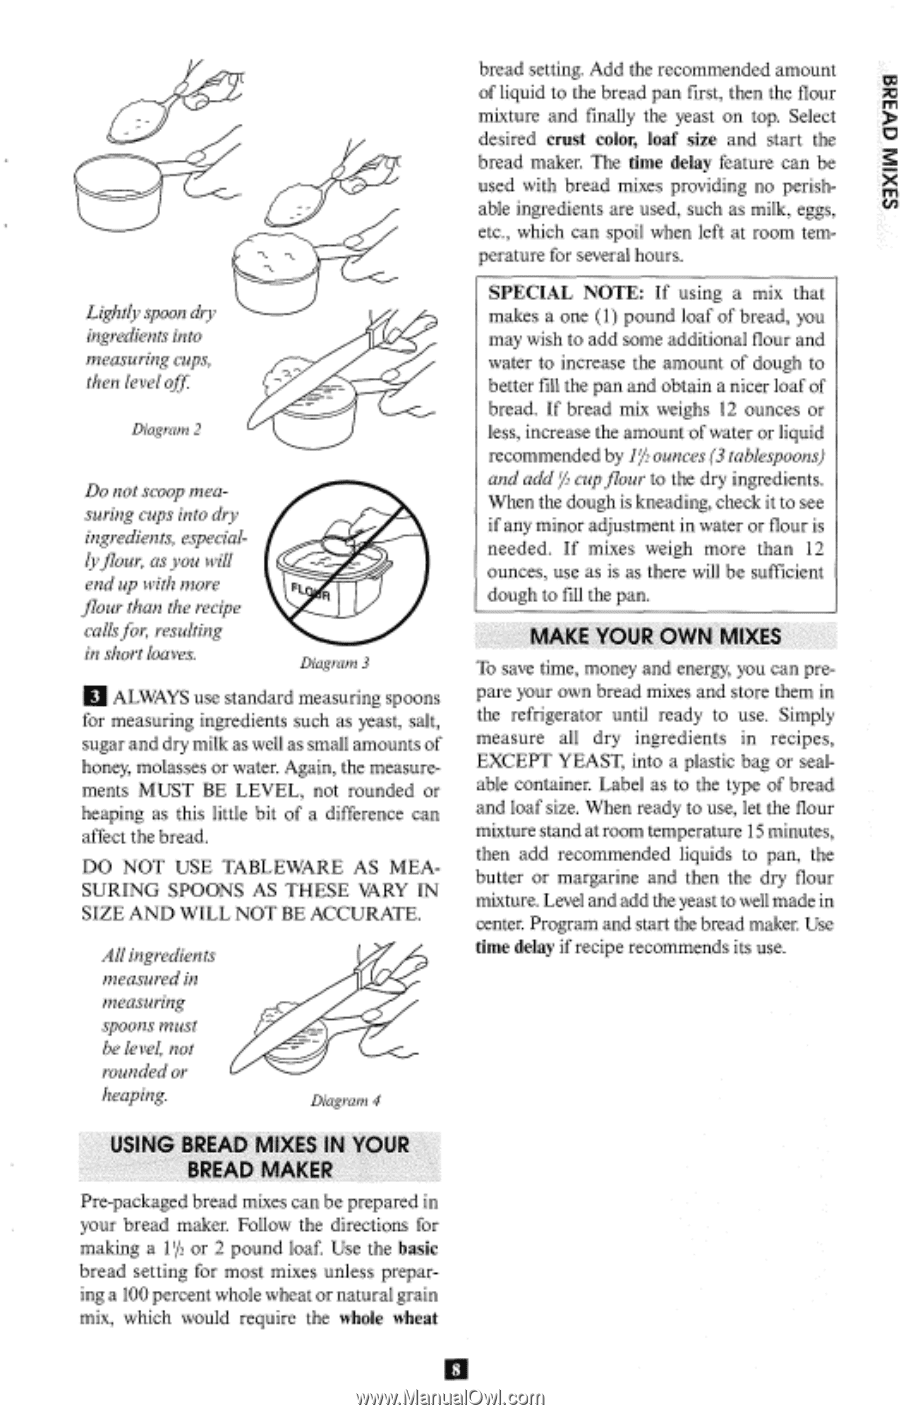
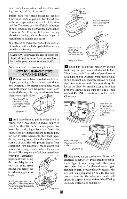
S3XIIAI CIV3219 Lightly spoon dry ingredients into measuring cups, then level off: Diagram 2 Do not scoop measuring cups into dry ingredients, especiallyflour, as you will end up with more flour than the recipe callsfor, resulting in short loaves. Diagram 3 n ALWAYS use standard measuring spoons for measuring ingredients such as yeast, salt, sugar and dry milk as well as small amounts of honey, molasses or water. Again, the measurements MUST BE LEVEL, not rounded or heaping as this little bit of a difference can affect the bread. DO NOT USE TABLEWARE AS MEASURING SPOONS AS THESE VARY IN SIZE AND WILL NOT BE ACCURATE. All ingredients measured in measuring spoons must be level, not rounded or heaping. Diagram 4 USING BREAD MIXES IN YOUR BREAD MAKER Pre-packaged bread mixes can be prepared in your bread maker. Follow the directions for making a 112/ or 2 pound loaf. Use the basic bread setting for most mixes unless preparing a 100 percent whole wheat or natural grain mix, which would require the whole wheat bread setting. Add the recommended amount of liquid to the bread pan first, then the flour mixture and finally the yeast on top. Select desired crust color, loaf size and start the bread maker. The time delay feature can be used with bread mixes providing no perishable ingredients are used, such as milk, eggs, etc., which can spoil when left at room temperature for several hours. SPECIAL NOTE: If using a mix that makes a one (1) pound loaf of bread, you may wish to add some additional flour and water to increase the amount of dough to better fill the pan and obtain a nicer loaf of bread. If bread mix weighs 12 ounces or less, increase the amount of water or liquid recommended by 1% ounces (3 tablespoons) and add %.? cup flour to the dry ingredients. When the dough is kneading, check it to see if any minor adjustment in water or flour is needed. If mixes weigh more than 12 ounces, use as is as there will be sufficient dough to fill the pan. MAKE YOUR OWN MIXES To save time, money and energy, you can prepare your own bread mixes and store them in the refrigerator until ready to use. Simply measure all dry ingredients in recipes, EXCEPT YEAST, into a plastic bag or sealable container. Label as to the type of bread and loaf size. When ready to use, let the flour mixture stand at room temperature 15 minutes, then add recommended liquids to pan, the butter or margarine and then the dry flour mixture. Level and add the yeast to well made in center. Program and start the bread maker. Use time delay if recipe recommends its use. 8
-
 1
1 -
2
-
3
-
 4
4 -
 5
5 -
 6
6 -
 7
7 -
 8
8 -
 9
9 -
 10
10 -
 11
11 -
 12
12 -
 13
13 -
 14
14 -
15
-
16
-
17
-
18
-
19
-
20
-
21
-
22
-
23
-
24
-
25
-
26
-
27
-
28
-
29
-
30
-
31
-
32
-
33
-
34
-
35
-
36
-
37
-
38
-
39
-
40
-
41
-
42
-
43
-
44
-
45
-
46
-
47
-
48
-
49
-
50
-
51
-
52
-
53
-
54
-
55
-
56
-
57
-
58
-
59
-
60
-
61
-
62
-
63
-
64
-
65
-
66
-
67
-
68
 |
 |