Yamaha PSR-3000 Owner's Manual - Page 105
Style Playback-related Settings, Setting the Split Point S and the Split Point L to different notes
 |
View all Yamaha PSR-3000 manuals
Add to My Manuals
Save this manual to your list of manuals |
Page 105 highlights
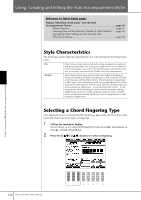
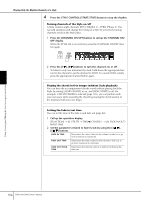
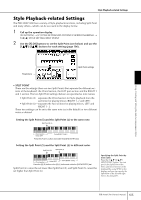
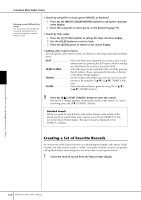
Style Playback-related Settings Style Playback-related Settings The PSR-3000/1500 has a variety of Style playback functions, including Split Point and many others-which can be accessed in the display below. 1 Call up the operation display. [FUNCTION] → [C] STYLE SETTING/SPLIT POINT/CHORD FINGERING → TAB[√] STYLE SETTING/SPLIT POINT 2 Use the [F]-[H] buttons to set the Split Point (see below) and use the [1π†]-[5π†] buttons for each setting (page 106). Using, Creating and Editing the Auto Accompaniment Styles Parameters Split Point settings • SPLIT POINT These are the settings (there are two Split Points) that separate the different sections of the keyboard: the Chord section, the LEFT part section and the RIGHT 1 and 2 section. The two Split Point settings (below) are specified as note names. • Split Point (S)- separates the Chord section for Style playback from the section(s) for playing Voices (RIGHT 1, 2 and LEFT) • Split Point (L)- separates the two sections for playing Voices, LEFT and RIGHT 1- 2. These two settings can be set to the same note (as in the default) or two different notes as desired. Setting the Split Point (S) and the Split Point (L) to the same note Split Point (S+L) Chord section + Voice LEFT Voice RIGHT 1and 2 Press the [F] (S+L) button and rotate the [DATA ENTRY] dial. Setting the Split Point (S) and the Split Point (L) to different notes Split Point (S) Split Point (L) Chord section Voice LEFT Voice RIGHT 1and 2 Press the [H] (S) button or the [G] (L) button and rotate the [DATA ENTRY] dial. Split Point (L) cannot be set lower than Split Point (S), and Split Point (S) cannot be set higher than Split Point (L). Specifying the Split Point by note name Press the [7π†]/[8π†] (SPLIT POINT) button. You can specify the Split Point of the Voice and chord section of the keyboard by using STYLE in the display, and you can specify the Split Point of the left and right Voices by using LEFT. PSR-3000/1500 Owner's Manual 105
-
 1
1 -
2
-
3
-
4
-
5
-
6
-
7
-
8
-
9
-
10
-
11
-
12
-
13
-
14
-
15
-
16
-
17
-
18
-
19
-
20
-
21
-
22
-
23
-
24
-
25
-
26
-
27
-
28
-
29
-
30
-
31
-
32
-
33
-
34
-
35
-
36
-
37
-
38
-
39
-
40
-
41
-
42
-
43
-
44
-
45
-
46
-
47
-
48
-
49
-
50
-
51
-
52
-
53
-
54
-
55
-
56
-
57
-
58
-
59
-
60
-
61
-
62
-
63
-
64
-
65
-
66
-
67
-
68
-
69
-
70
-
71
-
72
-
73
-
74
-
75
-
76
-
77
-
78
-
79
-
80
-
81
-
82
-
83
-
84
-
85
-
86
-
87
-
88
-
89
-
90
-
91
-
92
-
93
-
94
-
95
-
96
-
97
-
98
-
99
-
 100
100 -
 101
101 -
 102
102 -
 103
103 -
 104
104 -
 105
105 -
 106
106 -
 107
107 -
 108
108 -
 109
109 -
 110
110 -
111
-
112
-
113
-
114
-
115
-
116
-
117
-
118
-
119
-
120
-
121
-
122
-
123
-
124
-
125
-
126
-
127
-
128
-
129
-
130
-
131
-
132
-
133
-
134
-
135
-
136
-
137
-
138
-
139
-
140
-
141
-
142
-
143
-
144
-
145
-
146
-
147
-
148
-
149
-
150
-
151
-
152
-
153
-
154
-
155
-
156
-
157
-
158
-
159
-
160
-
161
-
162
-
163
-
164
-
165
-
166
-
167
-
168
-
169
-
170
-
171
-
172
-
173
-
174
-
175
-
176
-
177
-
178
-
179
-
180
-
181
-
182
-
183
-
184
-
185
-
186
-
187
-
188
-
189
-
190
-
191
-
192
-
193
-
194
-
195
-
196
-
197
-
198
-
199
-
200
-
201
-
202
-
203
-
204
-
205
-
206
-
207
-
208
-
209
-
210
-
211
-
212
-
213
-
214
-
215
-
216
-
217
-
218
-
219
-
220
 |
 |
