Yamaha PSR-3000 Owner's Manual - Page 144
desired part for the channel to be, set the desired channels to REC.
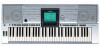 |
View all Yamaha PSR-3000 manuals
Add to My Manuals
Save this manual to your list of manuals |
Page 144 highlights
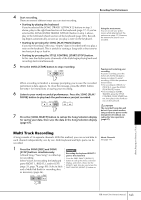
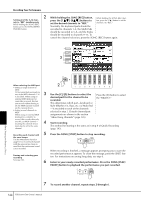
Recording Your Performance 2 While holding the SONG [REC] button, While holding the SONG [REC] but- Setting all of the 5-16 chan- press the [1π†]-[8π†] buttons to ton, press the [2π] button to set the nels to "REC" simultaneously While holding the SONG [REC] set the desired channels to "REC." channel 2 to "REC." button, press the SONG [EXTRA Normally, the keyboard parts should be TRACKS] button. recorded to channels 1-4, the Multi Pads should be recorded to 5-8, and the Styles should be recorded to channels 9-16. To cancel the channel selection, press the SONG [REC] button again. 3 Using, Creating and Editing Songs + When selecting the MIDI part 2 • Setting a single channel to MIDI All incoming data received via any of the MIDI channels 1-16 3 Use the [C]/[D] buttons to select the Press the [D] button to select is recorded. When using an external MIDI keyboard or controller to record, this lets desired part for the channel to be recorded. the "RIGHT2." you record without having to This determines which part-keyboard or set the MIDI transmit channel Style (Rhythm 1/2, Bass, etc.) or Multi Pad on the external device. • Setting several channels to MIDI When using an external MIDI -is recorded to each of the channels selected in step 2. Default channel/part assignments are shown in the section keyboard or controller to "About Song channels" (page 145). record, this records data only over the set MIDI channel- meaning the external device must also be set to the same 4 Start recording. The method for starting is the same as in step 4 of Quick Recording channel. (page 143). 5 Recording each channel with Press the SONG [STOP] button to stop recording. the same tempo Use the Metronome function (page 33) to record each channel with the same tempo. Keep in mind that the metronome sound is not recorded. When recording is finished, a message appears prompting you to save the Pausing and restarting your recording recorded performance appears. To close the message, press the [EXIT] button. For instructions on saving Song data, see step 8. See page 143. 6 Listen to your newly recorded performance. Press the SONG [PLAY/ PAUSE] button to playback the performance you just recorded. 7 To record another channel, repeat steps 2 through 6. 144 PSR-3000/1500 Owner's Manual
-
 1
1 -
2
-
3
-
4
-
5
-
6
-
7
-
8
-
9
-
10
-
11
-
12
-
13
-
14
-
15
-
16
-
17
-
18
-
19
-
20
-
21
-
22
-
23
-
24
-
25
-
26
-
27
-
28
-
29
-
30
-
31
-
32
-
33
-
34
-
35
-
36
-
37
-
38
-
39
-
40
-
41
-
42
-
43
-
44
-
45
-
46
-
47
-
48
-
49
-
50
-
51
-
52
-
53
-
54
-
55
-
56
-
57
-
58
-
59
-
60
-
61
-
62
-
63
-
64
-
65
-
66
-
67
-
68
-
69
-
70
-
71
-
72
-
73
-
74
-
75
-
76
-
77
-
78
-
79
-
80
-
81
-
82
-
83
-
84
-
85
-
86
-
87
-
88
-
89
-
90
-
91
-
92
-
93
-
94
-
95
-
96
-
97
-
98
-
99
-
100
-
101
-
102
-
103
-
104
-
105
-
106
-
107
-
108
-
109
-
110
-
111
-
112
-
113
-
114
-
115
-
116
-
117
-
118
-
119
-
120
-
121
-
122
-
123
-
124
-
125
-
126
-
127
-
128
-
129
-
130
-
131
-
132
-
133
-
134
-
135
-
136
-
137
-
138
-
 139
139 -
 140
140 -
 141
141 -
 142
142 -
 143
143 -
 144
144 -
 145
145 -
 146
146 -
 147
147 -
 148
148 -
 149
149 -
150
-
151
-
152
-
153
-
154
-
155
-
156
-
157
-
158
-
159
-
160
-
161
-
162
-
163
-
164
-
165
-
166
-
167
-
168
-
169
-
170
-
171
-
172
-
173
-
174
-
175
-
176
-
177
-
178
-
179
-
180
-
181
-
182
-
183
-
184
-
185
-
186
-
187
-
188
-
189
-
190
-
191
-
192
-
193
-
194
-
195
-
196
-
197
-
198
-
199
-
200
-
201
-
202
-
203
-
204
-
205
-
206
-
207
-
208
-
209
-
210
-
211
-
212
-
213
-
214
-
215
-
216
-
217
-
218
-
219
-
220
 |
 |
