Yamaha PSR-3000 Owner's Manual - Page 115
Rules when recording non-rhythm channels, To continue recording with another channel
 |
View all Yamaha PSR-3000 manuals
Add to My Manuals
Save this manual to your list of manuals |
Page 115 highlights
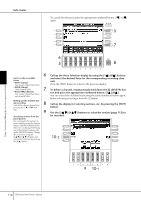
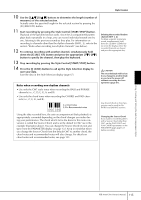
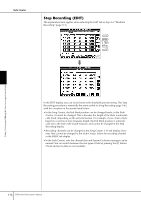
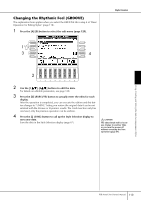
Style Creator 10 Use the [5π†]/[6π†] buttons to determine the length (number of measures) of the selected section. Actually enter the specified length for the selected section by pressing the [D] (EXECUTE) button. 11 Start recording by pressing the Style Control [START/STOP] button. Playback of the specified section starts. Since the accompaniment pattern plays back repeatedly in a loop, you can record individual sounds one by one, listening to the previous sounds as they play. For information on recording to channels other than the rhythm channels (RHY1, 2), refer to the section "Rules when recording non-rhythm channels" (see below). 12 To continue recording with another channel, simultaneously hold down the [F] (REC CH) button and press the appropriate [1†]-[8†] button to specify the channel, then play the keyboard. 13 Stop recording by pressing the Style Control [START/STOP] button. 14 Press the [I] (SAVE) button to call up the Style Selection display to save your data. Save the data in the Style Selection display (page 67). Rules when recording non-rhythm channels • Use only the CM7 scale tones when recording the BASS and PHRASE channels (i.e., C, D, E, G, A, and B). • Use only the chord tones when recording the CHORD and PAD channels (i.e., C, E, G, and B). C RC C RC C = Chord notes C, R = Recommended notes Using the data recorded here, the auto accompaniment (Style playback) is appropriately converted depending on the chord changes you make during your performance. The chord which forms the basis for this note conversion is called the Source Chord, and is set by default to CM7 (as in the example illustration above). You can change the Source Chord (its root and type) from the PARAMETER display on page 122. Keep in mind that when you change the Source Chord from the default CM7 to another chord, the chord notes and recommended notes will also change. For details on chord notes and recommended notes, see page 123. Deleting the recorded rhythm channel (RHY 1, 2) To delete a specific instrument sound, simultaneously hold down the [E] (RHY CLEAR) button (from the display where the recorded channels are shown) and press the appropriate key. CAUTION The recorded Style will be lost if you change to another Style or you turn the power off without executing the Save operation (page 67). Any desired chord or chord progression can be used for the INTRO and ENDING sections. Changing the Source Chord If you want to record the pattern with a Source Chord other than CM7, set the PLAY ROOT and PLAY CHORD parameters on the PARAMETER page (page 122) before recording. Using, Creating and Editing the Auto Accompaniment Styles PSR-3000/1500 Owner's Manual 115
-
 1
1 -
2
-
3
-
4
-
5
-
6
-
7
-
8
-
9
-
10
-
11
-
12
-
13
-
14
-
15
-
16
-
17
-
18
-
19
-
20
-
21
-
22
-
23
-
24
-
25
-
26
-
27
-
28
-
29
-
30
-
31
-
32
-
33
-
34
-
35
-
36
-
37
-
38
-
39
-
40
-
41
-
42
-
43
-
44
-
45
-
46
-
47
-
48
-
49
-
50
-
51
-
52
-
53
-
54
-
55
-
56
-
57
-
58
-
59
-
60
-
61
-
62
-
63
-
64
-
65
-
66
-
67
-
68
-
69
-
70
-
71
-
72
-
73
-
74
-
75
-
76
-
77
-
78
-
79
-
80
-
81
-
82
-
83
-
84
-
85
-
86
-
87
-
88
-
89
-
90
-
91
-
92
-
93
-
94
-
95
-
96
-
97
-
98
-
99
-
100
-
101
-
102
-
103
-
104
-
105
-
106
-
107
-
108
-
109
-
 110
110 -
 111
111 -
 112
112 -
 113
113 -
 114
114 -
 115
115 -
 116
116 -
 117
117 -
 118
118 -
 119
119 -
 120
120 -
121
-
122
-
123
-
124
-
125
-
126
-
127
-
128
-
129
-
130
-
131
-
132
-
133
-
134
-
135
-
136
-
137
-
138
-
139
-
140
-
141
-
142
-
143
-
144
-
145
-
146
-
147
-
148
-
149
-
150
-
151
-
152
-
153
-
154
-
155
-
156
-
157
-
158
-
159
-
160
-
161
-
162
-
163
-
164
-
165
-
166
-
167
-
168
-
169
-
170
-
171
-
172
-
173
-
174
-
175
-
176
-
177
-
178
-
179
-
180
-
181
-
182
-
183
-
184
-
185
-
186
-
187
-
188
-
189
-
190
-
191
-
192
-
193
-
194
-
195
-
196
-
197
-
198
-
199
-
200
-
201
-
202
-
203
-
204
-
205
-
206
-
207
-
208
-
209
-
210
-
211
-
212
-
213
-
214
-
215
-
216
-
217
-
218
-
219
-
220
 |
 |
