Yamaha PSR-3000 Owner's Manual - Page 33
Using the Modulation Wheel, Using the Metronome
 |
View all Yamaha PSR-3000 manuals
Add to My Manuals
Save this manual to your list of manuals |
Page 33 highlights
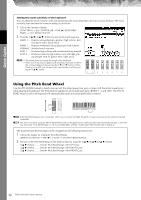
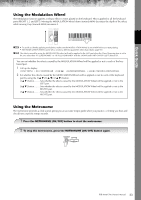
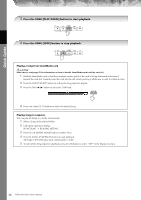
Quick Guide Using the Modulation Wheel The Modulation function applies a vibrato effect to notes played on the keyboard. This is applied to all the keyboard parts (RIGHT 1, 2 and LEFT). Moving the MODULATION wheel down (towards MIN) decreases the depth of the effect, while moving it up (towards MAX) increases it. PITCH BEND MODULATION n • To avoid accidently applying modulation, make sure the MODULATION Wheel is set at MIN before you start playing. • The MODULATION Wheel can be set to control a different parameter other than vibrato (page 96). n The effects caused by using the MODULATION wheel will not be applied to the LEFT part when the Chord Fingering type is set to the one other than "FULL KEYBOARD" or "AI FULL KEYBOARD" with the [ACMP] and PART ON/OFF [LEFT] turned on. You can set whether the effects caused by the MODULATION Wheel will be applied or not to each of the keyboard part. 1 Call up the display. [FUNCTION] → [D] CONTROLLER → TAB [®] → KEYBOARD/PANEL → [A]/[B] 2 MODULATION WHEEL 2 Set whether the effects caused by the MODULATION Wheel will be applied or not to each of the keyboard part by using the [5π†]/[6π†]/[7π†] button. [5π†] button..........Sets whether the effects caused by the MODULATION Wheel will be applied or not to the LEFT part. [6π†] button..........Sets whether the effects caused by the MODULATION Wheel will be applied or not to the RIGHT1 part. [7π†] button..........Sets whether the effects caused by the MODULATION Wheel will be applied or not to the RIGHT2 part. Using the Metronome The metronome provides a click sound, giving you an accurate tempo guide when you practice, or letting you hear and check how a specific tempo sounds. 1 Press the METRONOME [ON/OFF] button to start the metronome. 2 To stop the metronome, press the METRONOME [ON/OFF] button again. PSR-3000/1500 Owner's Manual 33
-
 1
1 -
2
-
3
-
4
-
5
-
6
-
7
-
8
-
9
-
10
-
11
-
12
-
13
-
14
-
15
-
16
-
17
-
18
-
19
-
20
-
21
-
22
-
23
-
24
-
25
-
26
-
27
-
 28
28 -
 29
29 -
 30
30 -
 31
31 -
 32
32 -
 33
33 -
 34
34 -
 35
35 -
 36
36 -
 37
37 -
 38
38 -
39
-
40
-
41
-
42
-
43
-
44
-
45
-
46
-
47
-
48
-
49
-
50
-
51
-
52
-
53
-
54
-
55
-
56
-
57
-
58
-
59
-
60
-
61
-
62
-
63
-
64
-
65
-
66
-
67
-
68
-
69
-
70
-
71
-
72
-
73
-
74
-
75
-
76
-
77
-
78
-
79
-
80
-
81
-
82
-
83
-
84
-
85
-
86
-
87
-
88
-
89
-
90
-
91
-
92
-
93
-
94
-
95
-
96
-
97
-
98
-
99
-
100
-
101
-
102
-
103
-
104
-
105
-
106
-
107
-
108
-
109
-
110
-
111
-
112
-
113
-
114
-
115
-
116
-
117
-
118
-
119
-
120
-
121
-
122
-
123
-
124
-
125
-
126
-
127
-
128
-
129
-
130
-
131
-
132
-
133
-
134
-
135
-
136
-
137
-
138
-
139
-
140
-
141
-
142
-
143
-
144
-
145
-
146
-
147
-
148
-
149
-
150
-
151
-
152
-
153
-
154
-
155
-
156
-
157
-
158
-
159
-
160
-
161
-
162
-
163
-
164
-
165
-
166
-
167
-
168
-
169
-
170
-
171
-
172
-
173
-
174
-
175
-
176
-
177
-
178
-
179
-
180
-
181
-
182
-
183
-
184
-
185
-
186
-
187
-
188
-
189
-
190
-
191
-
192
-
193
-
194
-
195
-
196
-
197
-
198
-
199
-
200
-
201
-
202
-
203
-
204
-
205
-
206
-
207
-
208
-
209
-
210
-
211
-
212
-
213
-
214
-
215
-
216
-
217
-
218
-
219
-
220
 |
 |
