Yamaha PSR-3000 Owner's Manual - Page 189
Using Your Instrument with Other Devices, Connecting Audio & Video Devices - power adaptor
 |
View all Yamaha PSR-3000 manuals
Add to My Manuals
Save this manual to your list of manuals |
Page 189 highlights
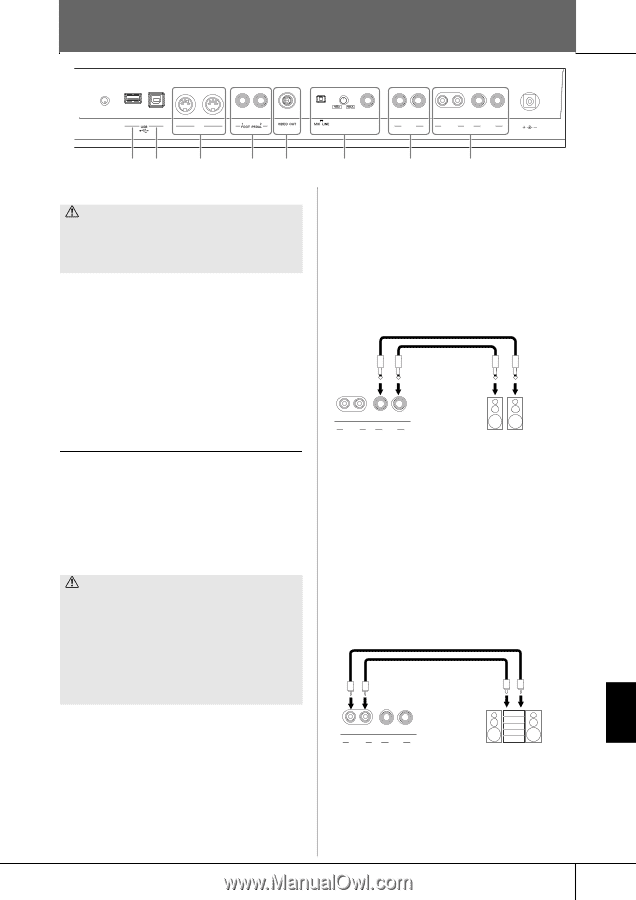
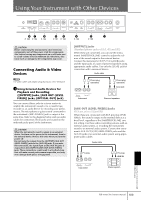
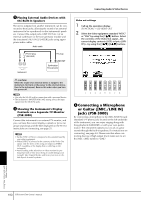
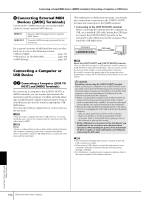
Using Your Instrument with Other Devices LCD CONTRAST TO DEVICE TO HOST IN OUT MIDI 87 P. 195 P. 194 6 P. 194 53 P. 191 P. 190 CAUTION Before connecting the instrument to other electronic components, turn off the power of all the components. Also, before turning any components on or off, make sure to set all volume levels to minimum (0). Otherwise, electrical shock or damage to the components may occur. Connecting Audio & Video Devices n Use audio cables and adaptor plugs having no (zero) resistance. 1 Using External Audio Devices for Playback and Recording ([OUTPUT] Jacks, [AUX OUT (LEVEL FIXED)] Jacks, [OPTICAL OUT] Jack) You can connect these jacks to a stereo system to amplify the instrument's sound or to a cassette tape recorder or an audio device for recording your performance. The microphone or guitar sound connected to the instrument's [MIC./LINE IN] jack) is output at the same time. Refer to the diagrams below and use audio cables for connection. These jacks are located on the underside jacks panel of the instrument. CAUTION When the instrument's sound is output to an external device, first turn on the power to the instrument, then to the external device. Reverse this order when you turn the power off. Do not route the output from the [OUTPUT] [AUX OUT (LEVEL FIXED)] jacks to the [AUX IN] jacks. If you make this connection, the signal input at the [AUX IN] jacks is output from the [OUTPUT] [AUX OUT (LEVEL FIXED)] jacks. These connections could result in a feedback loop that will make normal performance impossible, and may even damage both pieces of equipment. INPUT VOLUME MIC./ LINE IN R L/L+R AUX IN R L AUX OUT (LEVEL FIXED) R L/L+R OUTPUT DC IN 16V 4 2 1 P. 190 P. 190 [OUTPUT] Jacks (Standard phone jacks of [L/L+R] and [R]) When these are connected, you can use the instrument's [MASTER VOLUME] control to adjust the volume of the sound output to the external device. Connect the instrument's OUTPUT [L/L+R]/[R] jacks and the input jacks of a pair of powered speakers using appropriate audio cables. Use only the [L/L+R] jack for connection with a monaural device. Audio cable Phone plug (standard) Phone plug (standard) Input jack R L AUX OUT (LEVEL FIXED) R L/L+R OUTPUT Instrument Powered speakers [AUX OUT (LEVEL FIXED)] Jacks (RCA pin jacks of [L]and [R]) When these are connected (with RCA pin plug; LEVEL FIXED), the sound is output to the external device at a fixed level, regardless of the [MASTER VOLUME] control setting. Use these when controlling volume with an external audio system, or recording the instrument's sound to an external audio system. Connect the instrument's AUX OUT [L]/[R] (LEVEL FIXED) jacks and the AUX IN jacks of an external audio system using appropriate audio cables. Audio cable Pin plug R L AUX OUT (LEVEL FIXED) R L/L+R OUTPUT Instrument Pin plug AUX IN Stereo system Using Your Instrument with Other Devices PSR-3000/1500 Owner's Manual 189
-
 1
1 -
2
-
3
-
4
-
5
-
6
-
7
-
8
-
9
-
10
-
11
-
12
-
13
-
14
-
15
-
16
-
17
-
18
-
19
-
20
-
21
-
22
-
23
-
24
-
25
-
26
-
27
-
28
-
29
-
30
-
31
-
32
-
33
-
34
-
35
-
36
-
37
-
38
-
39
-
40
-
41
-
42
-
43
-
44
-
45
-
46
-
47
-
48
-
49
-
50
-
51
-
52
-
53
-
54
-
55
-
56
-
57
-
58
-
59
-
60
-
61
-
62
-
63
-
64
-
65
-
66
-
67
-
68
-
69
-
70
-
71
-
72
-
73
-
74
-
75
-
76
-
77
-
78
-
79
-
80
-
81
-
82
-
83
-
84
-
85
-
86
-
87
-
88
-
89
-
90
-
91
-
92
-
93
-
94
-
95
-
96
-
97
-
98
-
99
-
100
-
101
-
102
-
103
-
104
-
105
-
106
-
107
-
108
-
109
-
110
-
111
-
112
-
113
-
114
-
115
-
116
-
117
-
118
-
119
-
120
-
121
-
122
-
123
-
124
-
125
-
126
-
127
-
128
-
129
-
130
-
131
-
132
-
133
-
134
-
135
-
136
-
137
-
138
-
139
-
140
-
141
-
142
-
143
-
144
-
145
-
146
-
147
-
148
-
149
-
150
-
151
-
152
-
153
-
154
-
155
-
156
-
157
-
158
-
159
-
160
-
161
-
162
-
163
-
164
-
165
-
166
-
167
-
168
-
169
-
170
-
171
-
172
-
173
-
174
-
175
-
176
-
177
-
178
-
179
-
180
-
181
-
182
-
183
-
 184
184 -
 185
185 -
 186
186 -
 187
187 -
 188
188 -
 189
189 -
 190
190 -
 191
191 -
 192
192 -
 193
193 -
 194
194 -
195
-
196
-
197
-
198
-
199
-
200
-
201
-
202
-
203
-
204
-
205
-
206
-
207
-
208
-
209
-
210
-
211
-
212
-
213
-
214
-
215
-
216
-
217
-
218
-
219
-
220
 |
 |