3Com 3CR858-91 User Guide - Page 37
LAN Settings, IP Pool Start Address, IP Pool End, Address, Lease Time, Local Domain Name
 |
UPC - 662705490946
View all 3Com 3CR858-91 manuals
Add to My Manuals
Save this manual to your list of manuals |
Page 37 highlights
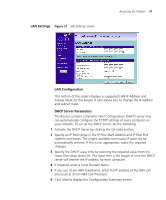
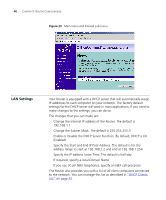
LAN Settings Figure 21 LAN Settings Screen Accessing the Wizard 37 LAN Configuration This section of the screen displays a suggested LAN IP Address and Subnet Mask for the Router. It also allows you to change the IP address and subnet mask. DHCP Server Parameters The Router contains a Dynamic Host Configuration (DHCP) server that can automatically configure the TCP/IP settings of every computer on your network. To set up the DHCP Server, do the following: 1 Activate the DHCP Server by clicking the On radio button. 2 Specify an IP Pool range in the IP Pool Start Address and IP Pool End Address text boxes. The largest available continuous IP pool will be automatically entered. If this is not appropriate, make the required changes. 3 Specify the DHCP Lease time by selecting the required value from the Lease Time drop down list. The lease time is the length of time the DHCP server will reserve the IP address for each computer. 4 If required, enter a Local Domain Name. 5 If you use 3Com NBX telephones, enter the IP address of the NBX call processor at 3Com NBX Call Processor. 6 Click Next to display the Configuration Summary screen.
-
 1
1 -
2
-
3
-
4
-
5
-
6
-
7
-
8
-
9
-
10
-
11
-
12
-
13
-
14
-
15
-
16
-
17
-
18
-
19
-
20
-
21
-
22
-
23
-
24
-
25
-
26
-
27
-
28
-
29
-
30
-
31
-
 32
32 -
 33
33 -
 34
34 -
 35
35 -
 36
36 -
 37
37 -
 38
38 -
 39
39 -
 40
40 -
 41
41 -
 42
42 -
43
-
44
-
45
-
46
-
47
-
48
-
49
-
50
-
51
-
52
-
53
-
54
-
55
-
56
-
57
-
58
-
59
-
60
-
61
-
62
-
63
-
64
-
65
-
66
-
67
-
68
-
69
-
70
-
71
-
72
-
73
-
74
-
75
-
76
-
77
-
78
-
79
-
80
-
81
-
82
-
83
-
84
-
85
-
86
-
87
-
88
-
89
-
90
-
91
-
92
-
93
-
94
-
95
-
96
-
97
-
98
-
99
-
100
-
101
-
102
-
103
-
104
-
105
-
106
-
107
-
108
-
109
-
110
-
111
-
112
-
113
-
114
-
115
-
116
-
117
-
118
-
119
-
120
-
121
-
122
-
123
-
124
-
125
-
126
-
127
-
128
-
129
-
130
 |
 |
