3Com 3CR858-91 User Guide - Page 66
In the IP Address Pool for L2TP/PPTP Clients enter the first LAN,
 |
UPC - 662705490946
View all 3Com 3CR858-91 manuals
Add to My Manuals
Save this manual to your list of manuals |
Page 66 highlights
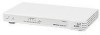
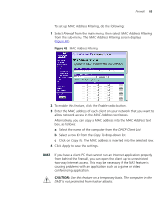
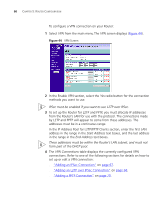
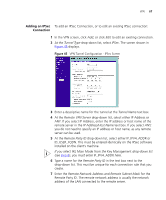
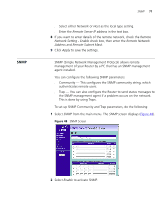
66 CHAPTER 5: ROUTER CONFIGURATION To configure a VPN connection on your Router: 1 Select VPN from the main menu.The VPN screen displays (Figure 44). Figure 44 VPN Screen 2 In the Enable VPN section, select the Yes radio button for the connection methods you want to use. IPSec must be enabled if you want to use L2TP over IPSec. 3 To set up the Router for L2TP and PPTP, you must allocate IP addresses from the Router's LAN for use with the protocol. The connections made by L2TP and PPTP will appear to come from these addresses. The addresses must be in a continuous range. In the IP Address Pool for L2TP/PPTP Clients section, enter the first LAN address in the range in the Start Address text boxes, and the last address in the range in the End Address text boxes. These addresses must be within the Router's LAN subnet, and must not form part of the DHCP pool. 4 The VPN Connections table displays the currently configured VPN connections. Refer to one of the following sections for details on how to set up or edit a VPN connection: ■ "Adding an IPSec Connection" on page 67. ■ "Adding an L2TP over IPSec Connection" on page 68. ■ "Adding a PPTP Connection" on page 70.
-
 1
1 -
2
-
3
-
4
-
5
-
6
-
7
-
8
-
9
-
10
-
11
-
12
-
13
-
14
-
15
-
16
-
17
-
18
-
19
-
20
-
21
-
22
-
23
-
24
-
25
-
26
-
27
-
28
-
29
-
30
-
31
-
32
-
33
-
34
-
35
-
36
-
37
-
38
-
39
-
40
-
41
-
42
-
43
-
44
-
45
-
46
-
47
-
48
-
49
-
50
-
51
-
52
-
53
-
54
-
55
-
56
-
57
-
58
-
59
-
60
-
 61
61 -
 62
62 -
 63
63 -
 64
64 -
 65
65 -
 66
66 -
 67
67 -
 68
68 -
 69
69 -
 70
70 -
 71
71 -
72
-
73
-
74
-
75
-
76
-
77
-
78
-
79
-
80
-
81
-
82
-
83
-
84
-
85
-
86
-
87
-
88
-
89
-
90
-
91
-
92
-
93
-
94
-
95
-
96
-
97
-
98
-
99
-
100
-
101
-
102
-
103
-
104
-
105
-
106
-
107
-
108
-
109
-
110
-
111
-
112
-
113
-
114
-
115
-
116
-
117
-
118
-
119
-
120
-
121
-
122
-
123
-
124
-
125
-
126
-
127
-
128
-
129
-
130
 |
 |