3Com 3CR858-91 User Guide - Page 68
Adding an L2TP over IPSec Connection, select either IKE Main Mode or IKE Aggressive Mode. - downloads
 |
UPC - 662705490946
View all 3Com 3CR858-91 manuals
Add to My Manuals
Save this manual to your list of manuals |
Page 68 highlights
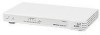
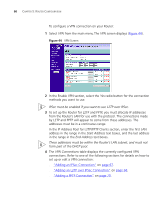
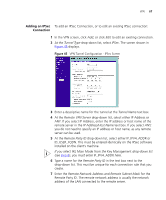
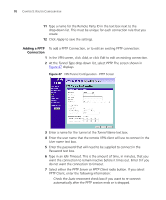
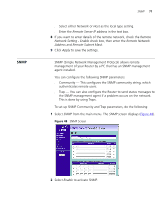
68 CHAPTER 5: ROUTER CONFIGURATION 8 Enter the Network Address and Subnet Mask of the local secure group. The network address of the local secure group is usually the network address of the local network.From the Key Management drop-down list, select either IKE Main Mode or IKE Aggressive Mode. 9 At the Pre-shared Key text box, enter the password for the connection. This must be unique for each connection rule that you create. 10 Enter the Key lifetime, in seconds. The default is 3600 seconds. The value must be at least 300 seconds. 11 Select MD5, SHA1 or None from the Authentication Algorithm drop-down list. Both ends of the connection must use the same value. 12 Select DES, 3DES or None from the Encrypt Algorithm drop-down list. 3DES is more secure than DES but may take longer to encrypt. Both ends of the connection must use the same value. 3DES is not shipped as standard with the Router due to international restrictions on encryption. If your country permits their use, they can be downloaded from the 3Com Web site at http://www.3com.com 13 Click Apply to save the settings. The IKE Keep Alive feature is not available. Adding an L2TP over To add an L2TP over IPSec Connection, or to edit an existing L2TP over IPSec Connection IPSec connection: 1 In the VPN screen, click Add, or click Edit to edit an existing connection. 2 At the Tunnel Type drop-down list, select L2TP over IPSec. The screen shown in Figure 46 displays.
-
 1
1 -
2
-
3
-
4
-
5
-
6
-
7
-
8
-
9
-
10
-
11
-
12
-
13
-
14
-
15
-
16
-
17
-
18
-
19
-
20
-
21
-
22
-
23
-
24
-
25
-
26
-
27
-
28
-
29
-
30
-
31
-
32
-
33
-
34
-
35
-
36
-
37
-
38
-
39
-
40
-
41
-
42
-
43
-
44
-
45
-
46
-
47
-
48
-
49
-
50
-
51
-
52
-
53
-
54
-
55
-
56
-
57
-
58
-
59
-
60
-
61
-
62
-
 63
63 -
 64
64 -
 65
65 -
 66
66 -
 67
67 -
 68
68 -
 69
69 -
 70
70 -
 71
71 -
 72
72 -
 73
73 -
74
-
75
-
76
-
77
-
78
-
79
-
80
-
81
-
82
-
83
-
84
-
85
-
86
-
87
-
88
-
89
-
90
-
91
-
92
-
93
-
94
-
95
-
96
-
97
-
98
-
99
-
100
-
101
-
102
-
103
-
104
-
105
-
106
-
107
-
108
-
109
-
110
-
111
-
112
-
113
-
114
-
115
-
116
-
117
-
118
-
119
-
120
-
121
-
122
-
123
-
124
-
125
-
126
-
127
-
128
-
129
-
130
 |
 |