3Com 3CR858-91 User Guide - Page 69
ID_USER_FQDN., Network Setting - Enable
 |
UPC - 662705490946
View all 3Com 3CR858-91 manuals
Add to My Manuals
Save this manual to your list of manuals |
Page 69 highlights
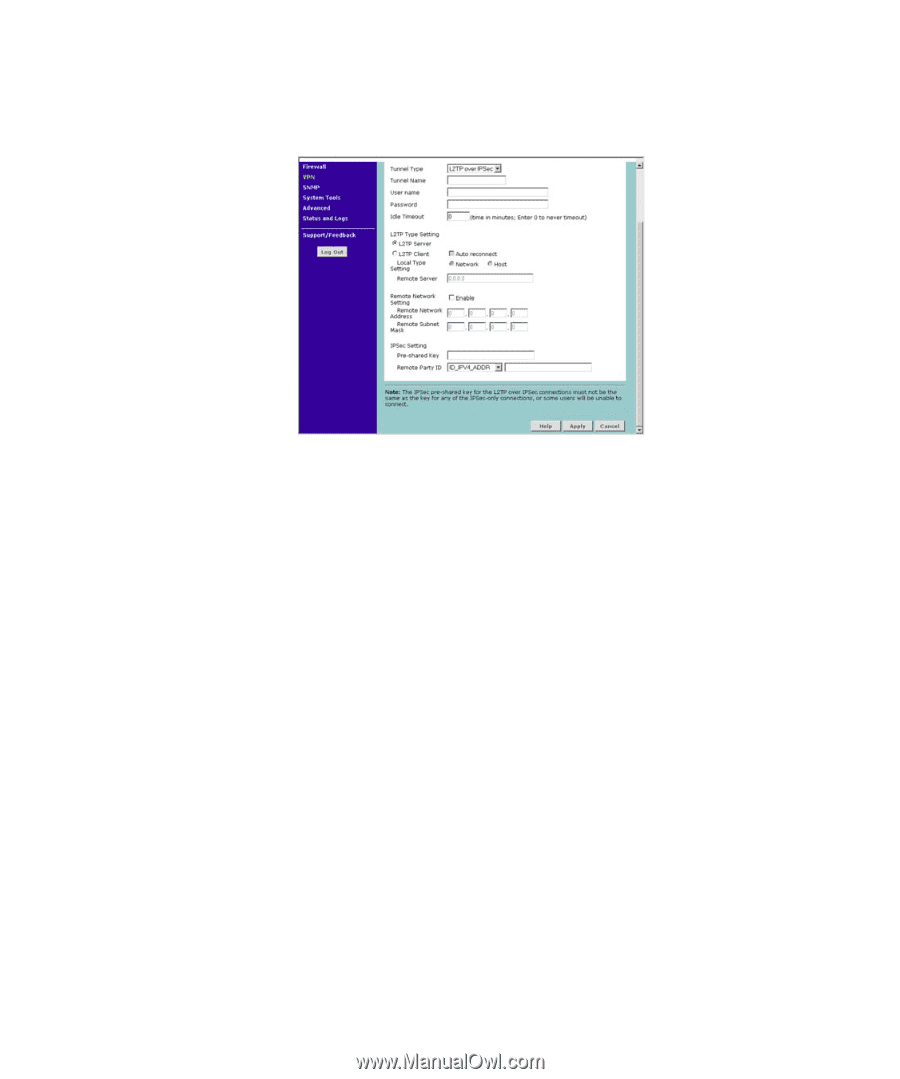
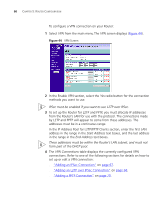
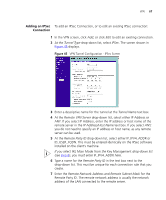
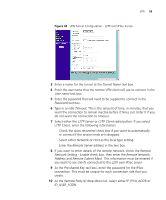
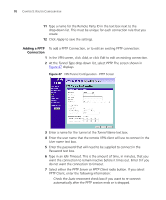
VPN 69 Figure 46 VPN Tunnel Configuration - L2TP over IPSec Screen 3 Enter a name for the tunnel at the Tunnel Name text box. 4 Enter the user name that the remote VPN client will use to connect in the User name text box. 5 Enter the password that will need to be supplied to connect in the Password text box. 6 Type in an Idle Timeout. This is the amount of time, in minutes, that you want the connection to remain inactive before it times out. Enter 0 if you do not want the connection to timeout. 7 Select either the L2TP Server or L2TP Client radio button. If you select L2TP Client, enter the following information: ■ Check the Auto reconnect check box if you want to automatically re-connect if the session ends or is dropped. ■ Select either Network or Host as the local type setting. ■ Enter the Remote Server address in the text box. 8 If you want to enter details of the remote network, check the Remote Network Setting - Enable check box, then enter the Remote Network Address and Remote Subnet Mask. This information must be entered if you want to see clients connected to the L2TP over IPSec server. 9 At the Pre-shared Key text box, enter the password for the IPSec connection. This must be unique for each connection rule that you create. 10 At the Remote Party ID drop-down list, select either IP_IPV4_ADDR or ID_USER_FQDN.
-
 1
1 -
2
-
3
-
4
-
5
-
6
-
7
-
8
-
9
-
10
-
11
-
12
-
13
-
14
-
15
-
16
-
17
-
18
-
19
-
20
-
21
-
22
-
23
-
24
-
25
-
26
-
27
-
28
-
29
-
30
-
31
-
32
-
33
-
34
-
35
-
36
-
37
-
38
-
39
-
40
-
41
-
42
-
43
-
44
-
45
-
46
-
47
-
48
-
49
-
50
-
51
-
52
-
53
-
54
-
55
-
56
-
57
-
58
-
59
-
60
-
61
-
62
-
63
-
 64
64 -
 65
65 -
 66
66 -
 67
67 -
 68
68 -
 69
69 -
 70
70 -
 71
71 -
 72
72 -
 73
73 -
 74
74 -
75
-
76
-
77
-
78
-
79
-
80
-
81
-
82
-
83
-
84
-
85
-
86
-
87
-
88
-
89
-
90
-
91
-
92
-
93
-
94
-
95
-
96
-
97
-
98
-
99
-
100
-
101
-
102
-
103
-
104
-
105
-
106
-
107
-
108
-
109
-
110
-
111
-
112
-
113
-
114
-
115
-
116
-
117
-
118
-
119
-
120
-
121
-
122
-
123
-
124
-
125
-
126
-
127
-
128
-
129
-
130
 |
 |