3Com 3CR858-91 User Guide - Page 64
VPN, The Router has a Virtual Private Network VPN feature that provides
 |
UPC - 662705490946
View all 3Com 3CR858-91 manuals
Add to My Manuals
Save this manual to your list of manuals |
Page 64 highlights
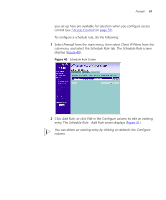
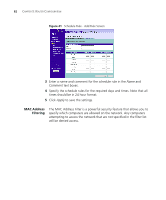
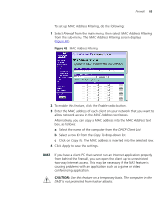
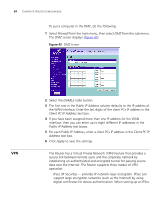
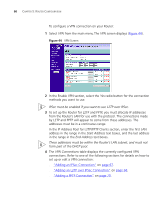
64 CHAPTER 5: ROUTER CONFIGURATION To put a computer in the DMZ, do the following: 1 Select Firewall from the main menu, then select DMZ from the sub-menu. The DMZ screen displays (Figure 43). Figure 43 DMZ Screen VPN 2 Select the ENABLE radio button. 3 The first row in the Public IP Address column defaults to the IP address of the WAN interface. Enter the last digits of the client PCs IP address in the Client PC IP Address text box. 4 If you have been assigned more than one IP address for the WAN interface, then you can enter up to eight different IP addresses in the Public IP Address text boxes. 5 For each Public IP Address, enter a client PCs IP address in the Client PC IP Address text box. 6 Click Apply to save the settings. The Router has a Virtual Private Network (VPN) feature that provides a secure link between remote users and the corporate network by establishing an authenticated and encrypted tunnel for passing secure data over the Internet. The Router supports three modes of VPN operation: ■ IPsec (IP Security) - provides IP network-layer encryption. IPSec can support large encryption networks (such as the Internet) by using digital certificates for device authentication. When setting up an IPSec
-
 1
1 -
2
-
3
-
4
-
5
-
6
-
7
-
8
-
9
-
10
-
11
-
12
-
13
-
14
-
15
-
16
-
17
-
18
-
19
-
20
-
21
-
22
-
23
-
24
-
25
-
26
-
27
-
28
-
29
-
30
-
31
-
32
-
33
-
34
-
35
-
36
-
37
-
38
-
39
-
40
-
41
-
42
-
43
-
44
-
45
-
46
-
47
-
48
-
49
-
50
-
51
-
52
-
53
-
54
-
55
-
56
-
57
-
58
-
 59
59 -
 60
60 -
 61
61 -
 62
62 -
 63
63 -
 64
64 -
 65
65 -
 66
66 -
 67
67 -
 68
68 -
 69
69 -
70
-
71
-
72
-
73
-
74
-
75
-
76
-
77
-
78
-
79
-
80
-
81
-
82
-
83
-
84
-
85
-
86
-
87
-
88
-
89
-
90
-
91
-
92
-
93
-
94
-
95
-
96
-
97
-
98
-
99
-
100
-
101
-
102
-
103
-
104
-
105
-
106
-
107
-
108
-
109
-
110
-
111
-
112
-
113
-
114
-
115
-
116
-
117
-
118
-
119
-
120
-
121
-
122
-
123
-
124
-
125
-
126
-
127
-
128
-
129
-
130
 |
 |