Benelli Nova Pump Field User Manual - Page 11
più prolunga, ATTENZIONE: prima di procedere, leggere attentamente le istruzio, ni Prolunga tubo
 |
View all Benelli Nova Pump Field manuals
Add to My Manuals
Save this manual to your list of manuals |
Page 11 highlights
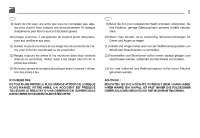
10 I In caso di tubo serbatoio corto più prolunga (serbatoio in 2 pezzi) togliere anche la prolunga. ATTENZIONE: prima di procedere, leggere attentamente le istruzioni "Prolunga tubo serbatoio". 2) Posizionare verticalmente l'arma, impugnare il gruppo canna-culatta ed infilare il prolungamento della culatta sulla carcassa, accertandosi che l'anello guida canna calzi correttamente il tubo (fig. 4). 3) Per agevolare l'inserimento della culatta, premere la leva arresto otturatore nel senso indicato dalla freccia (fig. 5): l'otturatore può ora arretrare. Spingere a fondo la canna nella carcassa: uno scatto metallico vi segnalerà il corretto assestamento del gruppo. 4) Avvitare il cappellotto fissaggio canna sul tubo serbatoio, serrandolo a fondo per bloccare perfettamente la canna contro la carcassa (fig. 6). 5) Verificare che, a serraggio ultimato, la culatta sia completamente in battuta contro la carcassa (fig. 7). GB In the case of the short magazine tube plus the extension (two piece tank), also remove the extension. CAUTION: before proceeding, carefully read the instructions entitled "Magazine tube extension". 2) Hold the shotgun vertically, grasping the barrel-breech assembly and insert the extension of the barrel in the receiver, ensuring that the barrel guide ring fits correctly into the tube (fig. 4). 3) To facilitate the insertion of the breech, push the action locking lever in the direction of the arrow (fig. 5); the barrel assembly can now be brought back. Push the barrel to the end of the receiver: one metal click indicates the correct adjustment of the assembly. 4) Screw on the fore end cap fixing barrel on the magazine tube, turning fully lock the barrel on the receiver (fig. 6). 5) Ensure that when tightly screwed, the breech is tight against the receiver (fig. 7). 4 5
-
 1
1 -
2
-
3
-
4
-
5
-
 6
6 -
 7
7 -
 8
8 -
 9
9 -
 10
10 -
 11
11 -
 12
12 -
 13
13 -
 14
14 -
 15
15 -
 16
16 -
17
-
18
-
19
-
20
-
21
-
22
-
23
-
24
-
25
-
26
-
27
-
28
-
29
-
30
-
31
-
32
-
33
-
34
-
35
-
36
-
37
-
38
-
39
-
40
-
41
-
42
-
43
-
44
-
45
-
46
-
47
-
48
-
49
-
50
-
51
-
52
-
53
-
54
 |
 |
