Bernina Bernette 56 Instruction Manual - Page 55

IHlhVt'i\Vh

Page 55 highlights

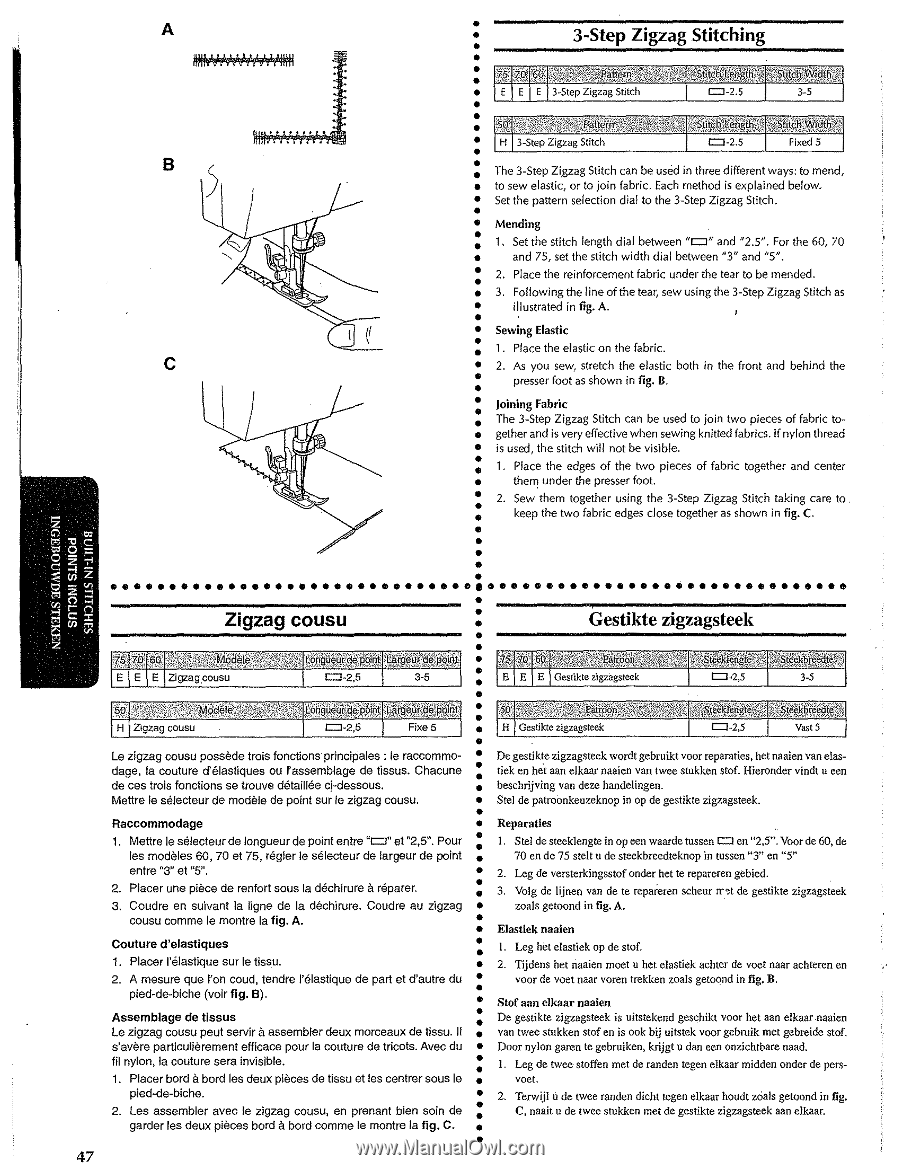
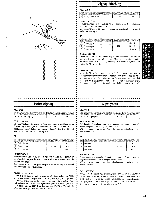
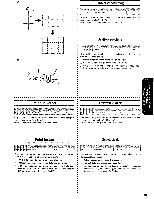
A IHlhVt'i\Vh\' .'/JHH B c The 3~Step Zigzag Stitch can be used in three different ways: to mend, to sew elastic, or to join fabric. Each method is explained below• Set the pattern selection dial to the 3-Step Zigzag Stitch . Mending 1. Set the stitch length dial between "c::J" and "2.5". For the 60, 70 and 75, set the stitch width dial between "3" and "5". 2. Place the reinforcement fabric under the tear to be mended . 3. Following the line of the tear, sew using the 3~Step Zigzag Stitch as illustrated in fig. A. Sewing Elastic 1. Place the elastic on the fabric . 2. As you sew, stretch the elastic both in the front and behind the presser foot as shown in fig. B. Joining Fabric The 3-Step Zigzag Stitch can be used to join two pieces of fabric together and is very effective when sewing knitted fabrics. If nylon thread is used, the stitch will not be visible . 1. Place the edges of the two pieces of fabric together and center thei'T! under the presser foot. 2. Sew them together using the 3~Step Zigzag Stitch taking care to keep the two fabric edges close together as shown in fig. C. 0 o Le zigzag cousu poss€de trois fonctions· principales : le raccommo~ dage, Ia couture d'€1astiques ou I'assemblage de tissus. Chacune de ces trois fonctions se trouve d€tamee cj~dessous. Mettre le stHecteur de mod61e de point sur le zigzag cousu. Raccommodage 1. Mettre le s€1ecteur de longueur de point entre "t::l" et "2,5". Pour les mod61es 60, 70 et 75, r€gler le s€1ecteur de largeur de point entre "3" et "5". a 2. Placer une piBce de renfort sous Ia d€chlrure r€parer. 3. Coudre en suivant Ia ligne de Ia d€ichirure. Coudre au zigzag cousu com me le montre Ia fig. A. Couture d'elastiques 1. Placer J'elastique sur le tissu. 2. A mesure que I'on coud, tendre l'€lastique de part et d'autre du pied~de~biche (voir fig. 8}. Assemblage de tissus Le zigzag cousu peut servlr a assembler deux morceaux de tissu. II s'avere particu!i€rement efficace pour Ia couture de tricots. Avec du fil nylon, Ia couture sera invisible. 1. Placer bard a bard les deux pieces de tfssu et les centrer sous le pled~de~biche. 2. Les assembler avec !e zigzag cousu, en prenant bien soin de garder !es deux pi€ces borda bord comme !e montre Ia fig. C. De gestikte zigzagsteek wordt gebruikt voor reparaties, bet naaien van elas~ tick en he.t aan elkaar naaien van twee stukken stof. Hieronder vindt u een beschrijving van deze handelingen . Stel de patroOnkeuzeknop in op de gestikte zigzagsteek. Reparaties 1. Stel de steeklengte in op een waarde tussen c:J en "2,5". Voor de 60, de 70 en de 75 stelt u de steekbreedteknop in tussen "3" en "5" 2. Leg de versterkingsstof onder het te repareren gebied. 3. Volg de lijnen van de te repaferen scheur rnt de gestikte zigzagsteek zoals getoond in fig. A. Elastiel

  • 1
  • 2
  • 3
  • 4
  • 5
  • 6
  • 7
  • 8
  • 9
  • 10
  • 11
  • 12
  • 13
  • 14
  • 15
  • 16
  • 17
  • 18
  • 19
  • 20
  • 21
  • 22
  • 23
  • 24
  • 25
  • 26
  • 27
  • 28
  • 29
  • 30
  • 31
  • 32
  • 33
  • 34
  • 35
  • 36
  • 37
  • 38
  • 39
  • 40
  • 41
  • 42
  • 43
  • 44
  • 45
  • 46
  • 47
  • 48
  • 49
  • 50
  • 51
  • 52
  • 53
  • 54
  • 55
  • 56
  • 57
  • 58
  • 59
  • 60
  • 61
  • 62
  • 63
  • 64
  • 65
  • 66
  • 67
  • 68
  • 69
  • 70
  • 71
  • 72
  • 73
  • 74
  • 75
  • 76
  • 77
  • 78
  • 79
  • 80
  • 81
  • 82
  • 83
  • 84
  • 85
  • 86

47
A
IHlhVt'i\Vh\'
.'/JHH
B
c
••••••••••••••••••••••••••••••
0
Le zigzag cousu poss€de trois fonctions· principales : le
raccommo~
dage, Ia couture d'€1astiques ou
I'
assemblage de tissus. Chacune
de ces trois fonctions se trouve
d€tamee
cj~dessous.
Mettre
le
stHecteur
de
mod61e
de point sur
le
zigzag cousu.
Raccommodage
1.
Mettre
le
s€1ecteur
de
longueur
de
point entre
"t::l"
et "2,5". Pour
les mod61es 60,
70
et 75, r€gler le s€1ecteur de largeur
de
point
entre
"3"
et
"5".
2. Placer une piBce
de
renfort sous
Ia
d€chlrure
a
r€parer.
3.
Coudre en suivant
Ia
ligne de
Ia
d€ichirure. Coudre au zigzag
cousu
com
me
le
montre
Ia
fig.
A.
Couture
d'elastiques
1.
Placer J'elastique sur
le
tissu.
2. A mesure que
I'
on coud, tendre l'€lastique de
part
et
d'autre du
pied~de~biche
(voir
fig.
8}.
Assemblage
de
tissus
Le zigzag cousu
peut
servlr a assembler deux morceaux
de
tissu.
II
s'avere particu!i€rement efficace pour
Ia
couture
de
tricots. Avec
du
fil
nylon, Ia couture sera invisible.
1.
Placer bard a bard les deux pieces de tfssu et les centrer sous le
pled~de~biche.
2. Les assembler avec !e zigzag cousu, en prenant bien soin
de
garder !es
deux
pi€ces
borda
bord comme !e montre Ia
fig.
C.
The
3~Step
Zigzag Stitch can be
used
in three different ways: to mend,
to sew elastic, or to
join
fabric.
Each
method
is
explained below•
Set
the pattern selection dial to the 3-Step Zigzag Stitch .
Mending
1.
Set
the stitch length dial between
"c::J"
and "2.5". For the 60,
70
and
75,
set the stitch width dial between
"3"
and
"5" .
2.
Place the reinforcement fabric under the tear to
be
mended .
3.
Following the line
of
the
tear,
sew using the
3~Step
Zigzag Stitch
as
illustrated
in
fig.
A .
Sewing
Elastic
1.
Place the elastic on the fabric .
2.
As
you
sew,
stretch the elastic both
in
the front and behind the
presser foot
as
shown in
fig.
B.
Joining
Fabric
The 3-Step Zigzag Stitch can be
used
to join
two
pieces
of
fabric to-
gether and
is
very effective when sewing knitted fabrics.
If
nylon thread
is
used, the stitch
will
not be visible .
1.
Place the
edges
of
the
two
pieces
of
fabric together and center
thei'T!
under the presser foot.
2.
Sew them together using the
3~Step
Zigzag Stitch taking care to
keep the
two
fabric
edges
close together
as
shown in
fig.
C.
o••••••••••••••••••••••••••••••
De gestikte zigzagsteek wordt gebruikt voor reparaties, bet naaien van
elas~
tick en
he.t
aan elkaar naaien van twee stukken stof. Hieronder vindt u een
beschrijving van deze handelingen .
Stel de patroOnkeuzeknop
in
op de gestikte zigzagsteek.
Reparaties
1.
Stel de steeklengte in op een waarde tussen
c:J
en "2,5". Voor de 60, de
70
en de 75 stelt u de steekbreedteknop
in
tussen
"3"
en "5"
2.
Leg de versterkingsstof onder het te repareren gebied .
3.
Volg de lijnen
van
de te repaferen scheur
rnt
de gestikte zigzagsteek
zoals getoond in fig. A.
Elastiel<.
naaien
I.
Leg het elastiek op de stof.
2.
Tijdens het riaaien moet u het elastiek achter
de
voet naar achteren en
voor de voet naar voren trekken zoals getoond
in
fig. B .
Stof aan elkaar naaien
De gestikte zigzagsteek is uitstekend geschikt voor het aan elkaar .naaien
van
twee stukken stof en
is
ook bij uitstek voor gebruik met gebreide stof.
Door nylon garen te gebruiken, krijgt u dan een onzichtbare naad .
1.
Leg de twee stoffen met
de
randen tegen elkaar midden onder de
pers~
voet.
2.
Terwijl Ude twee randen dicht tegen elkaar houdt
zclals
getoond
in
fig .
C, naait u de twee stukken met de gestikte zigzagsteek aan elkaar
.