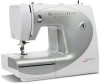
Bernina Bernette 56 Instruction Manual - Page 63
Stop the machine when the needle, at the, side of the stitches, then raise the needle.
 |
View all Bernina Bernette 56 manuals
Add to My Manuals
Save this manual to your list of manuals |
Page 63 highlights
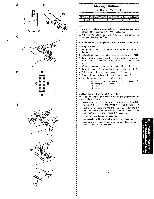
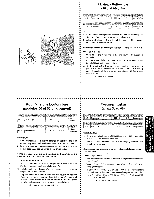
MAKING A BUTTONHOLE Step 1 (Front bar tack) _, Step 2 (Left side) [ Step 3 (Back bar tack) Step 4 (Right side) 1. Set the pattern selection dial to "1 ". 2. lower the presser foot and sew 5 to 6 stitches. 3. Stop the machine when the needle is at the left side of the stitches, then raise the needle from the material. 1. Turn the pattern selection dial to "2". 2. Sew the predetermined length of the tailor's chalk line. 3. Stop the machine when the needle is at the left side of the stitch, then raise the needle. l. Turn the pattern selection dial to "3" (same position as in step 1). 2. Sew 5 to 6 stitches. 3. Stop the machine when the needle is at the right side of the stitch, then raise the needle from the material. 1. Set the pattern selection dial to "4". 2. Sew the right side until the needle reaches the stitches sewn in step 1. 1er temps (barre d' arret avant de Ia boutonniere} 2€me temps (cote gauche) 3Elme temps (barre d'arret arri€re de Ia boutonniere) 49metemps (cOte droit) _, [ 3 - [ D. II 4 1. Mettre !e s9!ecteur de modele sur 1. 2. Abaisser le pied-de-biche et coudre 5 ou 6 points. 3. Arreter !a machine !orsque l'aiguil!e se trouve a gauche des points et relever l'aigunle du tissu. 1. Mettre !e s6!ecteur de modele sur 2. 2. Coudre Ia longueur de Ia ligne pr9-d9finie a Ia craie. 3. Arr8ter Ia machine lorsque l'aiguille se trouve a gauche des points et lever l'aiguille. 1. Mettre !e se!ecteur de modele sur 3 (meme position que 1). a 2. Coudre 5 6 points. 3. Arreter Ia machine !orsque l'algui!!e se trouve a droite des points et !ever l'aiguille du tissu. 1. Mettre le seJecteui de mod€!e sur 4. 2. Coudre Ia l€vre droite jusqu'a ce que_f'aigullle atteigne les points a formes Ia phase 1.
-
 1
1 -
2
-
3
-
4
-
5
-
6
-
7
-
8
-
9
-
10
-
11
-
12
-
13
-
14
-
15
-
16
-
17
-
18
-
19
-
20
-
21
-
22
-
23
-
24
-
25
-
26
-
27
-
28
-
29
-
30
-
31
-
32
-
33
-
34
-
35
-
36
-
37
-
38
-
39
-
40
-
41
-
42
-
43
-
44
-
45
-
46
-
47
-
48
-
49
-
50
-
51
-
52
-
53
-
54
-
55
-
56
-
57
-
 58
58 -
 59
59 -
 60
60 -
 61
61 -
 62
62 -
 63
63 -
 64
64 -
 65
65 -
 66
66 -
 67
67 -
 68
68 -
69
-
70
-
71
-
72
-
73
-
74
-
75
-
76
-
77
-
78
-
79
-
80
-
81
-
82
-
83
-
84
-
85
-
86
 |
 |
