Bernina Bernette 56 Instruction Manual - Page 77

Cleaning, Reiniging

Page 77 highlights

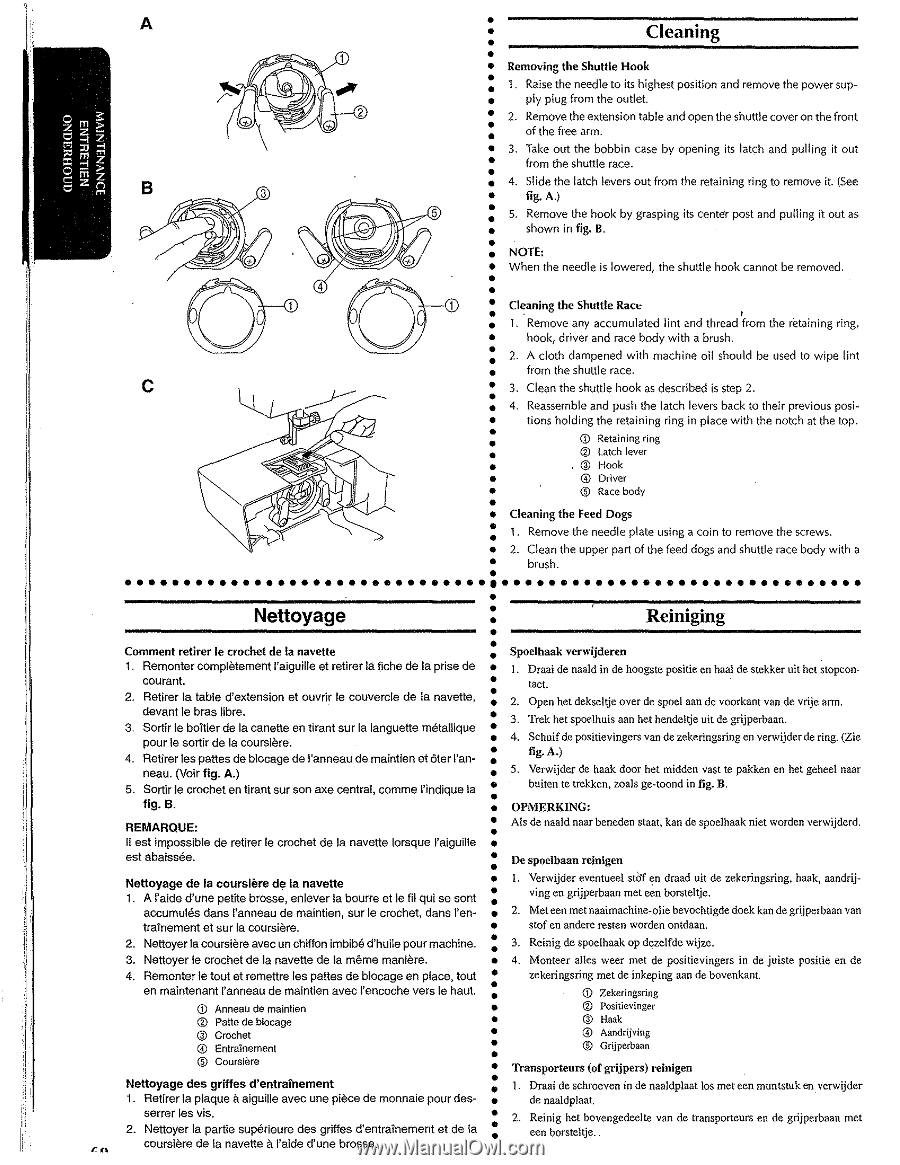
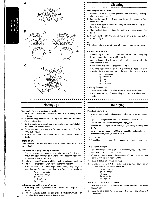
A Cleaning Removing the Shuttle Hook 1. Raise the needle to its highest position and remove the power sup- ply plug from the outlet. ® 2. Remove the extension table and open the shuttle cover on the front of the free arm. 8 c 3. Take out the bobbin case by opening its latch and pulling it out from the shuttle race. 4. Slide the latch levers out from the retaining ring to remove it. (See fig. A.) 5. Remove the hook by grasping its cente'r post and pulling it out as shown in fig. B. NOTE: When the needle is lowered, the shuttle hook cannot be removed . Cl~aning the Shuttle Race 1 1. Remove any accumulated lint and thread from the retaining ring, hook, driver and race body with a brush . 2. A cloth dampened with machine oil should be used to wipe lint from the shuttle race . 3. Clean the shuttle hook as described is step 2. 4. Reassemble and push the latch levers back to their previous posi~ tions holding the retaining ring in place with the notch at the top . CD Retaining ring ® latch lever @ Hook @Driver ® Race body Cleaning the Feed Dogs l. Remove the needle plate using a coin to remove the screws . 2. Clean the upper part of the feed dogs and shuttle race body with a • • • • • • • • • • • • • • • • • • • • • • • • • • • • • • • ••• • • brush . •••• • • • • • • • • • • • • • • • • • • • • • • • • • i I 1. en Nettoyage Comment retirer le crochet de Ia navette 1. Remonter comp!€tement l'aiguilte et retirer Ia (iche de Ia prise de courant. 2. Retirer Ia table d'extension et ouvrir le couvercte de Ia navette, devant le bras libre. 3. Sortir le boitier de Ia canette en tirant sur Ia languette meta!!ique pour le sortir de Ia coursi9re. 4. Retirer les pattes de blocage de l'anneau de maintien et Oter !'an~ neau. (Voir fig. A.) 5. Sortir le crochet en tirant sur son axe central, comme l'indique Ia fig. B. REMARQUE: II est impossible de retirer le crochet de Ia navette lorsque l'aiguille est abaissee. Nettoyage de Ia coursiere d~ Ia navette 1. A !'aide d'une petite brosse, en lever Ia bourre et le fil qui se sont accumules dans l'anneau de maintien, sur le crochet, dans I'en~ trainement et sur Ia coursi€re. 2. Nettoyer Ia coursi€re avec un chiffon imbibe d'huile pour machine. 3. Nettoyer le crochet de Ia navette de Ia meme mani13re. 4. Remonter le tout et remettre tes pattes de blocage en place, tout en maintenant l'anneau de maintien avec l'encoche vers le haut.

  • 1
  • 2
  • 3
  • 4
  • 5
  • 6
  • 7
  • 8
  • 9
  • 10
  • 11
  • 12
  • 13
  • 14
  • 15
  • 16
  • 17
  • 18
  • 19
  • 20
  • 21
  • 22
  • 23
  • 24
  • 25
  • 26
  • 27
  • 28
  • 29
  • 30
  • 31
  • 32
  • 33
  • 34
  • 35
  • 36
  • 37
  • 38
  • 39
  • 40
  • 41
  • 42
  • 43
  • 44
  • 45
  • 46
  • 47
  • 48
  • 49
  • 50
  • 51
  • 52
  • 53
  • 54
  • 55
  • 56
  • 57
  • 58
  • 59
  • 60
  • 61
  • 62
  • 63
  • 64
  • 65
  • 66
  • 67
  • 68
  • 69
  • 70
  • 71
  • 72
  • 73
  • 74
  • 75
  • 76
  • 77
  • 78
  • 79
  • 80
  • 81
  • 82
  • 83
  • 84
  • 85
  • 86

i
I
1.
en
A
®
8
c
Cleaning
Removing
the
Shuttle Hook
1.
Raise the needle
to
its highest position and remove the
power
sup-
ply
plug
from the outlet.
2.
Remove the extension table and open the shuttle cover on
the
front
of
the free arm.
3.
Take
out
the
bobbin
case
by
opening
its latch and
pulling
it
out
from the shuttle race .
4.
Slide the latch levers
out
from
the retaining ring to remove
it.
(See
fig.
A.)
5.
Remove the
hook
by
grasping
its
cente'r post and
pulling
it
out
as
shown
in
fig.
B
.
NOTE:
When
the needle is lowered, the shuttle
hook
cannot
be removed .
Cl~aning
the
Shuttle Race
1
1.
Remove any accumulated
lint
and thread from the retaining ring,
hook,
driver
and race
body
with
a brush .
2.
A
cloth
dampened
with
machine
oil
should be used to
wipe
lint
from the shuttle race .
3.
Clean the shuttle
hook
as
described
is
step
2.
4.
Reassemble and push the latch levers back
to
their previous
posi~
tions
holding
the retaining ring in place
with
the notch
at
the top .
CD
Retaining
ring
®
latch
lever
@
Hook
@Driver
®
Race body
Cleaning
the
Feed Dogs
l.
Remove the needle plate using a
coin
to remove the screws .
2.
Clean the upper part
of
the feed dogs and shuttle race
body
with
a
brush .
•••••••••••••••••••••••••••••••••••••••••••••••••••••••••••••••
Nettoyage
Comment retirer le
crochet
de
Ia
navette
1.
Remonter comp!€tement l'aiguilte et retirer Ia (iche de Ia prise de
courant.
2.
Retirer Ia table d'extension et ouvrir
le
couvercte de Ia navette,
devant le bras libre.
3.
Sortir
le
boitier de Ia canette en tirant sur
Ia
languette meta!!ique
pour le sortir de Ia coursi9re.
4.
Retirer les pattes de blocage de l'anneau de maintien et
Oter
!'an~
neau.
(Voir fig.
A.)
5.
Sortir le crochet en tirant sur son axe central, comme l'indique Ia
fig.
B.
REMARQUE:
II
est impossible de retirer
le
crochet de Ia navette lorsque l'aiguille
est abaissee.
Nettoyage de
Ia
coursiere
d~
Ia
navette
1.
A !'aide d'une petite brosse,
en
lever Ia bourre et le
fil
qui se sont
accumules dans l'anneau de maintien, sur
le
crochet, dans
I'
en~
trainement et sur
Ia
coursi€re.
2. Nettoyer Ia coursi€re avec
un
chiffon imbibe d'huile pour machine.
3.
Nettoyer le crochet de Ia navette de Ia meme
mani13re.
4.
Remonter le tout
et
remettre tes pattes de blocage en place, tout
en maintenant l'anneau de maintien avec l'encoche vers le haut.
<D
Anneau
de
maintien
®
Patte de b!ocage
@
Crochet
@
Entrainement
®
Coursiere
Nettoyage des griffes d'entrainement
1.
Retirer Ia plaque
a
aiguille avec une piece de monnaie pour
des~
serrer les vis.
2.
Nettoyer Ia partie sup9rieure des griffes d'entrainement et de Ia
coursi€re de Ia navette
a
\'aide d'une brosse.
Reiniging
Spoelhaak verwijderen
1.
Draai
de
naald
in
de hoogste positie en haal de stekker uit het stopcon-
tact.
2.
Open het dekseltje over de spoel aan
de
voorkant van de vrije
arm
.
3.
Trek het spoelhuis aan het hendeltje
uit
de grijperbaan.
4.
Schuif de positievingers van
de
zekeringsring en verwijder de ring. (Zie
fig. A.)
5.
Verwijder de haak door
het
midden vast te pakken en het geheel naar
buiten te trekken, zoals ge¥toond
in
fig. B .
OPMERKING:
Als de naald naar beneden staat, kan de spoelhaak niet worden verwijderd.
De
spoe1baan reinigen
l.
Verwijder eventueel
stO'f
~n
draad
uit
de zekeringsring, haak, aandri}
ving en grijperbaan met een borsteltje .
2.
Meteen
met naaimachine-olie bevochtigde doek kan de grijperbaan van
stof en andere resten worden ontdaan .
3. Reinig
de
spoelhaak op d¥zelfde wijze.
4.
Monteer alles weer met de positievingers in de juiste positie en
de
zekeringsring met de inkeping aan
de
bovenkant.
<D
Zekeringsring
®
Positievinger
@
Haak
@
Aandrijving
®
Grijperbaan
Transporteurs (of grijpers) reinigen
I.
Draai de schroeven in de naaldplaat los met een muntstuk en verwijder
de naaldplaat.
2.
Reinig het bovengedeelte van de transporteurs en
de
grijperbaan met
een borsteltje .